


LILY OF THE VALLEY: An overview of a fragrant, lovely shade garden favorite.
Lily of the Valley, Convallaria majalis, is a charming, herbaceous perennial plant native to Europe and Asia. Known for its fragrant, bell shaped flowers that bloom in late spring and early summer, it displays delicate shades of white and exudes a soft, captivating floral fragrance. Thriving in partial to full shade, Lily of the Valley prefers well draining soil, enriched with organic matter. With its low maintenance requirements, an occasional watering during dry spells, and thinning of crowded clumps will encourage its growth. Thriving in USDA growing zones 2 to 7, Lily of the Valley stands at a graceful height of up to 8 inches. Often utilized in woodland gardens and borders and as a lovely ground cover, this plant imparts an enchanting touch with its softly fragrant blooms.
Connect with us:
Facebook: https://www.facebook.com/TayloesLawnCare
Web: https://www.tayloeslawncare.com
MeWe: https://mewe.com/p/diyhomegarden
CREDITS:
Image and music licensed via Canva Pro
Video scripts and audio production by https://www.wordinnovations.com
23
views

YUCCA: Growing the perfect drought-tolerant plant for xeriscaping
Yucca is a genus of perennials native to North and Central America, prized for its spiky, sword shaped leaves and striking flower spikes that bloom in late spring and summer. With its preference for full sun to partial shade and well draining sandy soil, yucca is a relatively low maintenance plant. While it can tolerate dry soil conditions, occasional watering during dry spells encourages optimal growth. Hardy in USDA growing zones 4 to 11, yucca can reach heights of up to 30 feet, depending on the species. It is an excellent choice for landscaping, creating eye catching focal points in gardens, xeriscapes, or even container gardens. Love landscaping? Follow us for more videos.
Connect with us
Facebook: https://www.facebook.com/TayloesLawnCare
Web: https://www.tayloeslawncare.com
MeWe: https://mewe.com/p/diyhomegarden
CREDITS:
Image and music licensed via Canva Pro
Video scripts and audio production by https://www.wordinnovations.com
26
views

ARBORVITAE: An evergreen landscape specimen or hedge (60-second overview)
Arborvitae (Thuja) is a genus of evergreen trees and shrubs known for their dense foliage and conical shape. These plants thrive in full sun to partial shade and prefer well-draining, moderately fertile soil. Arborvitae is relatively low maintenance and can tolerate a range of soil conditions, including periods of drought. The plant is hardy in USDA growing zones 2 to 8. With a potential height of up to 70 feet, arborvitae is a great landscaping specimen plant, in hedges, or as a privacy screen. Its aesthetic appeal and versatility make it a sought-after addition to gardens and landscapes, enhancing the natural beauty of outdoor spaces. Furthermore, arborvitae wood is valued for construction and woodworking projects due to its durability. Love gardening? Follow and like for more videos.
Connect with us
Facebook: https://www.facebook.com/TayloesLawnCare
Web: https://www.tayloeslawncare.com
MeWe: https://mewe.com/p/diyhomegarden
CREDITS:
Image and music licensed via Canva Pro
Video scripts and audio production by https://www.wordinnovations.com
16
views
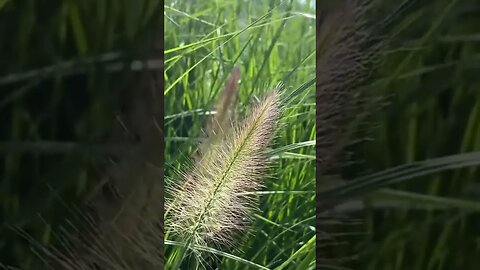
FOUNTAIN GRASS: A quick overview of a lovely ornamental grass
Fountain grass, Pennisetum alopecuroides, is a stunning ornamental grass that adds grace and beauty to your landscape. It's versatile and thrives in USDA growing zones 5 to 9.
The feathery plumes of fountain grass sway gently in the breeze, attracting birds and butterflies.
This ornamental grass prefers well-drained soil and full sun but tolerates partial shade.
Caring for fountain grass is easy. Ensure that the soil is consistently moist, without soaking it. Cut back the foliage just above the ground in late winter or early spring to promote health.
One of the fantastic benefits of growing fountain grass is its long-lasting and eye-catching display. Its beautiful plumes provide visual interest throughout the seasons, adding appeal to your landscape.
Love landscaping and gardening? Please like and follow us so you don't miss out.
Connect with us
Facebook: https://www.facebook.com/TayloesLawnCare
Web: https://www.tayloeslawncare.com
MeWe: https://mewe.com/p/diyhomegarden
CREDITS:
Image and music licensed via Canva Pro
Video scripts and audio production by https://www.wordinnovations.com
15
views
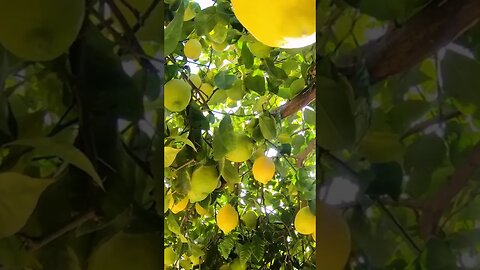
How to Grow Lemon Trees in Pots or Containers
When growing lemon trees in pots or containers, it's important to know the USDA growing zones for outdoor planting. Lemon trees thrive in zones 9-11, but can also be grown in cooler zones if brought indoors during the winter. To pot a lemon tree, choose a container with drainage holes and a well-draining soil mix. Place the tree in a sunny location and water regularly, allowing the soil to dry out slightly between waterings. Lemon trees have dark green leaves and fragrant white flowers that give way to bright yellow fruits. The fragrance of the leaves and fruits is fresh and citrusy. With proper care, your potted lemon tree can provide a bountiful harvest of juicy, flavorful fruit.
Connect with us
Facebook: https://www.facebook.com/TayloesLawnCare
Web: https://www.tayloeslawncare.com
MeWe: https://mewe.com/p/diyhomegarden
CREDITS:
Image and music licensed via Canva Pro
Video scripts and audio production by https://www.wordinnovations.com
28
views

CALENDULA FLOWERS: Beautiful in the pollinator garden or with your herbs.
Calendula, Latin Calendula officinalis, is a herbaceous plant that is native to Europe and Asia. it is famous for its cheerful, yellow or orange flowers that bloom in summer and fall. The plant prefers full sun to partial shade and well-draining soil that is somewhat fertile and can tolerate dry soil conditions. Calendula is relatively low maintenance and can be used in cottage gardens, as a companion plant, or as a cut flower. Additionally, the flowers have a soft fragrance, often used in cosmetics.
Connect with us
Facebook: https://www.facebook.com/TayloesLawnCare
Web: https://www.tayloeslawncare.com
MeWe: https://mewe.com/p/diyhomegarden
CREDITS:
Image and music licensed via Canva Pro
Video scripts and audio production by https://www.wordinnovations.com
30
views
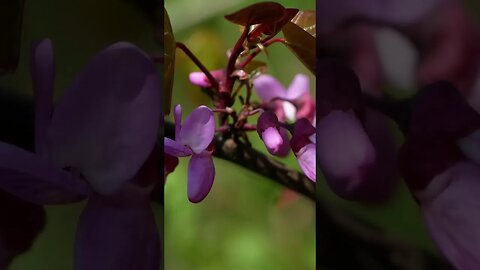
Redbud Tree: A Quick Overview of a Lovely Landscaping Tree
The redbud tree (Cercis canadensis) is a beautiful small to medium-sized deciduous tree, native to eastern North America. Known for its spectacular spring display of vibrant pink or purple flowers, this tree is a popular ornamental plant in gardens and landscapes. Its heart-shaped leaves emerge after the flowers, adding to its appeal. The redbud tree is hardy in USDA growing zones 4 to 9. It prefers full sun to partial shade and moist, well-draining soil. It requires moderate watering and pruning to maintain its shape and health. Proper care makes the redbud tree a stunning addition to any garden. Be sure to follow us for more landscape and gardening tips.
Connect with us
Facebook: https://www.facebook.com/TayloesLawnCare
Web: https://www.tayloeslawncare.com
and https://www.gardenrevelations
MeWe: https://mewe.com/p/diyhomegarden
CREDITS:
Image and music licensed via Canva Pro
Video scripts and audio production by https://www.wordinnovations.com
29
views
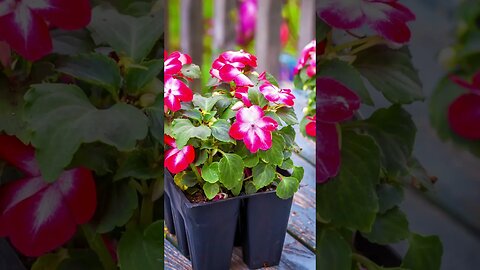
IMPATIENS
Impatiens are a popular annual plant with bright and showy blooms. There are many different species of impatiens, but the most commonly grown is Impatiens walleriana. These plants are native to Africa.
Impatiens prefer partial to total shade exposure and well-draining, consistently moist soil. They are relatively easy to care for and require regular watering and fertilization to maintain their vibrant blooms throughout the growing season. Impatiens are also highly versatile and can be grown in containers, hanging baskets, or as bedding plants.
Impatiens grow in every growing zone in the United States, with varying season lengths according to local conditions. These plants are great for adding vibrant color to the garden's shady areas, a staple in many garden beds and borders.
Impatiens are an excellent choice for those seeking a low-maintenance, shade-loving plant with stunning blooms in breathtaking colors, like pink, red, white, and purple.
Connect with us
Facebook: https://www.facebook.com/GardenRevelations
Web: https://www.tayloeslawncare.com
and https://www.gardenrevelations
MeWe: https://mewe.com/p/diyhomegarden
CREDITS:
Images and music licensed via Canva Pro
Video scripts and audio production by https://www.wordinnovations.com
15
views
1
comment
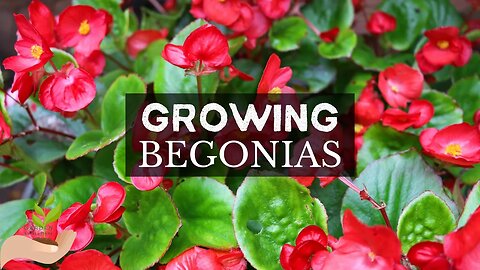
GROWING BEGONIAS: Beautiful, colorful flowers with many varieties and colors to choose!
Begonias are a popular flowering plant. They are best known for their bright, showy blooms and distinctive foliage. With over 1,800 species, Begonia is a genus of perennial plants in the family Begoniaceae. They are native to tropical and subtropical regions, including Africa, Asia, and the Americas. In this content, we will explore the Latin name, soil, and light conditions, USDA zones, the appearance of flowers, leaves and stems, fragrance, how to plant and maintain, and what pollinators they attract. The genus Begonia belongs to the family Begoniaceae, and the scientific name for Begonia is Begonia L. Soil and Light Conditions. Begonias prefer well drained, moist soil that is rich in organic matter. They require partial shade to thrive, as direct sunlight can scorch their leaves and flowers. Begonias grow best in temperatures ranging from 60 to 75 degrees Fahrenheit. They grow well in the ground or in containers. They're charming in hanging baskets on a deck or porch. What Are the Best USDA Zones for Begonias? Begonias are suitable for USDA hardiness zones 10 and 11. But some varieties can be grown in cooler zones with special care, such as protecting the blossoms from late season frosts. The appearance of Flowers, Leaves, and Stems. Begonias come in a wide range of flower colors, including pink, red, orange, white, and yellow. Some species have double flowers, while others have single or ruffled petals. Depending on the species, the flowers can be as small as a dime or as large as a dinner plate. Begonia leaves are also incredibly diverse, with shapes ranging from circular to oblong and sizes ranging from tiny to more than a foot in diameter. The leaves can be smooth, waxy, or hairy, and they may have variegated patterns of different colors. The stems of begonias are typically succulent and contain a milky sap. Some species have upright, woody stems, while others have trailing or creeping stems. How to Plant and Maintain Begonia Flowers. To plant begonias, choose a location with partial shade and well drained soil. Dig a hole twice the size of the plant's root ball and place the plant in the hole. Water thoroughly and add a layer of mulch around the base of the plant. Begonias require regular watering, especially during hot, dry weather. They prefer consistently moist soil but not waterlogged, so be careful not to overwater. Fertilize your begonias once a month during the growing season with a balanced, water soluble fertilizer. To maintain your begonias, pinch any leggy stems to encourage bushy growth and remove dead or damaged leaves. Look out for pests such as spider mites and aphids, and treat them promptly if you notice an infestation. What Pollinators Will Your Begonias Attract? Begonias are known to attract various pollinators, including bees, butterflies, and hummingbirds. Their bright, showy blooms and sweet nectar make them a popular pollinator choice. Begonias are a diverse and beautiful group of flowering plants that can add color and interest to any garden. With proper care and maintenance, they can thrive in many soil and light conditions and attract many helpful pollinators to your yard.
Connect with us
Facebook: https://www.facebook.com/GardenRevelations
Web: https://www.tayloeslawncare.com
and https://www.gardenrevelations
MeWe: https://mewe.com/p/diyhomegarden
CREDITS:
Image and music licensed via Canva Pro
Video scripts and audio production by https://www.wordinnovations.com
38
views

Garden Revelations YouTube Channel Trailer
Welcome to Garden Revelations, the ultimate destination for anyone who loves gardening or wants to learn more about it! On this channel, we reveal the art and science of gardening and make growing a garden accessible to all. Our mission is to help you cultivate a beautiful, healthy, and sustainable garden, no matter what your skill level or experience.
From expert tips and tricks to inspiring stories and beautiful garden tours, Garden Revelations has everything you need to start, maintain, and enjoy your own garden. Whether you're a seasoned gardener or just starting out, you'll find something new and exciting to learn on our channel.
Join our community of passionate gardeners from around the world and discover the joy of growing your own food, creating a beautiful landscape, and connecting with nature. Subscribe now and never miss a new video from Garden Revelations!
Connect with us
Facebook: https://www.facebook.com/GardenRevelations
Web: https://www.tayloeslawncare.com
and https://www.gardenrevelations
MeWe: https://mewe.com/p/diyhomegarden
CREDITS:
Image and music licensed via Canva Pro
39
views

How to Choose a Bird Bath + 5 Reasons Why a Birdbath Makes an Excellent Addition to Your Back Yard
A bird bath is an essential part of any bird-friendly garden. It provides a source of fresh, clean water for birds to drink and bathe in and a place for them to preen and groom their feathers. Bird baths can also attract various bird species to your garden, making it a great way to observe and enjoy nature.
Including a birdbath in your yard is an easy way to attract more birds to your property and provide them with a much-needed water source. Bird baths are a great addition to any backyard, and they offer a variety of benefits.
When choosing a bird bath, you will need to consider the size, type of birdbath, and location.
The bird bath size should be large enough to accommodate several birds at once. But you don’t one so large that it is difficult to maintain or too heavy to move. Consider the material of the bird bath; stone or ceramic styles are the most durable, while plastic and metal bird baths are more lightweight and easy to move.
The location of the bird bath is also essential. Please place it in a spot easily visible to birds but not too close to windows or other areas where cats or other predators may prey on them. The bird bath should also be sheltered from the wind and rain, as birds will be less likely to use it if it is too exposed to bad weather.
Here are five of the most compelling reasons to consider putting a bird bath in your yard:
1. Attract More Birds.
Birdbaths are a great way to attract more birds to your yard. Your local flock needs water to drink and bathe and will seek out this vital watering hole in your yard.
In addition to providing a water source for your feathered friends, birdbaths can also attract a variety of other wildlife to your garden. Adding a few stones or pebbles to the bottom of the bird bath can provide a safe place for frogs and other amphibians to hide and lay eggs.
This simple addition to your garden will become a hub of activity for small critters–you’ll enjoy the show.
2. Provide a Source of Water.
Birdbaths provide birds with a reliable water source. This oasis is vital during drought or when natural water sources are scarce.
Once you install a birdbath, keeping it clean and well-maintained is crucial. Expect to add fresh water daily to prevent stagnation.
3. Create a Relaxing Environment:
Birdbaths create a peaceful and relaxing environment in your yard. The sound of birds splashing in the water is calming and will fill you with joy.
4. Increase Bird Diversity.
Bird baths can attract various species to your yard. You will enjoy an enormous variety of birds in your area. They will provide you with opportunities to observe different species.
5. A Bird Bath Is Easy to Maintain.
Bird baths are relatively easy to maintain. You can expect to scrub the basin with clear water (no detergents) at least once a week to prevent algae and bacteria buildup.
This wonderful oasis is an essential part of any avian-friendly garden. It provides a source of fresh, clean water for your local flock to drink and bathe in and a place to preen and groom their feathers. You should consider size, material, and location when choosing a bird bath. Also, remember you will need to keep it clean and well-maintained. A birdbath is a small investment that will bring you hours of pleasure as you watch your feathered friends flock to your yard.
This wonderful oasis is an essential part of any avian-friendly garden. It provides a source of fresh, clean water for your local flock to drink and bathe in and a place to preen and groom their feathers. You should consider size, material, and location when choosing a bird bath. Also, remember you will need to keep it clean and well-maintained. A birdbath is a small investment that will bring you hours of pleasure as you watch your feathered friends flock to your yard.
Connect with us
Facebook: https://www.facebook.com/GardenRevelations
Web: https://tayloeslawncare.com/bird-bath/
and https://www.gardenrevelations
MeWe: https://mewe.com/p/diyhomegarden
CREDITS:
Image and music licensed via Canva Pro
Video scripts and audio production by https://www.wordinnovations.com
88
views

Yeti Rambler and Tervis Tumblers Collect Mold and Bacteria - Here's How to Clean a Yeti and a Tervis
We share an essential cleaning routine for your Yeti Rambler with a magnetic lid or your Tervis Tumbler. If you're a gardening enthusiast like us, you know how crucial it is to stay hydrated while working in the garden. But, with frequent use, your reusable cups can become a breeding ground for harmful bacteria, mold, and dirt, posing serious health risks.
We'll show you how to deep clean your cups, focusing on the areas that often go unnoticed, such as under the lids and around the Yeti seal. Our step-by-step guide is easy to follow and requires only a few household items.
But, why is cleaning your cups so important? We'll delve into the health hazards associated with contaminants that hide in the lids, such as E. coli, Salmonella, and Staphylococcus. Each of these nasties can cause food poisoning and other illnesses.
By following our Yeti cup cleaning routine, you'll ensure your travel tumblers are sparkling clean and protect yourself and your loved ones from harmful bacteria and other contaminants.
So, if you're looking for a simple and effective way to clean your Yeti Rambler Cup and Tervis Tumbler, watch our video!
Connect with us
Facebook: https://www.facebook.com/revelations.com
Web: https://www.gardenrevelations.com
MeWe: https://mewe.com/p/diyhomegarden
Image and music licensed via Canva Pro
52
views

How to Cut a Garden Fresh Tomato Without Smushing It (You have been doing it wrong all along!)
In this video, you'll learn how to slice a fresh garden tomato without smushing it. You've probably been doing it wrong all along! If you hack away in a sawing motion with a serrated knife or use a dull blade, you damage the fruit and release all the yummy juices. Common mistake! No fear, this quick shorts video demonstrates the proper tomato cutting technique.
We'll share a simple technique that will help you cut perfect tomato slices every time, without damaging the delicate flesh of the tomato. Whether you are making a salad, sandwich, or topping for a burger, this method will ensure that your tomato slices look and taste their best. So grab a tomato, a sharp knife, and let's get slicing!
Connect with us
Facebook: https://www.facebook.com/GardenRevelations
Web: https://www.gardenrevelations
MeWe: https://mewe.com/p/diyhomegarden
Image and music licensed via Canva Pro
20
views

ROMA TOMATOES: Bountiful Harvest Tips, Grow in the Ground or in a Container Garden
The Roma tomato plant, Latin Solanum lycopersicum 'Roma,' is a determinate tomato plant widely grown for its flavorful and meaty fruits. They're ideal for making sauces, pastes, and canning. It is a beloved variety of tomato plant due to its productivity and disease resistance.
Roma tomato plants typically grow to a mature height of 3 to 4 feet and have a compact, bushy habit. They produce oblong-shaped fruits about 3 inches long and 1.5 to 2 inches wide, with thick flesh and few seeds.
When ripe, the fruits are deep red and have a slightly sweet, tangy flavor.
The Roma tomato plant is relatively easy to grow and requires full sun and well-drained soil. It is a determinate plant, producing a large crop of tomatoes over a relatively short period, typically within one to two weeks. After this initial harvest, the plant will produce only a few new tomatoes.
This content will share information about how to use Roma tomato plants, when to harvest them, and how to grow and maintain them. We will also take a brief look at Roma tomatoes versus plums--similar in looks but different in uses. Let's explore this beautiful fruit.
Roma Tomatoes Are a Highly Versatile Fruit.
Roma tomato plants are a home garden favorite, as well as commercial tomato fields. Harvest them when the fruits are fully ripe, although they can be picked when slightly green and allowed to ripen off the vine. They are helpful in tomato paste, sauces, and other tomato-based products and adding flavor and texture to salads, sandwiches, and other dishes.
Growing the Roma Tomato Plant.
Roma tomatoes are a warm-season crop that grows best in USDA plant hardiness zones three to eleven, with a minimum temperature range of 50 to 60 degrees Fahrenheit. They require total sun exposure, at least six to eight hours of direct sunlight daily, and well-draining soil with a pH level between 6 and 7.
To plant Roma tomatoes.
Prepare the soil by adding compost or mature manure to improve soil structure and fertility.
Plant seeds indoors about six to eight weeks before the last frost in your area. Transplant the seedlings outdoors once the soil has warmed up and all danger of frost has passed.
Space the plants about two to three feet apart and provide support for them to grow upright.
Connect with us:
Facebook: https://www.facebook.com/TayloesLawnCare
Web: https://www.tayloeslawncare.com
MeWe: https://mewe.com/p/diyhomegarden
Image and music licensed via Canva Pro
69
views
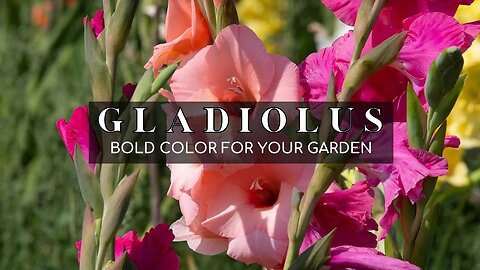
GLADIOLUS: Sword Lily Adds Vertical Interest and Bold Color to Your Garden.
Gladiolus: Add Vertical Interest and Bold Color to Your Garden.
Gladiolus, also known as sword lily, is popular among gardeners for its striking, colorful blooms and tall, elegant growth habit. These eye-catching plants can make a bold statement in any garden setting. In this article, we will explore the characteristics of gladiolus, including its appearance, growing zones, planting, care, and maintenance.
Colors and Appearance.
Gladiolus comes in various colors, including red, pink, purple, orange, yellow, cream, and white. The flowers are funnel-shaped and arranged along a tall, upright spike or inflorescence, with sword-like leaves emanating from the base of the plant. Gladiolus can grow anywhere from 2 to 6 feet tall, depending on the variety.
While gladiolus is primarily pollinated by wind, it can also attract various insects, such as bees and butterflies, due to its vivid colors and sweet nectar.
Growing Zones and Environmental Conditions.
Gladiolus is native to Africa and thrives in USDA plant hardiness zones 7 to 10. These plants prefer well-draining soil with a pH level of 6.0 to 6.5. Gladiolus requires full sun, with at least 6 hours of direct sunlight daily, for optimal growth and flowering.
Latin Names.
The Gladiolus genus comprises more than 250 species and numerous cultivars, with some of the most popular being the following:
Gladiolus x hortulanus, Garden Gladiolus.
Gladiolus dalenii, Parrot Gladiolus.
Gladiolus nanus, Dwarf Gladiolus.
Gladiolus callianthus, Peacock Orchid.
When to Plant Gladiolus.
Gladiolus comes from corms, underground, bulb-like structures that store nutrients and energy for the plant. The roots, shoots, and leaves are the base from which they grow. While similar to bulbs, they have a firm, starchy interior, and a papery outer tunic. On the other hand, bulbs have fleshy scales surrounding a central bud.
The best time to plant gladiolus corms is in the spring after the danger of frost has passed and the soil has warmed.
Planting, Care, and Maintenance.
Prepare the planting site by loosening the soil to a depth of 12 inches and incorporating compost or other organic matter to improve drainage and fertility.
Plant the corms 4 to 6 inches deep and 6 to 8 inches apart, with the pointed side facing upward.
Water the corms thoroughly after planting and maintain consistent moisture throughout the growing season. Avoid overwatering, as this can lead to rot.
Apply a layer of mulch around the plants to help conserve moisture, suppress weeds, and regulate soil temperature.
Stake tall gladiolus varieties to provide support and prevent the flower spikes from toppling over.
Remove spent flowers to maintain a neat appearance and prevent the plant from expending energy on seed production.
Fertilize gladiolus with a balanced, slow-release fertilizer when the foliage emerges and again when the flower spikes begin to show color.
In colder climates, zones 6 and below, lift the corms in the fall after the foliage has yellowed. Clean and store them in a cool, dry place for the winter before replanting in the spring.
Gladiolus adds dramatic vertical interest and a splash of bold color to any garden, making it an eye-catching choice for gardeners seeking to create a stunning display. By following the planting and care guidelines outlined, you can enjoy the beautiful, statuesque blooms of gladiolus in your garden for years to come. These spectacular plants are perfect for creating a focal point in your garden beds or borders, and their cut flowers make an excellent addition to floral arrangements. With proper care and attention, gladiolus will reward you with a breathtaking display that elevates your garden to new heights.
Connect with us
Facebook: https://www.facebook.com/TayloesLawnCare
Web: https://www.tayloeslawncare.com
MeWe: https://mewe.com/p/diyhomegarden
Image and music licensed via Canva Pro
52
views
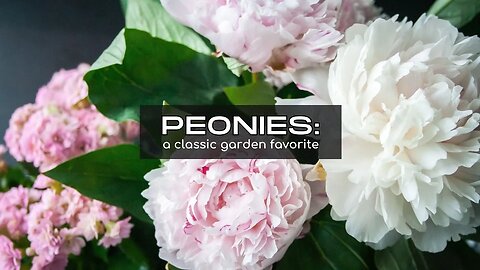
PEONIES: How to grow and maintain the peony, a gardening classic.
Peonies are beloved perennials known for their lush, fragrant flowers and striking foliage. Their beauty and resilience make them a favorite among gardeners. In this friendly guide, we will explore the fascinating origin of peonies, their Latin names, color variations, and more. Additionally, we'll provide essential information on planting, care, maintenance, and common diseases or threats.
Peonies (Paeonia spp.) originated in Asia, Southern Europe, and Western North America. They have been cultivated for thousands of years and hold a special place in Chinese, Japanese, and European history, where they have been revered for their medicinal, ornamental, and cultural significance.
Peonies are generally hardy in USDA Plant Hardiness Zones 3 to 8. Some varieties may be able to tolerate the warmer conditions in Zone 9, but this depends on the specific cultivar. Peonies thrive in regions with cold winters and moderate summers, as the cold temperatures help them undergo the necessary dormancy period. In their suitable hardiness zones, peonies can provide stunning blooms and fragrance for many years.
The genus Paeonia is comprised of around 33 species, with the most commonly cultivated being Paeonia lactiflora (Chinese peony), Paeonia officinalis (European peony), and Paeonia suffruticosa (tree peony).
Peonies come in an array of colors, including white, pink, red, coral, and even yellow. The color spectrum varies depending on the species and cultivar.
Tree peonies (Paeonia suffruticosa) have a woody trunk that can reach 4-5 feet in height. Herbaceous peonies have strong, green, upright stems that die back to the ground each year. Peonies have compound, dark green leaves that are deeply lobed and provide an attractive backdrop for the flowers.Peony blossoms range from simple, single-petaled flowers to extravagant double forms. They typically measure 2 to 10 inches in diameter and bloom from late spring to early summer.
Peonies are well-known for their intoxicating fragrance, which can vary from sweet and floral to spicy and citrusy, depending on the cultivar.
The best time to plant peonies is in the fall, around September to October, allowing the roots to establish before winter dormancy.
Planting, Care, and Maintenance of Peonies.
Choose a location with well-draining soil and full sun to light shade.
Plant peony tubers with the "eyes" (buds) 1-2 inches below the soil surface, spacing them 3-4 feet apart.
Water thoroughly after planting and continue to water regularly during the growing season.
Apply a balanced, slow-release fertilizer in early spring and mid-summer.
Provide support for heavy blooms, using stakes or peony rings.
Remove spent flowers to promote plant health.
Cut back herbaceous peonies to the ground in the fall, while tree peonies require only light pruning to remove dead or diseased branches.
Common Diseases or Threats to Peonies, and the Treatment.
Botrytis Blight (Gray Mold). Remove infected plant parts, improve air circulation, and apply a fungicide if necessary.
Peony Wilt. Remove and destroy affected plants. Avoid overhead watering to prevent fungal spores from spreading.
Powdery Mildew. Increase air circulation, avoid overhead watering, and apply a fungicide if required.
Ants are attracted to the nectar on peony buds but are generally harmless. If they become a nuisance, use insecticidal soap or diatomaceous earth.
Peonies are a beautiful addition to any garden. With proper planting, care, and maintenance, these stunning perennials will reward you with their enchanting blooms and fragrance for years to come. Please remember to like and subscribe!
Connect with us
Facebook: https://www.facebook.com/TayloesLawnCare
Web: https://www.tayloeslawncare.com
MeWe: https://mewe.com/p/diyhomegarden
Image and music licensed via Canva Pro
55
views

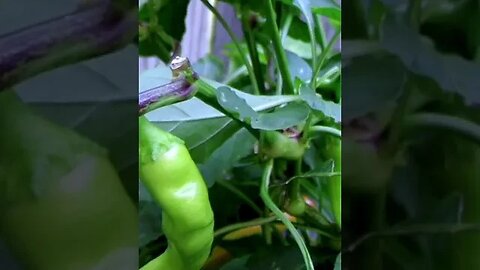
CHILI PEPPERS: Add Spice and Color to Your Garden
Chili Peppers: Add Spice and Color to Your Garden.
Chili peppers are a popular garden addition for their fiery flavor and vibrant colors. These versatile plants offer both culinary and ornamental value, making them an exciting choice for gardeners seeking to add a touch of heat and visual interest to their outdoor spaces. In this content, we will explore the characteristics of chili peppers, including their appearance, growing zones, planting, care, and maintenance.
Colors and Appearance of Peppers.
Chili peppers come in a vast range of colors, including shades of red, orange, yellow, green, purple, and even white. The fruits vary in size and shape, ranging from small, round peppers to long, slender varieties. Chili pepper plants typically have green leaves and white flowers, with the fruits often ripening to their final color as they mature. Depending on the variety, chili pepper plants can grow anywhere from 1 to 6 feet (30 cm to 1.8 meters) tall.
Growing Zones and Environmental Conditions
Chili peppers (Capsicum annuum) are native to Central and South America and thrive in moderately warm to hotter USDA plant hardiness zones. However, they can also be grown as annuals in colder climates. Check with your local ag extension office to see which varieties would work best for your region.
These plants prefer well-draining soil with a pH level of 6 to 6.8. Chili peppers require full sun, with at least 6 hours of direct sunlight daily, for optimal growth and fruit production.
Chili peppers are self-pollinating but can also attract insects, such as bees and butterflies, due to their fragrant flowers and vivid fruit colors.
Latin Names of Some Favorite Chili Peppers.
The Capsicum genus includes several species and countless cultivars of chili peppers, with some popular varieties being:
Capsicum annuum 'Jalapeno' (Jalapeno Pepper),
Capsicum annuum 'Cayenne' (Cayenne Pepper),
Capsicum chinense 'Habanero' (Habanero Pepper),
Capsicum chinense 'Carolina Reaper' (Carolina Reaper Pepper).
When to Plant Chili Peppers.
The best time to plant chili peppers is in the spring after the danger of frost has passed and the soil has warmed to at least 60 degrees Fahrenheit.
Planting, Care, and Maintenance.
Start chili pepper seeds indoors 6 to 8 weeks before your last expected frost date. Transplant seedlings outdoors when nighttime temperatures consistently remain above 55 degrees.
Prepare the planting site by loosening the soil to a depth of 12 inches (30 cm) and incorporating compost or other organic matter to improve drainage and fertility.
Space plants 18 to 24 inches (45-60 cm) apart to ensure adequate air circulation and room for growth.
Water regularly throughout the growing season, maintaining consistent moisture while avoiding overwatering. Chili peppers prefer evenly moist but not waterlogged soil.
Apply a layer of mulch around the plants to help conserve moisture, suppress weeds, and regulate soil temperature.
Fertilize chili peppers with a balanced, slow-release fertilizer when transplanting, and switch to a low-nitrogen, high-potassium fertilizer once fruit production begins.
Prune chili pepper plants to encourage bushier growth and increased fruit production. Remove any diseased or damaged plant material as needed.
Harvest chili peppers when they have reached their mature color and desired heat level. The longer peppers remain on the plant, the spicier they become.
Chili peppers are an exciting and flavorful addition to any garden, offering various culinary and ornamental uses. Following the planting and care guidelines outlined above, you can enjoy a bountiful harvest of colorful, spicy peppers to use in your favorite dishes or add visual interest to your garden. These versatile plants provide heat and flavor. These beauties are a must-have for gardeners seeking to create a diverse and dynamic outdoor space.
Connect with us:
Facebook: https://www.facebook.com/TayloesLawnCare
Web: https://www.tayloeslawncare.com
MeWe: https://mewe.com/p/diyhomegarden
Image and music licensed via Canva Pro
133
views

BLACK EYED SUSANS + BROWN EYED SUSANS: Delightful native wildflowers for the garden
Black-Eyed and Brown-Eyed Susans: Delightful Native Wildflowers for Your Garden.
Black-eyed Susans and brown-eyed Susans are beloved native wildflowers known for their bright, cheerful blooms and resilient nature. These hardy perennials are popular among gardeners seeking to add a touch of natural beauty to their outdoor spaces. Let's explore these captivating plants' characteristics, growing zones, planting, care, and maintenance.
Colors and Appearance.
Both black-eyed and brown-eyed Susans feature daisy-like flowers with a dark central cone surrounded by colorful rays. Black-eyed Susans (Rudbeckia hirta) has bright yellow to orange petals with a dark brown or black center. In contrast, brown-eyed Susans (Rudbeckia triloba) have yellow petals with a brown center. The leaves of these plants are lance-shaped, often with a rough, hairy texture. Mature plants can reach heights of 2 to 3 feet, depending on the variety.
Growing Zones and Environmental Conditions.
Black-eyed and brown-eyed Susans are native to North America and thrive in USDA plant hardiness zones 3 to 9. These resilient perennials prefer well-draining soil with a pH of 6.0 to 7.0. While they can tolerate partial shade, they grow best in full sun, requiring at least 6 hours of direct sunlight daily.
Latin Names.
The Rudbeckia genus, including black-eyed and brown-eyed Susans, contains several species and cultivars. Some of the most commonly grown varieties are:
Rudbeckia hirta (Black-Eyed Susan).
Rudbeckia triloba (Brown-Eyed Susan).
Rudbeckia fulgida 'Goldsturm' (Goldsturm Black-Eyed Susan).
Pollinators They Attract.
Black-eyed and brown-eyed Susans are magnets for pollinators such as bees, butterflies, and even hummingbirds. They provide a rich source of nectar and pollen, making them a valuable addition to a pollinator-friendly garden.
When to Plant.
The best time to plant black-eyed and brown-eyed Susans is in the spring or early fall, allowing the plants to establish a robust root system before the summer heat or winter cold.
Planting, Care, and Maintenance.
Prepare the planting site by loosening the soil to a depth of 12 to 15 inches and incorporating compost or other organic matter to improve drainage and fertility.
Space plants 18 to 24 inches apart to ensure adequate air circulation and room for growth.
Water regularly during the first growing season to help the plants establish a deep root system. Once established, these perennials are drought-tolerant and require minimal watering.
Apply a layer of mulch around the plants to help conserve moisture and suppress weeds.
Deadhead spent flowers to encourage continuous blooming and maintain a neat appearance.
Fertilize with a balanced, slow-release fertilizer in early spring to support robust growth and flowering.
Divide mature plants every 3 to 4 years in the spring or fall to maintain vigor and promote healthy growth.
Black-eyed and brown-eyed Susans are a delightful addition to any garden, offering a cheerful display of color and a valuable resource for local pollinator populations. By following the planting and care guidelines outlined above, you can create a thriving, eye-catching display in your garden that lasts many years. These charming native plants bring beauty, color, and helpful pollinators to your yard.
PURCHASE NON GMO BLACK-SUSAN SEEDS: https://amzn.to/3mlJUoI
As an Amazon Associate I earn from qualifying purchases.
Connect with us
Facebook: https://www.facebook.com/TayloesLawnCare
Web: https://www.tayloeslawncare.com
MeWe: https://mewe.com/p/diyhomegarden
Image and music licensed via Canva Pro
127
views
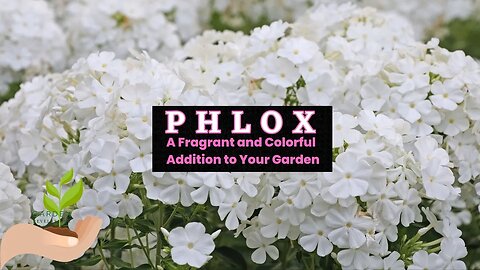
PHLOX: A fragrant, tall or creeping addition to your flower garden
Phlox is a genus of flowering plants known for their vibrant, fragrant blooms and versatile growing habits. These perennials and annuals offer an impressive display of color, making them a popular choice among gardeners. In this article, we will explore the various aspects of phlox, including their appearance, growing zones, planting, care, and maintenance.
Colors and Appearance.
Phlox is available in a wide range of colors, including shades of pink, purple, red, white, and blue. The flowers are typically star-shaped and form dense clusters atop sturdy stems. Phlox leaves are usually lance-shaped or oval, and their arrangement varies depending on the species. The plants can grow anywhere from 6 inches to 4 feet tall, depending on the variety.
Growing Zones and Environmental Conditions.
Phlox species are native to North America and thrive in USDA plant hardiness zones 3 to 9, depending on the specific variety. These plants prefer well-draining, slightly alkaline soil with a pH of 6.5 to 7.5. While some species can tolerate partial shade, phlox generally grows best in full sun, requiring at least 6 hours of direct sunlight daily.
Latin Names.
The Phlox genus comprises several species, with some of the most commonly grown being:
Phlox paniculata (Garden Phlox).
Phlox subulata (Creeping Phlox).
Phlox drummondii (Annual Phlox).
Phlox divaricata (Woodland Phlox).
Pollinators You Will Attract.
Phlox attracts a variety of pollinators, including bees, butterflies, and hummingbirds. Their fragrant, nectar-rich flowers provide a valuable food source for these beneficial insects and birds, making phlox an excellent addition to a pollinator-friendly garden.
When to Plant Phlox.
The best time to plant phlox is in the spring or early fall, allowing the plants to establish a healthy root system before summer heat or winter cold.
Planting, Care, and Maintenance.
Prepare the planting site by loosening the soil to a depth of 12 to 15 inches and incorporating compost or other organic matter to improve drainage and fertility.
Space plants 18 to 24 inches apart to ensure proper air circulation and room for growth.
Water newly planted phlox regularly during the first growing season to establish a deep root system. Once established, phlox is relatively drought-tolerant and requires minimal watering.
Apply a layer of mulch around the plants to help conserve moisture, suppress weeds, and regulate soil temperature.
Phlox is generally low-maintenance, but removing spent flowers and cutting back the stems after blooming will promote a neater appearance and prevent self-seeding.
Fertilize phlox with a balanced, slow-release fertilizer in early spring to support robust growth and flowering.
To prevent spreading diseases, such as powdery mildew, ensure good air circulation and avoid overhead watering. If necessary, treat affected plants with an appropriate fungicide.
Divide perennial phlox every 3 to 4 years in the spring or early fall to maintain vigor and promote healthy growth.
Phlox is a charming addition to any garden, offering a delightful display of color and fragrance. Following the planting and care guidelines, you can create a thriving phlox garden that will enchant and delight for years. Their versatility and ability to attract pollinators make Phlox an excellent choice for gardeners looking to enhance their outdoor spaces' beauty and ecological value. Whether you grow garden phlox, creeping phlox, or one of the many other varieties, these captivating plants will undoubtedly become a cherished part of your garden landscape.
As an Amazon Associate I earn from qualifying purchases.
PURCHASE PHLOX - TALL PHLOX MIX VALUE BAG (6) https://amzn.to/3UlSEHU
Connect with us:
Facebook: https://www.facebook.com/TayloesLawnCare
Web: https://www.tayloeslawncare.com
MeWe: https://mewe.com/p/diyhomegarden
Image and music licensed via Canva Pro
25
views
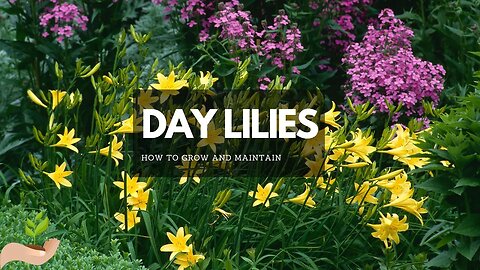
DAYLILIES: A Beautiful, Low-Maintenance Garden Perennial (so many day lilies to choose from!)
Daylilies are popular among gardeners for their stunning blooms, low-maintenance requirements, and adaptability to various growing conditions. These perennials offer an impressive display of color and texture that can brighten up any garden. This content will delve into the fascinating world of daylilies, discussing their appearance, growing zones, planting, care, and maintenance.
Colors and Appearance.
Daylilies, belonging to the Hemerocallis genus, are available in various colors, including shades of yellow, orange, red, pink, purple, and even near-white. These trumpet-shaped flowers usually have six petals and can measure up to 6 inches, or 15 cm, in diameter. The leaves are long, slender, and arching, forming a dense, grass-like clump. The flower stems, called scapes, can grow up to 4 feet, or 1.2 meters, tall, depending on the variety.
Growing Zones and Environmental Conditions.
Daylilies are native to Asia and thrive in USDA plant hardiness zones 3 to 9. These versatile perennials can tolerate various soil types but prefer well-draining, slightly acidic soil with a pH level of 6.0 to 6.5. While they can grow in partial shade, daylilies perform best in full sun, requiring at least 6 hours of direct sunlight daily.
Latin Names.
The Hemerocallis genus contains over 80,000 registered cultivars, making it one of the most diverse flowering perennials. Some popular daylily cultivars include:
Hemerocallis 'Stella de Oro' (Stella de Oro Daylily).
Hemerocallis 'Ruby Spider' (Ruby Spider Daylily).
Hemerocallis 'Happy Returns' (Happy Returns Daylily).
Hemerocallis 'Moonlit Masquerade' (Moonlit Masquerade Daylily).
Pollinators They Attract.
Daylilies attract many pollinators, including bees, butterflies, and hummingbirds. Their nectar-rich flowers provide a valuable food source for these beneficial insects and birds.
When to Plant Daylilies.
The ideal time to plant daylilies is in the spring or early fall, allowing the plants to establish a strong root system before summer heat or winter cold.
Planting, Care, and Maintenance.
Prepare the planting site by loosening the soil to a depth of 12 to 15 inches, or 30-38 centimeters, and incorporating compost or other organic matter to improve drainage and fertility.
Space plants 18 to 24 inches. 45-60 centimeters, apart to ensure proper air circulation and room for growth.
Water newly planted daylilies regularly during the first growing season to establish a deep root system. Once established, daylilies are relatively drought-tolerant and require minimal watering.
Apply a layer of mulch around the plants to help conserve moisture, suppress weeds, and regulate soil temperature.
Daylilies are low-maintenance, but removing spent flowers and cutting back the scapes after blooming will promote a neater appearance and prevent self-seeding.
Fertilize daylilies with a balanced, slow-release fertilizer in early spring and again in mid-summer to support robust growth and flowering.
Divide mature plants every 3 to 5 years in the spring or early fall to maintain vigor and promote healthy growth.
Daylilies are a fantastic addition to any garden, offering a stunning display of color and a low-maintenance growth habit. Following the planting and care guidelines outlined above, you can create a beautiful and thriving daylily garden that will bring joy and color to your outdoor space for years to come. These versatile perennials are attractive and highly adaptable, making them an excellent choice for gardeners of all experience levels.
PURCHASE DAYLILY MIX VALUE BAG: https://amzn.to/3zLxt8B
As an Amazon Associate I earn from qualifying purchases.
Connect with us
Facebook: https://www.facebook.com/TayloesLawnCare
Web: https://www.tayloeslawncare.com
MeWe: https://mewe.com/p/diyhomegarden
Image and music licensed via Canva Pro
28
views
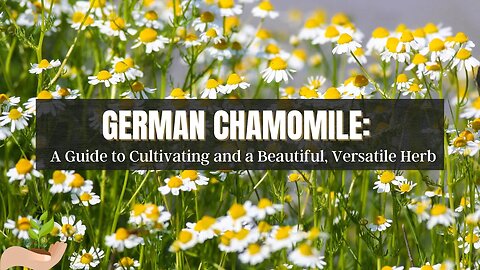
German Chamomile: A Guide to Cultivating and Utilizing this Versatile Herb
German chamomile, with the Latin name Matricaria chamomilla, is a flowering herb used for centuries for its medicinal and culinary properties. This versatile plant belongs to the Asteraceae family and is native to Europe and Western Asia. German chamomile is known for its delicate, daisy-like flowers with white petals and yellow centers, which have a sweet, apple-like fragrance.
Whether you are a seasoned gardener, or you're new to this productive hobby, this content will provide a comprehensive guide to planting German chamomile.
Matricaria chamomilla is a small, herbaceous plant from the Asteraceae family. It is an annual plant that can reach up to two feet tall, with delicate, feathery leaves that are light green. The flowers of German chamomile are small, daisy-like, and have a characteristic fragrance that is sweet and apple-like.
German chamomile flowers are ready to harvest when fully open when they are at their peak potency for medicinal and culinary use. The flowers have white petals and yellow centers and form a flat-topped cluster at the top of the stem.
It is essential to differentiate between German and Roman chamomile, another common chamomile species. While both plants have similar medicinal and culinary properties, they have some critical differences in their botanical features.
Roman chamomile, or Chamaemelum nobile, is a perennial plant with a more upright growth habit and smaller, more compact flowers than German chamomile. Roman chamomile has a slightly different fragrance than German chamomile, with a more earthy and herbaceous aroma.
Understanding the botanical features of German chamomile and differentiating it from other chamomile species is essential for the successful cultivation and proper use of this herb.
German chamomile is a relatively easy herb to grow in most climates. It prefers the full sun to partial shade and well-draining soil. It is hardy in growing zones 3 to 9 and can be grown as an annual in cooler zones or biennial in warmer areas. That depends on the climate and growing conditions.
To cultivate German chamomile, you must start by preparing the soil. Choosing a location with well-draining soil is important, as it does not tolerate standing water. To improve drainage and fertility, you can amend the soil with compost or another organic material.
Once you prep the soil, you can plant the seeds directly in the ground after the last frost. It is best to sow the seeds thinly and cover them lightly with soil. The seeds will germinate within 7 to 14 days and should be moist until they sprout.
German chamomile requires consistent watering throughout the growing season. It is vital to water the plant deeply, but avoid overwatering, because this can lead to root rot. Fertilizing the plant with a balanced monthly fertilizer can also help promote healthy growth and flowering.
Common pests and diseases affecting German chamomile include aphids, spider mites, and powdery mildew. Practice good garden hygiene and remove any dead or diseased plant material promptly to prevent these concerns. Also, you can use organic pest control methods, like insecticide soap or neem oil, to control pests.
German chamomile, or Matricaria chamomilla, is a versatile herb enjoying popularity for centuries for its many uses. Its delicate, daisy-like flowers with white petals and yellow centers have a sweet, apple-like fragrance that is so easily recognizable. German chamomile is easy to grow and can be cultivated in most climates, making it a terrific choice for gardeners of all skill levels.
Connect with us
Facebook: https://www.facebook.com/TayloesLawnCare
Web: https://www.tayloeslawncare.com
MeWe: https://mewe.com/p/diyhomegarden
Image and music licensed via Canva Pro
56
views
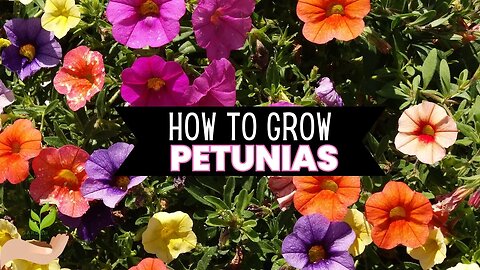
How to Grow Petunias: A Comprehensive Guide for Vibrant Blooms
Petunias are a garden favorite known for their abundant blooms and vibrant colors. Originating from South America, these flowers have been popular in gardens for centuries. With various types available, petunias can be grown in gardens or containers to suit any outdoor space. In this comprehensive guide, we'll explore the different types of petunias, planting techniques, and essential care tips to help you grow thriving petunias with spectacular blooms.
The Latin name for petunias is Petunia × atkinsiana (also known as Petunia × hybrida), which refers to the standard hybrid garden species. Petunias are annual plants that complete their life cycle in one growing season. They are suitable for USDA growing zones 2 through 11.
Types of Petunias.
Grandiflora Petunias. Grandiflora petunias are perfect for making a bold statement in your garden. However, they may require extra care, as their large, showy blooms are more susceptible to weather damage.
Multiflora Petunias. These petunias feature smaller flowers than Grandiflora varieties but produce more blooms. They are more tolerant of weather fluctuations and ideal for garden beds or containers.
Milliflora Petunias. Compact and prolific bloomers, Milliflora petunias are perfect for small spaces or containers. Their petite flowers create a delicate, elegant display.
Spreading or Wave Petunias. These vigorous, low-growing petunias are ideal for ground covers, hanging baskets, or containers. They spread quickly and produce abundant blooms throughout the season.
Double Petunias. With their lush, double-layered flowers, Double petunias add a touch of luxury and lush color to any garden.
Considering the right type for your garden or container? Consider available space, desired visual impact, and maintenance preferences when selecting the perfect petunia variety. Always check the care tag for your plants before purchasing.
Planting Petunias. Start petunia seeds indoors 10-12 weeks before the last expected frost. Start the seeds in seed trays or pots filled with a high-quality seed starting mix. Lightly press seeds into the soil surface but do not cover them, as petunias need light to germinate. Keep the soil moist and maintain temperatures around 70-75°F to ensure successful germination.
Are you buying transplants from the nursery? Here are two considerations.
Choose compact, well-branched petunia plants with healthy green foliage and no signs of pests or diseases. Use proper transplanting techniques. Gently remove the petunia from its container, taking care not to damage the roots. Plant it in your prepared garden bed or container at the same depth as in the original pot.
Next. Let's look at how to plant petunias in the ground or containers.
Planting in the ground. Prepare your soil and amendments. Petunias prefer well-draining, fertile soil with a pH between 6 and 7. Amend the soil with compost or herbivore manure to increase fertility and drainage. Plant petunias 10-12 inches apart to ensure proper air circulation and prevent overcrowding.
Planting in containers. Select a container with drainage holes to prevent waterlogging. Consider the mature size of your petunias when choosing a container size. Use a high-quality, well-draining potting mix in your container to promote healthy growth. You may add perlite or vermiculite to improve drainage further.
Caring for Petunias. What's the proper watering frequency and technique? Water petunias thoroughly and allow the soil to dry slightly between waterings. Container-grown petunias may require more frequent watering than those planted in the ground. Avoiding common watering problems. Overwatering can lead to root rot. On the other hand, underwatering may cause wilting and reduced blooms. Monitor soil moisture and adjust your watering schedule accordingly.
Fertilizing. Use a balanced, slow-release fertilizer or a water-soluble fertilizer specifically formulated for flowering plants. Apply fertilizer according to the package instructions, typically every 4-6 weeks during the growing season.
Pruning and deadheading. Regularly remove spent flowers (deadheading) to encourage continuous blooming. Pinch back leggy or overgrown stems to maintain a compact, bushy appearance. Prune petunias in late spring or early summer removes damaged or diseased stems. Lightly trim the plants in midsummer to encourage a flush of new growth and blooms.
Pest and disease management. Common pests and diseases include aphids, whiteflies, and slugs may attack petunias. Diseases such as powdery mildew, gray mold, and root rot can also affect petunias. Maintain proper plant spacing and avoid overwatering to reduce the risk of pests and diseases.
Connect:
Facebook: https://www.facebook.com/TayloesLawnCare
Web: https://www.tayloeslawncare.com
MeWe: https://mewe.com/p/diyhomegarden
Image and music licensed via Canva Pro
88
views
GROWING BANANA PEPPERS!
Want to know a little more about how to grow banana peppers? This short provides a quick over view abour growing banana peppers:
VIDEO TEXT:
The banana pepper is a popular chili pepper variety known for its mild and sweet flavor. It is typically harvested when it turns yellow, resembling the shape and color of a ripe banana, hence the name. Banana peppers are relatively easy to grow and thrive in warm climates. They prefer well-draining soil, with a pH range of 5.5 to 7.0, and require total sunlight exposure. Planting can be done either through seeds or transplanting. Start the seeds indoors about six weeks before the last frost date, then transplant them outside when the soil warms up. Banana peppers can be used fresh or pickled, adding a unique taste to salads, sandwiches, and other dishes.
Connect with us
Facebook: https://www.facebook.com/TayloesLawnCare
Web: https://www.tayloeslawncare.com
MeWe: https://mewe.com/p/diyhomegarden
Image and music licensed via Canva Pro
23
views
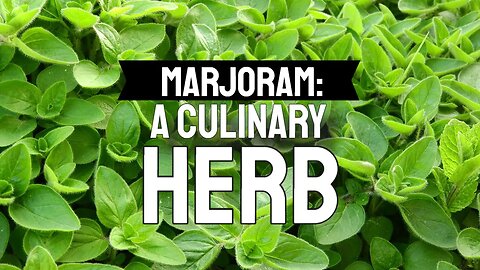
Marjoram: A Culinary Herb That Will Thrive in Containers or Your Herb Garden.
NOTE: In the video, we mention marjoram stems are green but they appear red in this content. That's because the stem deepens to burgundy in the late summer to early fall. This image was not collected during the early season.
What is marjoram?
Marjoram is an herb that is commonly used in Mediterranean cuisine. Its scientific name is Origanum majorana, and it belongs to the mint family. It grows well in full sunlight but can also thrive in partial shade.
Marjoram prefers well-draining soil with a slightly acidic pH of 6.5 to 7.5. It can grow in USDA hardiness zones 9 to 11 but flourish indoors in other zones.
Marjoram leaves are light green and velvety, while the stems are green and woody. They produce small white or pink flowers in the summer.
Growing marjoram:
To grow marjoram from seeds, plant them 6 to 8 weeks before the last frost. Put the seeds about a quarter inch deep in the soil. Space them 6 to 8 inches apart. When the seedlings have grown to a few inches tall, you can transplant them into a container or herb garden.
For maintenance, marjoram needs consistent watering, once or twice a week, depending on rainfall. Apply a balanced fertilizer every two weeks during the growing season to keep the plants healthy.
Marjoram makes an excellent flavoring for poultry, fish, soups, and salads. It perfectly complements other herbs, such as thyme and rosemary.
So, whether you grow it in a container or herb garden, marjoram is easy to care for, bringing good flavor to your cooking. Thanks for watching; please hit the subscribe button and notification bell for more gardening updates.
Connect with us
Facebook: https://www.facebook.com/TayloesLawnCare
Web: https://www.tayloeslawncare.com
MeWe: https://mewe.com/p/diyhomegarden
Image and music licensed via Canva Pro
34
views
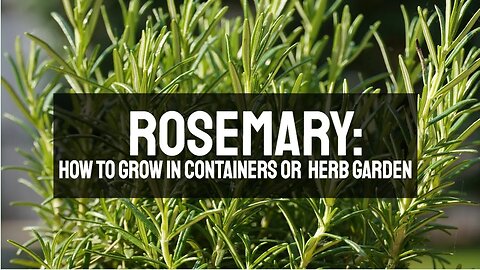
Rosemary: How to Grow and Maintain a Favorite Herb in a Container Garden or Herb Garden
Rosemary: A Perennial Herb for a Container Garden or in the Herb Garden.
Rosemary, known by its scientific name Rosmarinus officinalis, is a perennial herb native to the Mediterranean region. It is grown for its aromatic leaves and is an excellent culinary herb. Rosemary is a member of the mint family, and its leaves have a slightly bitter, woody flavor. This herb is easy to grow and requires minimal maintenance. This guide will discuss the main aspects of growing and maintaining rosemary plants.
Soil pH Requirements.
Rosemary prefers a neutral to alkaline soil with a pH range of 6 to 7.5. If the soil is too acidic, add lime to raise the pH. If the soil is alkaline, add sulfur to lower the pH. It is important to note that rosemary is a salt-sensitive plant, so avoid using fertilizers that contain high salt levels.
Sunlight Needs.
Rosemary requires at least 6 hours of direct sunlight daily. The plant thrives in a warm, dry climate, making it an ideal option for growing in the USDA hardiness zones 7 to 10.
Physical Appearance of rosemary.
Rosemary has needle-like leaves that are about an inch long and usually green to gray-green in color. The leaves are arranged in pairs along the stem and are very aromatic. When the plant blooms, it produces small blue, pink, or purple flowers. The plant is evergreen in USDA hardiness zones 8 and higher, but it loses its leaves in colder climates.
Culinary Uses.
Rosemary's distinctive flavor makes it a popular seasoning for many dishes. It pairs especially well with meats such as lamb, pork, and chicken. It can also be used in soups, stews, and sauces. You can use fresh or dried rosemary for cooking. If using fresh, chop the leaves finely before adding them to your dish.
How to Plant Rosemary.
1. Choose a location that receives at least 6 hours of direct sunlight daily.
2. Prepare the soil by adding compost or well-rotted manure to improve drainage.
3. If planting in-ground, dig a hole slightly larger than the plant's root ball.
4. If planting in a pot, choose a container 12 inches deep and wide., at a minimum.
5. Fill the hole or the pot with soil, leaving enough space for the plant.
6. Gently remove the plant from its container and loosen any tangled roots.
7. Place the plant in the hole or the pot, ensuring it is at the same depth as in the container.
8. Water the plant well and cover the soil with mulch to conserve moisture.
How to Maintain Rosemary.
1. Water the plant deeply twice a week, perhaps more often during hot and dry weather.
2. Prune the plant regularly to promote new growth and prevent it from becoming woody. Prune rosemary in the spring after new growth has begun.
3. Fertilize the plant once a year with a balanced fertilizer, but avoid using high-salt fertilizers.
4. When growing in pots or containers, consider repotting once every two to three years to prevent the plant from becoming root-bound.
5. Protect the plant from strong winds that can cause breakage.
6. Watch for pests such as spider mites, mealybugs, and aphids. Treat these with organic pest control methods such as neem oil.
Rosemary is a versatile and easy-to-grow herb that can add flavor and aroma to any dish. Following the tips above, you can grow and care for your rosemary plants successfully. Happy gardening! Please like our video and hit the notification button for our YouTube alerts.
Connect with us
Facebook: https://www.facebook.com/TayloesLawnCare
Web: https://www.tayloeslawncare.com
MeWe: https://mewe.com/p/diyhomegarden
Image and music licensed via Canva Pro
125
views