Enjoyed this channel? Join my Locals community for exclusive content at
crossedheartforge.locals.com!
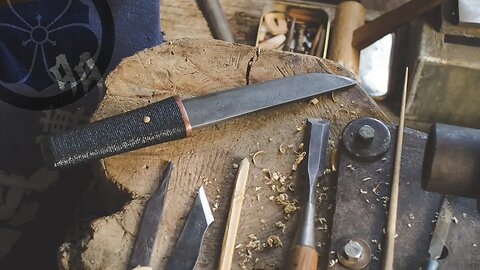
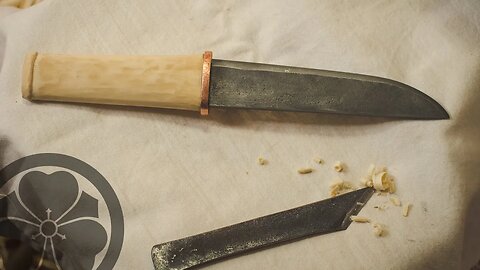
One bamboo peg - takedown & assembly of a classical tanto style knife
A demonstration on the takedown and assembly of classical tanto style knives. http://islandblacksmith.ca/2016/10/takedown-reassembly-classical-tanto-style-mountings/
Never pull or jerk the blade out with the power of your arms or you will lose control of the blade and possibly damage the saya (scabbard), yourself, or others. When unsheathing, make sure the edge is up, then pull just enough (a few mm) so that the habaki (blade collar) disengages its tight hold on the saya, then the blade may be easily and smoothly drawn, resting on the mune (spine) as it slides out.
One way to accomplish the initial part of the draw is to place a hand loosely on either side of the joint, topmost thumb knuckles together and then squeeze. The knuckles push against each other for only a short distance but it is enough to start the blade out in a controlled manner (this way is slightly more difficult and may take some practice). Another method is to grasp the tsuka (handle) and saya tightly with a little space between your hands and then use your saya thumb or forefinger to push against the other hand or against the tsuba (handguard), if it has one, until the release.
To replace the blade in the saya, make sure the edge is up, rest the tip in the koiguchi (mouth of the scabbard), and slide it in smoothly, keeping the edge up and resting it on the mune (spine) until the habaki engages again.
Storage & Handling
1. never touch the blade directly, hold the tang below the polished area instead.
2. store and display with the edge up and the handle to the left side.
3. keep in a secure, dry location in a sturdy storage bag.
4. if possible, keep the blade in shirasaya, apart from the fittings and mountings.
5. use a thumb against the guard or hand, or the squeeze technique to open the first few mm without pulling.
6. slide the blade out carefully along the spine with the edge upwards to avoid scuffing the blade or cutting the scabbard.
7. avoid condensation from temperature changes or breathing on the blade.
8. avoid wide temperature ranges or quick temperature or humidity changes to the wood.
9. keep lacquered parts out of long-term direct sunlight.
10. when closing, set the back of the tip inside the koiguchi (mouth of the scabbard) and then slide in carefully along the spine.
Disassembly & Reassembly:
1. remove the scabbard before disassembly.
2. remove the mekugi peg by pressing from the back side with a thin piece of wood or mekugi-nuki tool.
3. loosen by pressing the guard or gently striking the hand that is holding the handle.
4. work the fingers under the guard and grasp the tang before removing the handle.
5. take note of the order and direction of each component as it is removed.
6. reassemble in reverse order, taking care not to force any part (check the order, fit, and placement instead)
7. tap the pommel into your palm until the tang is fully seated in place.
8. ensure that the mekugi is aligned rotationally so that the long, straight, unbroken bamboo fibers face back towards the pommel.
9. insert from the correct side of the handle and press into place until flush or appropriately tight, do not overdrive.
10. check that everything is snug and all parts are in their proper places before sheathing.
Cleaning & Maintenance:
1. remove fittings from the blade before oiling.
2. remove old oil and dust with washi paper, tissue paper, or clean cotton cloth.
3. wipe slowly from base to tip with the edge away from fingers.
4. place a few drops of clove/camellia oil on a clean cotton cloth.
5. wrap the cloth around the spine with the edge away from your fingers.
6. wipe on a thin layer of oil starting from the polished area under the habaki towards the tip.
7. remove any excess with a second pass if necessary.
8. oil weekly to monthly depending on the climate and storage conditions.
9. the oil can be used sparingly on other iron fittings as well (such as the handguard).
10. sharpening and polishing should only be performed by specialized polishers.
read more here:
http://islandblacksmith.ca/knife-use-and-care/
more about these knives:
http://islandblacksmith.ca/2015/12/touzai-fusion-tanto/
http://islandblacksmith.ca/2014/09/tsukimi-tanto/
2.78K
views
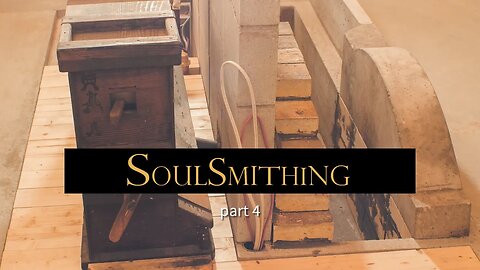
Soulsmithing 4: adventures in hitech/lotech - building the fuigo floor
Building the fuigo floor at Pierre Nadeau’s workshop. Pierre spent several years working as a swordsmith apprentice in rural Japan and is ready to continue his research into traditional Japanese swords and historical crafting techniques in Canada.
Soulsmithing channel: https://www.youtube.com/user/Soulsmithing
An interview of Pierre: https://www.youtube.com/watch?v=FNKymP1QF4M
The three major projects during this visit were focused on getting the forge itself ready for use. In this episode, creating a steel frame and wooden floor to support the fuigo and conceal the in-floor heating system and blower manifold.
For this particular project, the essence of "hitech-lotech" is to use available technology and equipment to overcome the challenges of swordsmithing without apprentices and assistants, in a cold climate, and still maintain the simple and peaceful environment of a traditional workshop. Pierre's solution was to use the space behind the forge wall which is out of sight of the smith and the area under the fuigo to locate and conceal equipment that does not need frequent accessing. An in-floor heating system and related equipment is installed under the back of the fuigo and the electric blower, valve, and manifold are located under the fuigo.
This series is a compilation of what footage I was able to collect while both of us worked morning ’til night but gives a good idea of what went on and will offer some valuable details for astute observers.
Pierre also specializes in making hempcrete mixers and custom wood-fired ovens on the side, the pizza was so good that unfortunately there is no footage!
http://soulsmithing.com
23
views
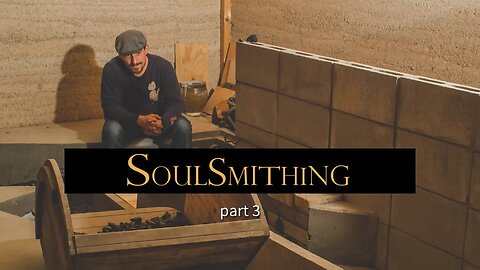
Soulsmithing 3: adventures in hitech/lotech - laying forge bricks
Laying bricks for the swordsmithing forge at Pierre Nadeau’s workshop. Pierre spent several years working as a swordsmith apprentice in rural Japan and is ready to continue his research into traditional Japanese swords and historical crafting techniques in Canada.
Soulsmithing channel: https://www.youtube.com/user/Soulsmithing
An interview of Pierre: https://www.youtube.com/watch?v=FNKymP1QF4M
The three major projects during this visit were focused on getting the forge itself ready for use. In this episode, insulating and laying bricks for the forge.
During the long cold Quebec winters, the ground can become very cold and tanren could become difficult or impossible with an earth-grounded forge. Pierre’s solution to combat cold and moisture is to enclose the forge in a concrete box, insulate inside the box with ceramic fiber, pour a castable refractory floor, and then install the hard firebrick walls inside. The bricks came from a former pottery kiln in the area and have lovely wabisabi textures and colours that record past projects from their earlier use. A blend of sand, refractory cement, and clay seals off the fuigo manifold pipe and the tuyere within the brick opening.
This series is a compilation of what footage I was able to collect while both of us worked morning ’til night but gives a good idea of what went on and will offer some valuable details for astute observers.
Pierre also specializes in making hempcrete mixers and custom wood-fired ovens on the side, the pizza was so good that unfortunately there is no footage!
http://soulsmithing.com
47
views
Soulsmithing 2: adventures in hitech/lotech - fuigo blower manifold
Fabricating a combined fuigo/blower manifold at Pierre Nadeau’s workshop. Pierre spent several years working as a swordsmith apprentice in rural Japan and is ready to continue his research into traditional Japanese swords and historical crafting techniques.
Soulsmithing channel: https://www.youtube.com/user/Soulsmithing
An interview of Pierre: https://www.youtube.com/watch?v=FNKymP1QF4M
The three major projects during this visit were focused on getting the forge itself ready for use. In this episode, fabricating a custom manifold for combined fuigo box bellows and electric cage blower.
During the early stages of tanren, the air must be slow and constant for a couple of hours straight for thorough heating without oxidization of the steel. A task traditionally reserved for an apprentice in order to allow the smith to carry on other work, Pierre’s solution is to install an electric fan under the fuigo with a valve system and manifold that allows him to leave the fuigo during this stage. In the video, the manifold and valve housing can be seen, the blower is yet to be installed. Wiring for a power switch to the blower runs up the front of the forge wall.
This series is a compilation of what footage I was able to collect while both of us worked morning ’til night but gives a good idea of what went on and will offer some valuable details for astute observers.
Pierre also specializes in making hempcrete mixers and custom wood-fired ovens on the side, the pizza was so good that unfortunately there is no footage!
http://soulsmithing.com
13
views
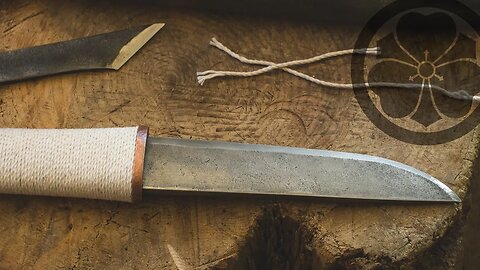
TimeWarp #9 - Making a Mountain Kotanto - Tools for Satoyama full build overview
Hand forging a knife from a reclaimed harrow tooth and crafting a Tools for Satoyama style nihonto mounting from natural materials. (4x)
Longer real-time version here: https://youtu.be/1VqXZgLwnRo
More about the process of making this knife here: http://islandblacksmith.ca/2016/08/process-making-the-mountain-kotanto/
More about the project:
Satoyama are the managed forest areas that border the cultivated fields and the mountain wilds in Japan. Historically they provided soil nutrients, firewood, edible plants, mushrooms, fish, and game, and supported local industries such as farming, timber construction, and charcoal making. Balancing the interaction of wetlands, streams, forests, and fields is an important component of the satoyama landscape and allows for sustainable use of the rich resources they offer.
The Tools for Satoyama project is inspired by this mutually beneficial interaction between humans and the natural world, a robust way of life that sustained both for centuries. Among the goals of the project are contributing to the growing awareness of the satoyama concept, sustainable practices, thoughtful approaches to intentional living, and related historical learning.
The four styles of kotanto knives designed for the project are named for the four main areas found within the satoyama landscape: stream, field, forest, and mountain. In addition, the forest and mountain models also come in a full sized tanto configuration. Some of the core characteristics of the knives produced for this project are the reclaimed and natural source materials, use of traditional techniques, and a humble and simple style of carving and finishing.
A clay tempered blade hand forged in a charcoal fire, water quenched with clay, sharpened with waterstones, and finished simply and humbly in the age-old style of farming and foresting tools traditionally used in managing satoyama lands.
Read more about satoyama: http://islandblacksmith.ca/2016/03/tools-for-satoyama/
_________
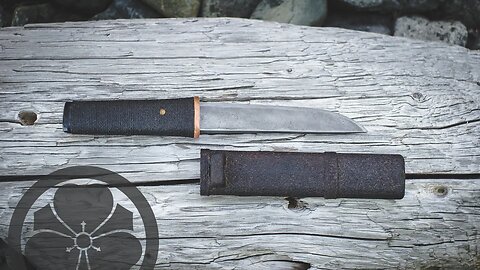
About this knife:
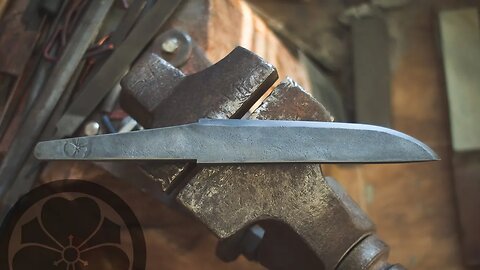
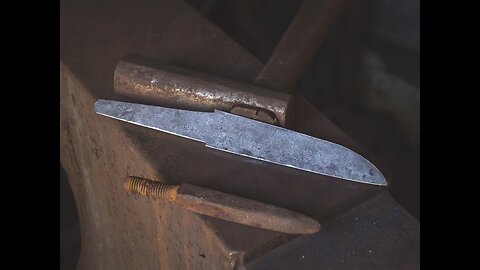
Forged from a reclaimed harrow tooth, the blade profile of the mountain style kotanto is based on a kamakura sword and has more pronounced belly with slight drop point. The temper of this high carbon steel blade has been left relatively hard in order to hold a keen edge for tasks such as wood carving and hand work. This particular combination of steel and heat treatment is well suited to users who require a good edge and are willing to take care of it.
The tang is constructed in a similar manner to a Japanese sword requiring only a single bamboo peg to hold the knife assembly together. In addition to the sense of beautiful simplicity, this design allows the knife to be taken apart for cleaning, polishing, detailed cutting tasks, or major resharpening work.
The handle and scabbard are carved from local Nootka Cypress and finished with natural urushi lacquer. The handle is wrapped with cotton cord and then lacquered and the scabbard is finished with traditional ishimeji (stone texture) made with urushi and crushed tea leaves. A forged copper guard and removable peg carved from Bamboo complete the handle.
The blade is just under 5.75″ long and the overall length is about 10.25″. The spine at the munemachi is about 5mm thick.
Specifications
Nagasa (blade length): 144mm
Motokasane (blade thickness): 5mm
Motohaba (blade width): 30mm
Sori (curve): uchizori
Nakago (tang): 102mm
Tsuka (handle): 110mm
Koshirae (overall): 285mm
Katachi (geometry): hira-zukuri, kaku-mune
Hamon (edge pattern): suguha
Boshi (tip pattern): maru
Nakago (tang): futsu, kuri-jiri, one mekugi-ana, signed near the tip
Mei (signature): hot stamped katabami-ken kamon
Koshirae (mounting): satoyama hamidashi style, issaku
Materials: reclaimed harrow tooth steel, copper electrical washer, Nootka Cypress, Maple, cotton cord, natural urushi lacquer, tea leaves, Bamboo
Design your own knife here: http://islandblacksmith.ca/design-your-own-knife-tools-for-satoyama/
58
views
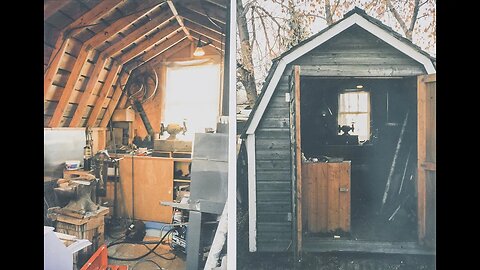
Soulsmithing: adventures in hitech/lotech part 1 - first look at the shop
I had the honour of being able to observe and assist as Pierre Nadeau of soulsmithing.com works on setting up his new smithy in Canada. The last time I saw Pierre and his wife was when they (and we) were in the midst of packing to move from Japan in late 2011. Pierre spent several years working as a swordsmith apprentice in rural Japan and is ready to continue his research into traditional Japanese swords and historical crafting techniques.
Soulsmithing channel: https://www.youtube.com/user/Soulsmithing
An interview of Pierre: https://www.youtube.com/watch?v=FNKymP1QF4M
The workshop has an interesting blend of "high tech" and "low tech" elements to allow him to work in the location and circumstances of the area. The hempcrete and timberframe building provide a natural sound and thermal barrier and the concrete slab is insulated and heated with an in-floor water system. The forge itself has several technical elements and additional insulation designed to protect it from moisture and ground heat-loss during the harsh Quebec winters.
Construction photos and rendering thanks to Pierre Groulx and Pierre Nadeau.
The three major projects during my visit were focused on getting the forge itself ready for use. First was to fabricate a custom manifold for combined fuigo box bellows and electric cage blower, second was to insulate and lay bricks for the forge itself, and third was to create a support and wooden floor to support the fuigo and conceal the in-floor heating system and blower manifold.
This series is a compilation of what footage I was able to collect while both of us worked morning 'til night but gives a good idea of what went on and will offer some valuable details for astute observers.
Pierre also specializes in making hempcrete mixers and custom wood-fired ovens on the side, the pizza was so good that unfortunately there is no footage!
http://soulsmithing.com
32
views
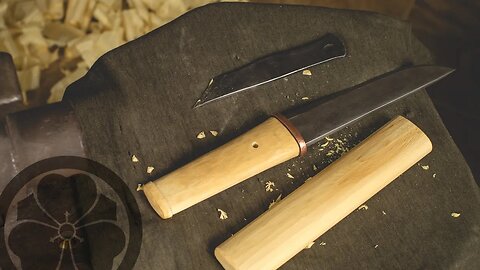
TimeWarp #8 - Carving a mekugi and Mountain Kotanto final assembly
Drilling the mekugi-ana and hand carving a bamboo mekugi peg for the largest of the Tools for Satoyama kotanto. (4x) Full knife build here: https://youtu.be/1VqXZgLwnRo
Serious students of the forge can watch the full process version here: https://youtu.be/m659YKUiu80
The strongest part of the bamboo is the outer wall, this side of the mekugi is not really carved at all, everything else is shaped in relation to it. This keeps the strong fibers running the full length of the mekugi on one side. This side of the mekugi must be rotated to face towards the pommel.
The way to identify the outside of the bamboo in a finished mekugi is to look for the full length "lines" (fibers) along one side, or from the end grain view it is the area with the most "dots" (holes) on it. Carving and aligning the mekugi this way maximizes the strength and puts it where most needed, at the point where tang is forced against it.
http://islandblacksmith.ca/process/
179
views
TLDW #14 - Carving a mekugi and Mountain Kotanto final assembly
**WARNING: This is the longer process version intended for serious students of knifemaking. Watch the overview edit here: https://youtu.be/Qi6RAGUvbsk Full knife build overview here: https://youtu.be/1VqXZgLwnRo
Drilling the mekugi-ana and hand carving a bamboo mekugi peg for the largest of the Tools for Satoyama kotanto. Final assembly and photos of the finished work.
The strongest part of the bamboo is the outer wall, this side of the mekugi is not really carved at all, everything else is shaped in relation to it. This keeps the strong fibers running the full length of the mekugi on one side. This side of the mekugi must be rotated to face towards the pommel.
The way to identify the outside of the bamboo in a finished mekugi is to look for the full length "lines" (fibers) along one side, or from the end grain view it is the area with the most "dots" (holes) on it. Carving and aligning the mekugi this way maximizes the strength and puts it where most needed, at the point where tang is forced against it.
http://islandblacksmith.ca/process/
5
views
Satetsu - testing iron sand, skimboarding bladesmith edit
Collecting and testing some local iron sand (magnetite) at the beach using a harddrive magnet. These samples were collected as west coast additions to soulsmith Pierre Nadeau's satetsu archive. Bonus summer skimboard footage thanks to a couple of friends who stopped by to enjoy the beach.
additional footage thanks to dan king and crow~san
watch dan's skimboard edit here: https://youtu.be/udAXDnRkfYI?t=2m54s
pierre's soulsmithing channel: https://www.youtube.com/user/Soulsmithing
10
views
TimeWarp #7 - Lacquering with natural urushi, Mountain Kotanto
Cord wrapping and using natural urushi lacquer to finish a satoyama style tanto made from reclaimed materials. (4x)
Serious students of the forge can watch the full process version here: https://youtu.be/dGVCgaF7IYA Full knife build overview here: https://youtu.be1VqXZgLwnRo
The abrasive plant material used for fine sanding/polishing is dried tokusa (polishing grass), known as horsetail in english...the plant cells contain silica and it can be used dried as is or glued to wooden blocks with sokui.
More about the process of making this knife here: http://islandblacksmith.ca/2016/08/process-making-the-mountain-kotanto/
1.92K
views

TLDW #13 - Mountain Kotanto natural urushi lacquering
**WARNING: This is the longer process version intended for serious students of knifemaking. Watch the overview edit here: https://youtu.be/kUdy_UjaD9U
Cord wrapping and using natural urushi lacquer to finish a Tools for Satoyama style tanto made from reclaimed materials. Full knife build overview here: https://youtu.be1VqXZgLwnRo
The abrasive plant material used for fine sanding/polishing is dried tokusa (polishing grass), known as horsetail in english...the plant cells contain silica and it can be used dried as is or glued to wooden blocks with sokui.
More about the process of making this knife here: http://islandblacksmith.ca/2016/08/process-making-the-mountain-kotanto/
12
views
TimeWarp #6 - Making a Saya for the Mountain Kotanto
Hand carving a Tools for Satoyama saya (scabbard) in the classical tanto style, made from scrap Nootka Cypress wood with maple kurikata. (4x) Full build overview: https://youtu.be/1VqXZgLwnRo
Serious students of the forge can watch the full process version here: https://youtu.be/JvLFrP6DNhE
Sokui is rice paste glue, the best tasting rice makes the best glue...using yesterday's rice is the optimal time for mixing and mashing completely before adding any water is recommended...read more about sokui here...
making: http://islandblacksmith.ca/2015/10/making-sokui-rice-paste-glue/
strength testing: http://islandblacksmith.ca/2014/03/sokui-rice-paste-glue-strength-testing/
The next step will be cord wrapping and finishing with natural urushi lacquer.
More about the process of making this knife here: http://islandblacksmith.ca/2016/08/process-making-the-mountain-kotanto/
1.58K
views

TLDW #12 - Hand Carving a Saya for the Mountain Kotanto
**WARNING: This is the longer process version intended for serious students of knifemaking. Watch the overview edit here: https://youtu.be/pzBdiFHBADk
Full build overview: https://youtu.be/1VqXZgLwnRo
Hand carving a Tools for Satoyama saya (scabbard) in the classical tanto style, made from scrap Nootka Cypress wood with maple kurikata.
Sokui is rice paste glue, the best tasting rice makes the best glue...using yesterday's rice is the optimal time for mixing and mashing completely before adding any water is recommended...read more about sokui here...
making: http://islandblacksmith.ca/2015/10/making-sokui-rice-paste-glue/
strength testing: http://islandblacksmith.ca/2014/03/sokui-rice-paste-glue-strength-testing/
The next step will be cord wrapping and finishing with natural urushi lacquer.
More about the process of making this knife here: http://islandblacksmith.ca/2016/08/process-making-the-mountain-kotanto/
2
views
TLDW #11 - Hand Carving a Tsuka for the Mountain Kotanto
**WARNING: This is the longer process version intended for serious students of knifemaking. Watch the TimeWarp edit here: https://youtu.be/jVe5DsMUTtM
Hand carving a Tools for Satoyama Mountain Kotanto tsuka (handle core) in the classical tanto style, made from scrap Nootka Cypress wood.
Full build overview: https://youtu.be/1VqXZgLwnRo
Sokui is rice paste glue, the best tasting rice makes the best glue...using yesterday's rice is the optimal time for mixing and mashing completely before adding any water is recommended...read more about sokui here...
making: http://islandblacksmith.ca/2015/10/making-sokui-rice-paste-glue/
strength testing: http://islandblacksmith.ca/2014/03/sokui-rice-paste-glue-strength-testing/
More about the process of making this knife here: http://islandblacksmith.ca/2016/08/process-making-the-mountain-kotanto/
3
views

TimeWarp #5 - Making a Tsuka for the Mountain Kotanto
Hand carving a Tools for Satoyama tsuka (handle core) in the classical tanto style, made from scrap Nootka Cypress wood. (4x) Full build overview: https://youtu.be/1VqXZgLwnRo
Serious students of the forge can watch the full process version here: https://youtu.be/rPPFoQ1I_oQ
Sokui is rice paste glue, the best tasting rice makes the best glue...using yesterday's rice is the optimal time for mixing and mashing completely before adding any water is recommended...read more about sokui here...
making: http://islandblacksmith.ca/2015/10/making-sokui-rice-paste-glue/
strength testing: http://islandblacksmith.ca/2014/03/sokui-rice-paste-glue-strength-testing/
More about the process of making this knife here: http://islandblacksmith.ca/2016/08/process-making-the-mountain-kotanto/
1.23K
views
Crossed Heart Forge - デイブ・フリーゼン – 鍛冶屋 - by Stria
Thanks to the amazingly talented crew who generously came all the way out to the forge on an epic and misty weekend and created this video as part of a design directed study in interactive art and technology at SFU. (2013)
________________
Dave is a maker and blacksmith based out of Vancouver Island BC. He works entirely with hand tools through each step as he believes traditional tools and methods are just as useful, if not more reliable, than modern technology. Each piece is handmade, every knife Dave creates is entirely unique - from the raw steel he chooses, to the marks and grooves left from the hammering and hardening process.
The Maker: Dave J Friesen of Crossed Heart Forge
Experience his Story: makersofstria.com/makers/CrossedHeartForge
Directed & Produced by Stria Productions : makersofstria.com
Ariana de Ryss
Trevor Komori
Jeffrey Qua
Sean Brouwer
Liam Leyland
Elisa Dametto
Music: brokeforfree.com
Japanese Translation: Tamaki Zushi
https://vimeo.com/81585710
______________
日本の刀鍛冶に魅了され、1990年からナイフを作りはじめる。スタイルは影響を受けた、アフリカ、北アメリカ、アジアでの文化とアートの融合。
ナイフや刃物のデザイン、仕上げ方法などは日本式を取る一方、キッチン用品などはアメリカのアーミッシュ(近代以前の生活様式を基本に自給自足の生活をする人たちのグループ)の鍛冶屋から基礎を学んだため、シンプルで素朴なスタイルが多い。
作られる前と後とのギャップを楽しむため、使い古された道具、いらなくなった農耕機具、製材所機器などを再利用して全ての作品が作られている。燃料となる木炭も廃材から手作りでできている。
高炭素鋼を日本の粘土焼き戻し工程を経て、刃物に作り上げている。質の高い刃物とそのユニークなスタイルから人気を得る。現在はバンクーバー島にある工房にて作品製作に励む。
続きを読む - http://islandblacksmith.ca/%e3%83%87%e3%82%a4%e3%83%96%e3%83%bb%e3%83%95%e3%83%aa%e3%83%bc%e3%82%bc%e3%83%b3-%e9%8d%9b%e5%86%b6%e5%b1%8b-%e3%82%ab%e3%83%8a%e3%83%80%e3%81%a7%e4%bd%9c%e3%82%89%e3%82%8c%e3%82%8b%e7%9f%ad/
3.11K
views
TLDW #10 - Mountain Kotanto Yaki-Ire, traditional swordsmith style
**WARNING: This is the longer process version intended for serious students of knifemaking. Watch the overview edit here: https://youtu.be/1VqXZgLwnRo Traditional clay/charcoal/water yaki-ire, differential hardening a classical tanto style kotanto blade forged from a reclaimed harrow tooth. Watch the forging here: https://youtu.be/IXvVUHmsnaA
The wedged wooden staple vise is called sen dai, named for the sen scraper it is often used for. As this will be a tsuchime (hammer finished) blade, only the bevel area is shaped and drawfiled before yaki ire.
The spine and body of the blade are coated with a thin layer of the clay mixture to insulate and slow down the cooling while the edge and tip are coated in a very thin slip layer which actually cools faster than bare steel and protects from oxidation.
The clay is a mixture of perhaps thirds of natural clay, crushed charcoal, and polishing stone powder. Each smith has their own recipe but the basics are the same...natural clay: to make it stick, polishing stone powder: to keep it from shrinking and cracking when it dries, and charcoal powder: to keep it from cracking when it is heated...knowing these properties allows a smith to make adjustments as needed.
Heated differentially in the charcoal forge with air provided by fuigo box bellows, the edge faces up for the initial heating and is flipped down when the temperature begins to approach but has not reached critical. Carefully observing the temperature and constantly moving to avoid over-heating and hot spots, once the edge-third reaches an even critical temperature the blade is quenched quickly in warm rainwater until cool. The tang is not heated or hardened and can be drilled later for the mekugi-ana.
A coarse synthetic Japanese stone is used to reduce the edge and then coarse and finer diamond stones were used to establish and polish the bevels.
Footage of making the guard was sparse due to battery issues so it is tacked it on the end rather than as a separate video. A quarter of a silver-plated copper washer from a bus bar was forged down and then drifted with the nakago-ana punch, filed to fit the tang, shaped and peened to finish.
More about the process of making this knife here: http://islandblacksmith.ca/2016/08/process-making-the-mountain-kotanto/
________________________
more on yaki-ire...
Process of Clay Tempering a Tanto Blade
http://islandblacksmith.ca/process/yaki-ire-clay-tempering/
Once the steel is shaped as much as possible in its softer state, it is coated with a thin layer of clay along the edge and a thicker layer on the body and spine. During the hardening process, the split second difference in cooling time caused by the clay layer creates two different hardness areas in the same piece of steel. The edge cools faster and forms a very hard steel structure called martensite while the body cools slower and forms a very tough steel structure made of ferrite and pearlite. The boundary between these two areas is called hamon and is commonly seen as a frosted wavy line down the length of a polished sword blade.
When the clay is fully dry, a charcoal fire is used to heat the steel slowly and evenly, taking care not to overheat any part of it and working in the dark for accurate colour viewing. First the spine is heated to bring the whole blade to just below temperature, and then it is flipped over to focus heat on the edge. When the entire edge is at the correct temperature, it is plunged into a hot water bath, edge down, and held until cool (yaki-ire). The hardness is checked with a file and the process repeated if necessary. After hardening, the clay is removed and the steel is heated slightly again to remove some of the internal stresses (yaki-modoshi). Once this process is finished, and if the steel survives, the blade is ready for Togi, hand polishing.
http://islandblacksmith.ca/process/
more:
5.07K
views
TLDW #9 - Forging a Mountain Kotanto from a Harrow Tooth
**WARNING: This is the longer process version intended for serious students of knifemaking. Watch the TimeWarp here: https://youtu.be/IXvVUHmsnaA and the full build overview edit here: https://youtu.be/1VqXZgLwnRo
Hand forging a satoyama kotanto style blade from a reclaimed harrow tooth. This is part of a full build series for this knife.
More about the process of making this knife here: http://islandblacksmith.ca/2016/08/process-making-the-mountain-kotanto/
More about the project:
Satoyama are the managed forest areas that border the cultivated fields and the mountain wilds in Japan. Historically they provided soil nutrients, firewood, edible plants, mushrooms, fish, and game, and supported local industries such as farming, timber construction, and charcoal making. Balancing the interaction of wetlands, streams, forests, and fields is an important component of the satoyama landscape and allows for sustainable use of the rich resources they offer.
The Tools for Satoyama project is inspired by this mutually beneficial interaction between humans and the natural world, a robust way of life that sustained both for centuries. Among the goals of the project are contributing to the growing awareness of the satoyama concept, sustainable practices, thoughtful approaches to intentional living, and related historical learning.
The four styles of kotanto knives designed for the project are named for the four main areas found within the satoyama landscape: stream, field, forest, and mountain. In addition, the forest and mountain models also come in a full sized tanto configuration. Some of the core characteristics of the knives produced for this project are the reclaimed and natural source materials, use of traditional techniques, and a humble and simple style of carving and finishing.
A clay tempered blade hand forged in a charcoal fire, water quenched with clay, sharpened with waterstones, and finished simply and humbly in the age-old style of farming and foresting tools traditionally used in managing satoyama lands.
Read more about satoyama: http://islandblacksmith.ca/2016/03/tools-for-satoyama/
Design your own knife here: http://islandblacksmith.ca/design-your-own-knife-tools-for-satoyama/
30
views
TimeWarp #4 - Forging a Mountain Kotanto from a Reclaimed Harrow Tooth
Hand forging a satoyama kotanto style blade from a reclaimed harrow tooth. (4x)
Overview of the full knife build: https://youtu.be/1VqXZgLwnRo
Serious students of the forge can watch the full process version here: https://youtu.be/0tFPLH05Aqc
More about the process of making this knife here: http://islandblacksmith.ca/2016/08/process-making-the-mountain-kotanto/
More about the project:
Satoyama are the managed forest areas that border the cultivated fields and the mountain wilds in Japan. Historically they provided soil nutrients, firewood, edible plants, mushrooms, fish, and game, and supported local industries such as farming, timber construction, and charcoal making. Balancing the interaction of wetlands, streams, forests, and fields is an important component of the satoyama landscape and allows for sustainable use of the rich resources they offer.
The Tools for Satoyama project is inspired by this mutually beneficial interaction between humans and the natural world, a robust way of life that sustained both for centuries. Among the goals of the project are contributing to the growing awareness of the satoyama concept, sustainable practices, thoughtful approaches to intentional living, and related historical learning.
The four styles of kotanto knives designed for the project are named for the four main areas found within the satoyama landscape: stream, field, forest, and mountain. In addition, the forest and mountain models also come in a full sized tanto configuration. Some of the core characteristics of the knives produced for this project are the reclaimed and natural source materials, use of traditional techniques, and a humble and simple style of carving and finishing.
A clay tempered blade hand forged in a charcoal fire, water quenched with clay, sharpened with waterstones, and finished simply and humbly in the age-old style of farming and foresting tools traditionally used in managing satoyama lands.
Read more about satoyama: http://islandblacksmith.ca/2016/03/tools-for-satoyama/
Design your own knife here: http://islandblacksmith.ca/design-your-own-knife-tools-for-satoyama/
2.06K
views
SOTW #14 - Tools for Satoyama Project - Mountain Kotanto
An introduction to the Tools for Satoyama project with an overview of the process for making a Mountain Kotanto. More detailed videos of the procedure to follow, total build time was about 40 hours over 3 months...forging TimeWarp: https://youtu.be/IXvVUHmsnaA
More about the process of making this knife here: http://islandblacksmith.ca/2016/08/process-making-the-mountain-kotanto/
more about the project:
Satoyama are the managed forest areas that border the cultivated fields and the mountain wilds in Japan. Historically they provided soil nutrients, firewood, edible plants, mushrooms, fish, and game, and supported local industries such as farming, timber construction, and charcoal making. Balancing the interaction of wetlands, streams, forests, and fields is an important component of the satoyama landscape and allows for sustainable use of the rich resources they offer.
The Tools for Satoyama project is inspired by this mutually beneficial interaction between humans and the natural world, a robust way of life that sustained both for centuries. Among the goals of the project are contributing to the growing awareness of the satoyama concept, sustainable practices, thoughtful approaches to intentional living, and related historical learning.
The four styles of kotanto knives designed for the project are named for the four main areas found within the satoyama landscape: stream, field, forest, and mountain. In addition, the forest and mountain models also come in a full sized tanto configuration. Some of the core characteristics of the knives produced for this project are the reclaimed and natural source materials, use of traditional techniques, and a humble and simple style of carving and finishing.
A clay tempered blade hand forged in a charcoal fire, water quenched with clay, sharpened with waterstones, and finished simply and humbly in the age-old style of farming and foresting tools traditionally used in managing satoyama lands.
Read more about satoyama: http://islandblacksmith.ca/2016/03/tools-for-satoyama/
_________
About this knife:
Forged from a reclaimed harrow tooth, the blade profile of the mountain style kotanto is based on a kamakura sword and has more pronounced belly with slight drop point. The temper of this high carbon steel blade has been left relatively hard in order to hold a keen edge for tasks such as wood carving and hand work. This particular combination of steel and heat treatment is well suited to users who require a good edge and are willing to take care of it.
The tang is constructed in a similar manner to a Japanese sword requiring only a single bamboo peg to hold the knife assembly together. In addition to the sense of beautiful simplicity, this design allows the knife to be taken apart for cleaning, polishing, detailed cutting tasks, or major resharpening work.
The handle and scabbard are carved from local Nootka Cypress and finished with natural urushi lacquer. The handle is wrapped with cotton cord and then lacquered and the scabbard is finished with traditional ishimeji (stone texture) made with urushi and crushed tea leaves. A forged copper guard and removable peg carved from Bamboo complete the handle.
The blade is just under 5.75″ long and the overall length is about 10.25″. The spine at the munemachi is about 5mm thick.
Specifications
Nagasa (blade length): 144mm
Motokasane (blade thickness): 5mm
Motohaba (blade width): 30mm
Sori (curve): uchizori
Nakago (tang): 102mm
Tsuka (handle): 110mm
Koshirae (overall): 285mm
Katachi (geometry): hira-zukuri, kaku-mune
Hamon (edge pattern): suguha
Boshi (tip pattern): maru
Nakago (tang): futsu, kuri-jiri, one mekugi-ana, signed near the tip
Mei (signature): hot stamped katabami-ken kamon
Koshirae (mounting): satoyama hamidashi style, issaku
Materials: reclaimed harrow tooth steel, copper electrical washer, Nootka Cypress, Maple, cotton cord, natural urushi lacquer, tea leaves, Bamboo
design your own knife here: http://islandblacksmith.ca/design-your-own-knife-tools-for-satoyama/
235
views
One last look at the old blacksmith workshop - baby birds extended edit
This summer I had an opportunity to revisit the site of my first workshop more than a decade later...my dad built the barn shed in the early 1980's from reclaimed wood and clad it in 50-year-old barnboard from one of my grandpa's graineries (look for a shot of the interesting interlocking profile of the boards at 2:23)...my first shop was outside in a lean-to under a tree in 1992, and in 1995 i moved into the shed...the last time i worked in that space was probably 2002 or so...
i took some video so i could remember the space and some of the details...the space is approximately 8'x12', the building sits on 2 skids (it has been transported to new locations by trailer a couple of times in the last three decades) and has an antique window installed in the back wall...
the concrete blocks and sheet metal (from the lean-to) around the forge area are still there, the siding has always been weathered and grey (the previous owners stained the front a few years ago and gave it a brownish tinge, the grey is original), the roof is in need of some work (35 years is pretty good!) and one pane of the glass is missing, but the rest of it is still going strong...the tree under which the lean-to stood has been cut down (1:11)...bonus footage of the current tenants on the top floor ^___^
i brought the single inside door pull home as a souvenir of the shop and that era of my work... (2:18)
see the current workshop here: http://islandblacksmith.ca/forge/
72
views
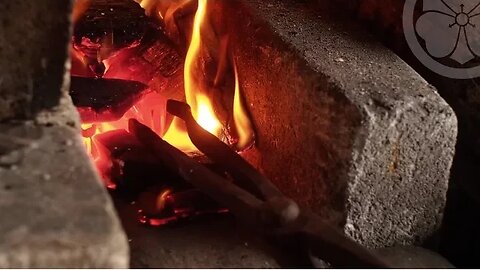
Silver Soldering Habaki with a Charcoal Forge & Fuigo
A clip from yesterday's work: silver soldering a habaki with the charcoal forge & fuigo box bellows. Watch the machigane area and you can see the solder begin to melt and flow around 0:40 until it is pulled out to stop the heating. The fuigo allows very precise air mix and heat control. When soldering habaki this way, some points are:
ensuring the fit is very tight (solder does not fill gaps),
cleaning the metal surfaces well to remove oxide and contaminants,
using a flux to prevent oxidation while heating (in this case borax and water),
forming a charcoal "oven" away from the direct air blast,
controlling the airflow for a reducing environment,
heating just to the flow temperature,
removing from the heat immediately,
allowing to slowly cool in air,
pickling off any remaining flux in vinegar before fitting to the blade.
Note that silver solder (more accurately known as silver brazing or silver welding) is not at all related to electronics or plumbing solder, it is made from mostly silver and copper and requires far more heat and a different flux. In this technique the filler material actually forms a new alloy with the parent metals (similar to welding). It is more difficult to achieve but the results are very different and much stronger than lead or tin based solder joints.
The wire that binds the parts together, provides tension while heating, and forms the stand is scrap bits of rusted steel wire, the oxide scale or rust helps prevent the solder from sticking and making it one with the habaki.
http://islandblacksmith.ca/2016/07/silver-soldering-habaki-charcoal-forge-fuigo/
learn more about the historical knifemaking process: http://islandblacksmith.ca/process/
learn more about making habaki: http://islandblacksmith.ca/process/making-habaki/
886
views
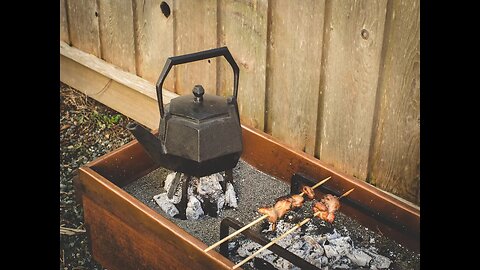
Edo Style Hibachi and fire tools - Japanese Charcoal Barbeque & Tea
Summer preparations for the Edo style hibachi ( 火鉢, charcoal bowl) used outdoors as a shichirin to cook food as well as make tea. Nothing has quite the flavour of slow cooked charcoal grilled food!
火箸 hibashi - fire chopsticks (to arrange the charcoal)
灰均し hainarashi - ash leveler (to rake ash and arrange sand)
鉄五徳 gotoku - tea kettle trivet (stand for a tetsubin kettle or teapot)
(the cast iron kettle/teapot has been in the family for a couple of generations, a gift from japan mom, charcoal is handmade from hardwood in our charcoal kiln)
Wire brushing the loose rust off, oiling with a coat of 100% pure tung oil, checking the bamboo nails, cleaning the Black Walnut box and copper lining, refilling the sand, and inserting the stand and trivet.
Take some time for slow food, enjoy the sea air and the company!
12
views

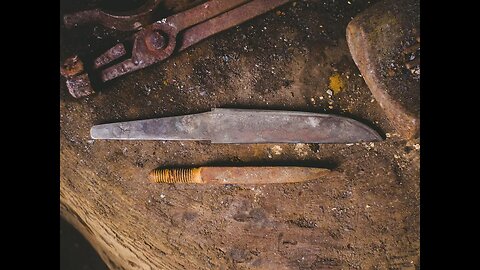
TLDW #8 - Tanto Forging Practice: Railroad Spike
**WARNING: This is the longer process version intended for serious students of knifemaking. Watch the overview edit here: https://youtu.be/eI883cfBoIE
Hand forging a classical tanto style blade study from a reclaimed railroad spike and a tsuba from the spike head...a serious letter opener? The goal is to use all of the steel by moving it into place.
This project was intended as purely a forging exercise to inspire those wishing to learn hand forging of sunobe and tanto, using an available source of scrap steel in a conveniently sized and shaped billet ("forge 10 of these and call me in the morning"). However as research into the composition and characteristics of railroad spike steel it has raised some interesting points which may lead to further research into koto swords.
First a note…
Don’t mess with the railway…if you don’t already have a spike this is not the practice material for you. The goal of this project is to use a material already on hand.
A review of some points...
High Carbon?
A railroad spike will never be "high carbon steel" as the accepted definition is that there is more than .5 or .6% carbon in high carbon steel (there are "higher carbon" versions of older spikes, but the official specs say they never pass .3% carbon)
Hardness?
A railroad spike with ~.2% carbon can be hardened with a water quench to about a maximum of 50HRC, this is not hard enough for most uses as a knife, however it is at the low end of axe hardness, harder than mild steel which maxes out around 40HRC. Additionally, many old koto and earlier swords have ~.4% carbon, which can be hardened to around 60HRC but does not meet the definition of "high carbon steel"...a further note, i did a quick hitatsura (no clay) differential quench on this piece and it gained a fair amount of sori (curvature), which i did not expect from this steel...
Toughness?
For most applications it seems the best approach with a spike is to water quench and not temper at all, in order to stay at the maximum hardness for the carbon content. A spike heat treated in this way will still not quite pass the break test, meaning there is plenty of toughness at the full hardness.
Recommendations
I still do not recommend making knives from this material other than for personal use or novelty purposes. However, as a material for a spear or sword that would excel in the bronze or early iron age, or as a tool for the forge the material is far better than mild steel or wrought iron when heat treated properly.
Railroad spikes are a good source of material for those wishing to practice and improve forging of classical tanto without wasting high carbon steel...
The final blade dimensions are 10.75" (274mm) long and 1 1/8" (29mm) by just over 1/4" (7mm) at the mune machi...point to tang tip is 15".
長さ/刃長 Nagasa: 9 sun 5 rin (274mm)
元幅 Motohaba: 9 bu 5 rin (29mm)
重ね/元重 Motokasane: 2 bu 5 rin (7mm)
反り Sori: 1 bu 2 rin (3.5mm)
中心/茎 Nakago: 3 sun 5 bu (117mm)
形 Katachi: hira-zukuri, iori-mune
中心/茎 Nakago: futsu, kuri-jiri, one mekugi-ana
銘 Mei: mumei
Read more: http://islandblacksmith.ca/2016/07/tanto-forging-practice-railroad-spike/
A chart comparing carbon content and maximum possible hardness:
https://books.google.ca/books?id=fVIlbCFTodgC&pg=PA45&dq=%22However,+the+hardness+in+the+region+of+the+curves+representing+the+formation+of+all+martensite+will+be+determined+essentially+only+by+the+carbon+content+of+the+martensite.%22&hl=en&sa=X&ved=0ahUKEwjavNvfzeLNAhVX9WMKHcl6CxYQ6AEIHjAA#v=onepage&q=%22However%2C%20the%20hardness%20in%20the%20region%20of%20the%20curves%20representing%20the%20formation%20of%20all%20martensite%20will%20be%20determined%20essentially%20only%20by%20the%20carbon%20content%20of%20the%20martensite.%22&f=false
3.03022 cm
= 0.1 shaku(尺)
= 1 sun(寸)
= 10 bu(分)
= 100 rin(厘)
385
views

TimeWarp #3 - Tanto Forging Practice: Railroad Spike
Hand forging a classical tanto style blade study from a reclaimed railroad spike and a tsuba from the spike head...a serious letter opener? (4x) The goal is to use all of the steel by moving it into place.
Serious students of the forge can watch the full process version here: https://youtu.be/0qU9wg_DVaY
This project was intended as purely a forging exercise to inspire those wishing to learn hand forging of sunobe and tanto, using an available source of scrap steel in a conveniently sized and shaped billet ("forge 10 of these and call me in the morning"). However as research into the composition and characteristics of railroad spike steel it has raised some interesting points which may lead to further research into koto swords.
First a note…
Don’t mess with the railway…if you don’t already have a spike this is not the practice material for you. The goal of this project is to use a material already on hand.
A review of some points...
High Carbon?
A railroad spike will never be "high carbon steel" as the accepted definition is that there is more than .5 or .6% carbon in high carbon steel (there are "higher carbon" versions of older spikes, but the official specs say they never pass .3% carbon)
Hardness?
A railroad spike with ~.3% carbon can be hardened with a water quench to about a maximum of 55HRC, this is not as hard as most knives, however it is about an axe hardness, much harder than mild steel which maxes out around 40HRC. Additionally, many old koto and earlier swords have ~.4% carbon, which can be hardened to around 60HRC but does not meet the definition of "high carbon steel"...a further note, i did a quick hitatsura (no clay) differential quench on this piece and it gained a fair amount of sori (curvature), which i did not expect from this steel...
Toughness?
For most applications it seems the best approach with a spike is to water quench and not temper at all, in order to stay at the maximum hardness for the carbon content. A spike heat treated in this way will still not quite pass the break test, meaning there is plenty of toughness at the full hardness.
Recommendations
I still do not recommend making knives from this material other than for personal use or novelty purposes. However, as a material for a spear or sword that would excel in the bronze or early iron age, or as a tool for the forge the material is far better than mild steel or wrought iron when heat treated properly.
Railroad spikes are a good source of material for those wishing to practice and improve forging of classical tanto without wasting high carbon steel...
The final blade dimensions are 10.75" (274mm) long and 1 1/8" (29mm) by just over 1/4" (7mm) at the mune machi...point to tang tip is 15".
長さ/刃長 Nagasa: 9 sun 5 rin (274mm)
元幅 Motohaba: 9 bu 5 rin (29mm)
重ね/元重 Motokasane: 2 bu 5 rin (7mm)
反り Sori: 1 bu 2 rin (3.5mm)
中心/茎 Nakago: 3 sun 5 bu (117mm)
形 Katachi: hira-zukuri, iori-mune
中心/茎 Nakago: futsu, kuri-jiri, one mekugi-ana
銘 Mei: mumei
Read more: http://islandblacksmith.ca/2016/07/tanto-forging-practice-railroad-spike/
A chart comparing carbon content and maximum possible hardness:
https://books.google.ca/books?id=fVIlbCFTodgC&pg=PA45&dq=%22However,+the+hardness+in+the+region+of+the+curves+representing+the+formation+of+all+martensite+will+be+determined+essentially+only+by+the+carbon+content+of+the+martensite.%22&hl=en&sa=X&ved=0ahUKEwjavNvfzeLNAhVX9WMKHcl6CxYQ6AEIHjAA#v=onepage&q=%22However%2C%20the%20hardness%20in%20the%20region%20of%20the%20curves%20representing%20the%20formation%20of%20all%20martensite%20will%20be%20determined%20essentially%20only%20by%20the%20carbon%20content%20of%20the%20martensite.%22&f=false
3.03022 cm
= 0.1 shaku(尺)
= 1 sun(寸)
= 10 bu(分)
= 100 rin(厘)
430
views
1
comment