Qolsys IQ Panel 4: Use SmartStart to Include Z Wave Devices
In this video, Dylan from Alarm Grid shows you how to use the SmartStart feature to add Z-Wave devices to the Qolsys IQ Panel 4. SmartStart allows a dealer to pre-load Z-Wave devices into a system prior to shipping it to a customer. Then, once the panel is installed and powered on, as each Z-Wave device is installed and powered on, it automatically joins the network.
DIYers can also use this feature to simplify Z-Wave device installation. In order to support SmartStart, the Z-Wave device must support S2 security. That means that the device will be a Z-Wave Plus or higher version product. Devices that support SmartStart will have a QR code on their packaging and should indicate support for the SmartStart feature.
To enroll a Z-Wave device with the Qolsys IQ Panel 4 using SmartStart begin by tapping the gray bar at the top of the panel screen. Select Settings then Advanced Settings. Enter the Installer or Dealer Code (1111 or 2222 respectively, by default). Next choose Installation, then Devices, then Z-Wave Devices, and finally SmartStart.
This will bring up a screen showing the view from the panel's front-facing camera and a number pad. You can either scan the QR Code from the packaging, or from the device itself. Alternatively, you can enter the 40-character DSK code shown on the box. Once the QR code has been picked up by the panel's camera, or the DSK code has been entered, basic information about the device will be shown on the screen. You can edit the device name by tapping the generic name provided and either choosing from the list, or choosing Custom Description and entering whatever you want. Once that's done, press Add.
This takes you to the provisioning list. This is a list of all Z-Wave devices being added using SmartStart and their current status. A status of Not in Network means that the QR Code or DSK has been entered, but the panel has not yet heard from that device. Now, install and/or power on the device. The panel will communicate with it, and will add it to the Z-Wave network. This will change the status in the provisioning list screen to Started, and eventually to Included. At this point, the device has been successfully added to the network and is ready to be used through the panel, and Alarm.com, if the panel is tied to an account with support for Automation.
https://www.alarmgrid.com/faq/how-do-i-use-smart-start-to-enroll-z-wave-on-an-iq-panel-4
-
 4:55
4:55
Alarm Grid Home Security DIY Videos
9 months agoQolsys IQ Panel 4: Program a Z Wave Device
15 -
 4:45
4:45
Alarm Grid Home Security DIY Videos
3 years agoUsing the Smart Start Feature on the Qolsys IQ Panel 2 Plus
13 -
 9:34
9:34
Apache Ranch
2 years agoZ-Wave ● Enbrighten Switch ● How to Install a Smart Switch by Yourself ✅ DIY
26 -
 19:04
19:04
Apache Ranch
3 years agoZ-Wave ● Pair, Reset, Exclude and Configure Dimmer and Relay Switches with SmartThings ✅ Zwave
39 -
 7:40
7:40
Bud's Smart Home
10 months agoZooz Zen51 Dry Contact Relay for the SmartThings Hub
17 -
 1:22:53
Automate Your Life
8 months agoHow To Use Smart Relays - 101 (Featuring The NEW Aqara Relay Module T2)
36 -
 4:11
4:11
Apache Ranch
3 years agoZ-Wave ● Enbrighten Outdoor Smart Plug Overview ✅ ● Jasco GE Honeywell ZWave Zigbee
63 -
 14:24
14:24
4Crawler
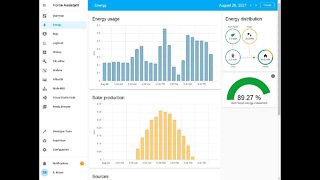
2 years agoHome Assistant Energy Dashboard With Vera/Z-Wave Sensors
37 -
 9:48
9:48
Electrician U
3 years agoHow To Install a SMART ENERGY MONITOR in Your ELECTRICAL PANEL
30 -
 9:46
9:46
Top Homeowner
3 years agoHow to Install a Smart Deadbolt - Kwikset 914 Z-Wave Deadbolt with Smartkey
5