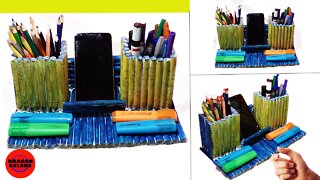
DIY pencil box with water bottle, How to make cute pencil box from waste bottle easy home way.
Welcome back to [Your YouTube Channel Name]! In today's video, we're going to show you an eco-friendly and adorable way to upcycle a waste water bottle into a charming pencil box. This fun and easy DIY project is perfect for all ages, and it's a fantastic way to give new life to old materials.
In this step-by-step tutorial, we'll guide you through the creative process, providing clear instructions and tips along the way. You'll be amazed at how simple and cost-effective it is to transform a discarded water bottle into a functional and stylish pencil box.
Materials you'll need:
Empty water bottle
Craft paper or decorative wrapping paper
Scissors
Glue or Mod Podge
Paintbrush
Craft knife
Markers, stickers, or other decorative elements
Join us as we turn trash into treasure with this exciting DIY project! Don't forget to hit that subscribe button and give us a thumbs up if you enjoy this video. Let's get crafting and make a difference together! 🌟✏️💧 #DIYPencilBox #CraftyCreations #UpcyclingIdeas
DIY pencil box with water bottle, How to make cute pencil box from waste bottle easy home way
Sure, I'd be happy to help! Here's a detailed guide on how to make a cute pencil box from a waste water bottle using easy home methods:
How to Make a Cute Pencil Box from a Waste Water Bottle:
Materials Needed:
* Waste water bottle (1.5-2 liters)
* Scissors
* Hot glue gun
* Pencils or pens
* Decorative items (optional)
Step 1: Clean and Prepare the Bottle
Begin by cleaning the water bottle thoroughly with soap and water. Let it dry completely before starting the craft.
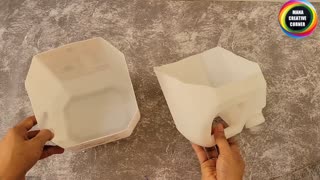
Step 2: Cut the Bottle
Use scissors to cut the bottle in half horizontally. Discard the top half and keep the bottom half with the cap intact.
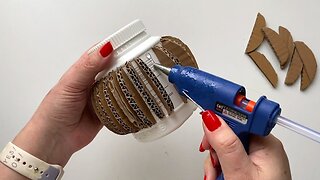
Step 3: Create the Pencil Box
Cut a rectangular shape from the bottom half of the bottle, leaving about 1-2 inches around the edges. This will create the base of the pencil box.
Step 4: Attach the Lid
Use hot glue to attach the cap of the bottle to the top of the rectangular base, creating a hinged lid. Make sure the lid is securely attached to prevent the pencils from falling out.
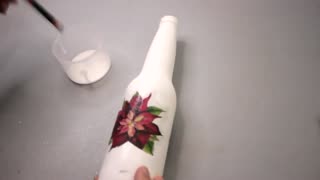
Step 5: Add Decorations (Optional)
If you'd like, you can decorate your pencil box with paint, markers, or stickers. You can also add some glitter or sequins to give it a more festive look.
Step 6: Add Pencils or Pens
Insert the pencils or pens into the box, making sure they are securely held in place by the lid.
Step 7: Add a Closure
To keep the pencils or pens from falling out, you can add a small closure such as a rubber band or a piece of tape.
Tips and Variations:
* Use different colors or patterns of water bottles to create a unique and personalized pencil box.
* Add a small compartment or tray to the pencil box to store other craft supplies such as paper clips, erasers, or markers.
* Use a different shape or size of bottle to create a more customized pencil box.
* Add a handle or strap to the pencil box to make it easier to carry.
-
 9:45
9:45
Girl Crafts
9 months ago8 DIY PENCIL HOLDER IDEAS - How to make Pencil Holder with waste cardboard
-
 2:37
2:37
Chanmal
1 year agoHow to make Pen Holder from waste paper | DIY Pen Holder
2 -
 4:16
4:16
Dream Fairy DIY
9 months agoDIY Simple cardboard bottle decor idea
96 -
 9:08
9:08
Crafts & Recycling
10 months agoDIY ♻ 3 Plastic Bottle Ideas 🌼 Easy Crafts 💕 Recycling Ideas 😍 Crafts and Recycling
4 -
 18:15
18:15
Crafts & Recycling
10 months ago🌟Christmas Bottle Decoration Ideas | Easy Home Decorating Ideas 🎄 Christmas Crafts 2020 🎁Recycling
11 -
 2:24
2:24
Dream Fairy DIY
1 year ago $0.35 earnedA simple idea to recycle a plastic bottle. Plastic bottle basket
4292 -
 17:00
17:00
Girl Crafts
9 months ago10 PENCIL CASE and PENCIL HOLDER IDEAS YOU WILL LOVE - Cute and Easy
-
 4:08
4:08
Dream Fairy DIY
1 year agoDIY Plastic bottle recycling | Cardboard craft
55 -
 11:58
11:58
Crafts & Recycling
10 months ago5 Christmas Bottle Decoration Ideas 🎄DIY 🎁 Recycling ♻ Easy Crafts 🌟 Christmas 2020💕
6 -
 1:06
1:06
Mana Creative Croner
10 months agoHow to recycle ♻️ waste detergent bottles | Recycled Craft Idea
6