

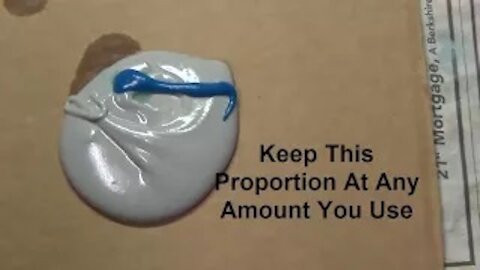
How To Mix Body Filler
How To Mix Body Filler
https://rodsshop.org/how-to-paint-a-car/
Read More information on my Blog Post: https://rodsshop.org/how-do-you-mix-auto-body-filler/
When new to auto body, there are some procedures that are not exactly clear. Many cream body fillers and hardeners instruct you to apply 4 to 5 drops of hardener to a golf ball size of body filler. Well this is insane as the cream hardener doesn’t come out in drops plus it wouldn’t be enough anyway. See how a professional mixes body filler and understand the concept of how temps and weather can effect it.
To learn how the professionals use body fillers and apply them, follow this link so you can learn auto body and paint like a pro within 2 hours. You will get not only a FREE eBook that will practically teach you all you need to know in Auto Body but also a free MIG welding guide book:
https://rodsshop.org/how-to-paint-a-car/
It would be nice if the cans or bottles of body fillers came with pictures or better instructions but they don’t. Temperatures and weather can effect body fillers excessively. On extremely hot summer days, especially dry days, you would use very little hardener in your mix as body filler will cure within 2 minutes even being mixed on the light side.
If the weather is really cold and moist, you may have to mix more hardener than you would think it should have just to get it to harden within 5 minutes.
It is really better to get you mix a little on the hot side, meaning a little too much hardener than too much on the light side. If you do not put enough hardener in your mix and then go apply it, it may never cure up enough to even sand it, you definitely won’t be able to paint over it. On the same note, if you mix way too much hardener in your filler mix, there is a bleach in the hardener and this can come back in your paint jobs later.
The trick is to add just enough hardener where it will harden within about 3 to 5 minutes and become completely sandable in about 15 to 20 minutes. The best practice is to wait at least 30 minutes before sanding and working your fillers after applying them.
https://rodsshop.org/how-do-you-mix-auto-body-filler/
https://rodsshop.org/how-to-paint-a-car/
478
views
2
comments
1994 - 1997 Honda Accord Front Bumper Removal
https://rodsshop.org/auto-body-paint/
This is how you remove the front bumper from a 1994 to 1997 Honda Accord. The most two common reasons you would remove the front bumper are collision damage or to remove the headlamp assemblies.
https://rodsshop.org/auto-body-paint/
As far as I can tell, every video out there on 1994 - 1997 Honda Accord Front Bumper Removal, are 100% wrong. These other videos show that you have to remove the side marker lenses, the grill, some of the actual bolts you should remove. But the most ignorant part is showing to pull and rip the bumper cover from four mounting clips directly under the headlamp assemblies.
Keep in mind, body work rarely ever requires you to break stuff to take it apart. If ripping or breaking things seems to be the method. Stop what you are doing and look for another method. Honda has some pretty good engineers, they made a way for the bumper assembly to come off to access the headlamp assemblies without stretching or breaking things.
I am going to show you how you pull the entire bumper assembly off as a unit before removing the bumper cover skin from the bumper reinforcement. The 1994 - 1997 Honda Accord Front Bumper Removal is an easy task that requires no breaking or ripping anything. So please ignore the other videos that mislead you into tearing things up and making the job harder than it is.
If you would like to know how to tackle a auto body and paint job projects like this. Even if this is a one time project or if you are considering making auto-body a serious hobby or even considering auto-body a profession. You can now learn this trade and all the secrets of getting an eye popping finish from your own home at not even at a fraction of what a school would run you. I am promoting two different courses. One is great for a simple projects and can put you on your way of painting like a pro. The other is a very in-depth course and can teach this skill as a new trade. Check these out:
https://rodsshop.org/auto-body-paint/
https://rodsshop.org/how-to-paint-a-car/
For auto body tools and materials:
https://rodsshop.org/auto-body-tools-and-supplies/
If you are removing the bumper to replace the bumper cover skin, this might be a good idea to replace the headlamp assemblies if they are extremely yellowed or chaffed.
View a Replacement Set Here: https://amzn.to/35TzFgM
This would also be a good time to clear your headlamp lenses if they are not in too bad a shape. You can view one method of clearing yellowed headlamp lenses here: https://rodsshop.org/headlamp-lens-restore-trick/
111
views
1
comment

Toyota Pickup Speedometer Not Working 85-94
https://rodsshop.org/get/online-auto-repair-manuals/
If your 85 to 94 Toyota Pickup speedometer has quit working and doesn't use a cable to drive it, this video should help. After a lot of testing that I pursued based off everyone's lame advice, I found it was the speedometer itself that was the issue. I sent the speedometer off to Atlanta Speedometer to get it repaired.
Here is the Link for the Wiring Schematic for the speedometer and cluster:
https://rodsshop.org/download-85-94-toy-pckup-instrmnt-wir-diagram/
Here is the link for the Speedometer Repair Service Atlanta Speedometer:
https://atlantaspeedometer.com/
After a bit of research and phone calls, I was led to believe that the issue with this 1994 Toyota Pickup was that it had bad wiring, a ground problem or a bad speed sensor. Everyone's reasoning was that if both the speedometer and odometer do not work, the it is an issue with the vehicle. Everyone told me that when the speedometer itself goes bad, that either the speedometer will work but not the odometer or that the odometer will work but not the speedometer.
Well I am her to save you time and money. After a lot of testing, I proved that the cluster was bad and it wasn't the vehicle. I then contacted Atlanta Speedometer and they told me that there are two components that are common to go bad in that year range unit. It was also common for some contacts in the speedometer to become corroded, enough so that they have to be replaced. They charged at the time, $40 plus you have to pay for shipping both ways, to diagnose it. If it needs repaired, the $40 goes to the repair.
I had talked to about 4 different Speedometer repair shops and this one was the most knowledgeable, friendliest and cheapest than all the others. They were super fast on diagnosing the unit and getting it back to me. The whole experience was under $200. If I had went that route in the very beginning, the customer would have had his truck back a lot faster and we would have spent less money. I would suggest not to ever purchase a used one unless you are going to get a written guarantee that if doesn't work, you get your money back.
I have provided the wiring schematic for the instrument cluster:
https://rodsshop.org/download-85-94-toy-pckup-instrmnt-wir-diagram/
However, I would highly recommend getting a full automotive manual that covers everything just in case you have other issues. The best online manuals I have seen to this date and I use quite often in my shop are RepairSurge Manuals:
https://rodsshop.org/get/online-auto-repair-manuals/
115
views