


Treetop fun
Today we will make the top of a wire tree. This is a great project for anyone with time and spare wire on their hands.
Skill level: Beginner to Intermediate
Safety:
-Protective Eyewear
-Leather gloves
Tools:
-Flush cut snips
-Flat needle nose pliers
1/8th inch mandrel (I use a the back end of broken drill bit and hold it I a pin vice, but a steel nail or something else will work too.)
Supplies:
22 gauge wire, I am using brass in this video, but I would recommend aluminum for the beginners as it is softer and much easier on the hands. Copper is great too, with a hardness somewhere between aluminum and brass.
I cut the wire into 35 pieces, you can use more, but using less will leave you a pretty bare looking tree.
Before the filming of this video I have roughly twisted the wires together in the middle and begun separating branches.
The completing of this sculpture will have to be another video, as it is also a fairly time consuming process.
Please let me know what you think of this video in the comments, and if you have any questions I will do my best to answer them as soon as I can!
Feel free to share this with your friends who are looking to learn wire sculpture skills too!
Thanks for supporting my arts!
~lazy dragon
17
views
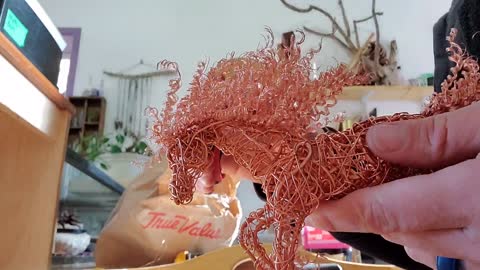
Horse hair how-to
In this video I will demonstrate my method of sculpting curly hair from copper wire for sculpture.
Skill level: beginner to intermediate
Safety: snipping fine gauge wire can cause bits to go flying. Always wear safety glasses and never trim wire in carpeted or upholstered areas as the tiny pieces of wire can become very painful splinters. Yes, they can.
Tools you will need:
sharp flush cut snips
1/8th inch wood dowel
A wooden ruler or some thing flat to wrap your wire around
Supplies you will need:
30 gauge copper wire
A wire sculpture frame/body
Description:
Start by preparing your ruler or other flat, hard surface to wrap your wire around. I use a wooden ruler with a pair of small copper strips taped on. A quilter's square will also work, so long as the surface is hard and will not catch the wire.
Wrap the wire around your ruler prongs at least 4 full wraps. Snip the wire loose from the spool and remove the wire from the ruler carefully so as to keep it straight. Twist about a half inch of each of the looped ends tightly together, this will prevent tangling and provide sort of a needle for weaving through the frame.
Pass the wire bundle at least twice through the frame and pull taught at roughly the midway point of the wire bundle. This will leave you with two hair bundles securely attached to the frame.
Starting at the twisted end of a hair bundle, wrap the wire around your dowel. I use wood because it "grabs" the wire making it easier to wrap. Roll the wire around stick down to the frame. Remove dowel.
Tease the hair bundles out to the approximate length you desire. Trim the twisted ends to free the individual strands. The hair can them be shaped and styled to the final desired product.
Thanks for your support! Please let me know how I can improve my videos/tutorials, and please let me know if you have any questions!
125
views
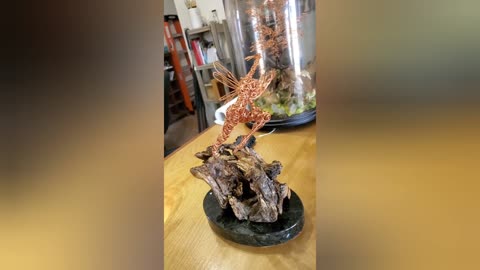
Making the fairy spin!
This is how I finished this fairy sculpture to make her spin freely...
Step one: make a sculpture
Step two: select a place on your sculpture to be the pivot point. In this case, I wanted her to look like she is floating above the base, so I used her right foot as the place to pivot from.
Step 3: find the material you'll be using as a base. Here I used a piece of driftwood, cleaned and sealed with polyurethane, which I epoxy glued to a finished marble base.
Step 4: select a piece of metal tubing that just fits your pivot wire.
Step 5: drill a hole slightly larger than the piece of tubing. In order for the sculpture to spin freely, this hole must be drilled perfectly vertical.
Step 6: set the tubing in the hole with epoxy glue and trim the excess tubing from the top of the base material. Let dry before installing the sculpture into the base.
That's it! If you have any questions about this or other processes, please let me know in the comments!
Thanks!
25
views
2
comments