

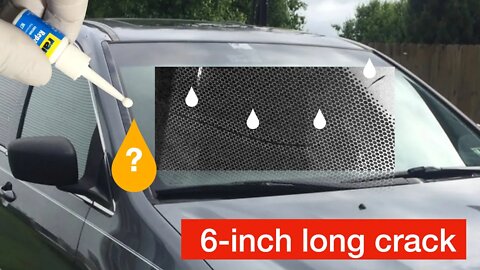
Windshield Long Crack Repair with RainX Kit: Does it work?
# Windshield Long Crack Repair
## Purpose
With a 6-inch long crack on the windsheild, hope the repair will:
1. make it less visible;
2. stop the growth of the crack;
## Supply
* RainX Windshield Repair Kit (resin bottle)
https://www.rainx.com/product/rain-x-windshield-repair-kit/
which comes with:
1. Resin bottle, x1
2. Curing strips
3. Razor blade
No affiliation. I chose it because it includes "long crack" in its product description and instructions.
## Steps
1. Mark the crack from inside.
2. From outside/above, apply resin VERY slowly along the crack.
3. Move at the speed for the crack line to disappear (not as visible).
4. Reapply resin wherever necessary.
5. Apply a small amount of pressure on the crack, from inside in the car.
1. just encough pressure
2. on both sides and center of crack
3. to help reduce air pockets
6. Move the car outside, under the sun, and let it cure for 10 minutes or so.
1. Or you may use a curing light.
7. After it is cured, remove the curing strips.
8. Use the provided razor blade to scratch off cured resin on the glass surface.
9. Check crack visually.
## Notes
+ It is a cloudy day and I leave the windshield hours to cure.
+ Crack is much harder to see after the repair.
+ One month after the repair, the crack remains the same size.
## Question
Not sure how long the repair will hold up, but will report back in a year or so.
--
Be safe. Stay dirty. Enjoy the work!
God bless!
22
views
Toyota Lexus - 3 Ways to "Service" Mode for Rear Brakes with EPB
# Toyota Lexus Rear Brakes with EPB: 3 Methods to Enter the Service Mode
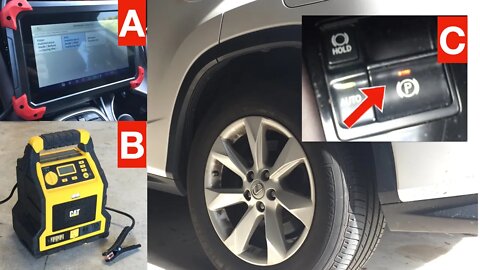
Rear brake service on a 2017 Lexus RX350 AWD Base model
## Tools
These are options:
1. Bidirectional scan tool, OR
2. If you have a recent Toyota/Lexus models that supports a simple procedure, OR
3. 12 V DC battery
## Safety and Preparation
Follow all safety precautions to any job on a vehicle.
## Method 1: Use a Bidirectional Scan Tool
On a XTool, for example:
1. Connect the OBD scan tool.
2. Start the car.
3. On XTool, select Special function / EPB / ASIA / Lexus / Automatic selection.
4. Select Enter Maintenance Mode, and confirm.
5. You should hear a whining sound to disengage the parking brake.
6. Parking light will be flashing slowly.
7. Now the vehicle is in the service mode.
To exit service mode after service is done:
1. Select Exit Maintenance Mode, and confirm.
2. You should hear a whining sound to reengage the parking brake.
3. Parking light will turn solid.
4. Now the vehicle is back to normal operations.
## Method 2: The Toyota / Lexus Procedures
This may or may not work on your vehicle so research your year/model to find out.
It doesn't work on my 2017 Lexus RX350, but on later models after 2019.
Disengage Electric Parking Brake (in Service Mode):
1. Without pressing the brake pedal, start the car once.
2. While depressing the brake pedal, within 8 seconds:
1. Pull (up) the (P) lever 3 times;
2. Push (down) the (P) lever 3 times;
3. While foot OFF brake, push and hold (P) unless the (P) indicator on dash is flashing SLOWLY.
* You may be able to hear the rear brake's electric rotor is running to retract the piston.
4. Release the (P) lever, and it is now in the Service mode.
5. Press Start/Stop to turn off ignition.
Re-Engage Electric Parking Brake (cancel Service Mode):
1. Without pressing the brake pedal, start the car once.
2. While foot off brake, pull and hold (P) lever until the (P) light is out.
* You may be able to hear the rear brake's eletric rotor sound again.
3. Release the (P) lever, and it is now back to normal (with eletric parking brake)
4. Press Start/Stop to turn off ignition.
## Method 3: Use a 12V DC Power
After the removal of the connector to the brake piston motor on the caliper:
1. Put a brake pressing tool on the brake piston, loosely engaged.
2. Connect one wire (e.g. black/negative) of the 12V DC to one pin on the motor.
3. Contact the other wire (e.g. red/positive) of the 12VDC with the other pin on the motor.
4. The motor will run and whine when the power is provided.
5. Make sure the motor is retracting the piston:
1. If it runs and compresses the pressing tool (making it tighter), reverse the two wire/connectors.
2. Only run the motor very briefly, and try to compress the piston with the pressing tool.
3. You can easily press piston with the tool if the motor is retracting in the right direction.
4. Do not force.
6. Once it is full retracted, you compress the piston to flush.
## Brake Job Afterwards
If one of the methods works, you can then proceed with the rear brake job.
--
Be safe, stay dirty. Enjoy the work!
God bless!
141
views
1
comment
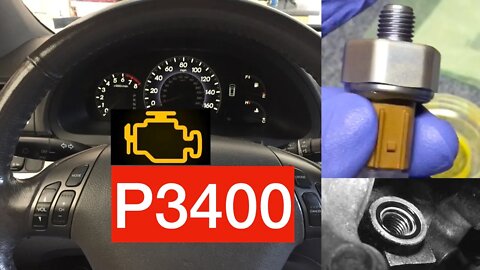
Honda V6 Oil Pressure Switch Replacement (Code P3400)
# Honda V6 VCM Oil Pressure Switch Replacement (Code P3400)
Honda V6 Engine J35A7, with VCM (Variable Cylinder Management)
shown in the 2010 Odyssey Ex-L
## Reason
* Check engine light P3400
* Valve Pause System (VPS) stuck in off position - bank 1
## Supplies
1. Honda Oil Pressure Switch, part#: 37240-R70-A04
2. O-ring, part#: 91319-PAA-A01
## Tools
1. Ratchet socket/box wrench
2. 24 mm deep socket
3. Torque wrench (set at 13 ft pounds)
4. Pick
## Preparation
1. Pop the hood
2. Remove the engine cover
## Oil Pressure Switch Removal
1. Find the bank 1 (in the back, to the firewall) oil pressure switch
2. Remove connector to the oil pressure switch
3. Use a 24mm deep socket to remove switch
4. Use a pick to remove the existing gasket, possibly stuck on the engine
5. Clean the surface
## Oil Pressure Switch Replacement
1. Lubricate the new o-ring with engine oil.
2. Put the new o-ring back on the engine contact.
3. Thread the oil pressure switch on, and make sure the o-ring is in place.
4. Torque the switch to 13 ft lb or snug.
## Check
1. Start engine and check leaks
2. Clear code and test drive
## Additional comments
Some service manuals (on older models) suggest the use of liquid gasket on the thread.
However, I don't see anything on the factory switch thread and skip this step.
It is working fine and so far no leak on the Odyssey.
--
Be safe, stay dirty.
Enjoy the work!
God bless!
27
views
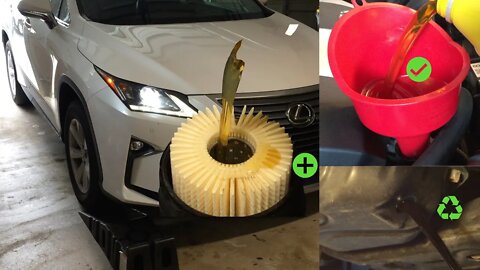
Lexus V6 Engine Oil Change
# Lexus Oil Change
2017 Lexus RX350 Base AWD
Engine: 3.5 V6 2GR-FKS
## Supply
1. Oil: 0W20 x5.8 qt
2. Oil Filter: 04152-YZZA1 1 $4.21 Oil filter cap torque 18 ft-lb
3. Drain gasket: 90430-12031 1 $0.88 Drain plug torque 30 ft-lb
4. Disposable gloves
## Tools
1. Ratchet socket wrench or breaker bar x1
2. 14 mm socket (or box wrench)
3. Oil filter wrench for Toyota/Lexus
4. Torque wrench (18 and 30 ft-lb)
## Safety and Preparation
1. Engage parking brake
2. Chocks
3. Pop the hood
4. Raise the car: using floor jack + jack stands or ramps
5. Safety check!!!
## Oil Change
1. Tip: Warm up the engine, 5 minutes
2. Open the oil cap, read the oil grade (0w20), or owner's manual
3. Remove the drain plug (14mm socket), and drain oil
4. Remove oil filter, with a filter wrench
5. Replace oil filter, and make sure:
1. clean
2. lubricate the rubber o-ring with oil
3. check cap on the filter, finger tight
4. torque oil filter to 18 ft-lb
6. Replace drain plug with new crush washer, clean, and torque to 30 ft pounds
1. Make sure to remove any remnant of gasket on the drain pan or bolt
7. With a funnel, add 5+ gallons, check it, and add more if necessary
1. check owner's manual, OR
2. measure the amount you take out
8. Start the engine, check leaks, shut off and measure with dipstick
9. For accurate oil level measurement, make sure your car is level
* you can lower the car at this point
11. Make sure no leak near oil filter and drain plug
## Oil Reset
1. Menu / Settings
2. Vehicle settings
3. Services/Maintenance / Reset Oil Change
4. Edit and set 5000 miles for the next service
## Final Comments
1. Oil change interval: 5000 miles or 6 months, whichever comes first
2. Oil type: Synthetic 0w20
3. Oil brand: doesn't matter as long as it is 0w20 (check your owner's manual)
4. Recycle the used oil
Be safe, stay dirty. Enjoy the work!
God bless!
56
views
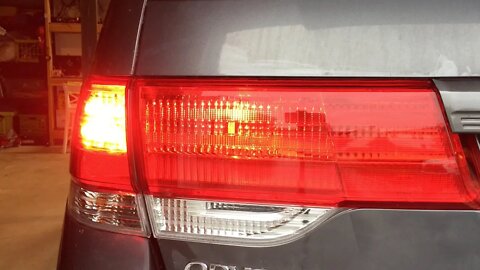
Honda Odyssey Taillight Inner and Outer Assembly Replacement
# 2010 Honda Odyssey Ex-L
Replacement of Taillight Assemblies
## Supply
1. Outer Taillight Assembly
2. Inner Taillight Assembly
## Tools
1. Panel removal tools
2. Ratchet wrench
3. 8mm socket
4. Swivel joint
5. Socket extension
## A. Taillight Outer Assembly Replacement
1. Remove 2 screws in the back.
2. Push the assembly toward the back to remove.
* It is helpful to use a panel remove tool for leverage.
3. Remove connectors to the lights.
4. Remove lights, if you want to reuse them.
5. Reinstall lights in the new assemly, if you reuse them.
6. Plug light connectors back.
7. Align the follow when placing the new assembly:
1. Front: Align the push pin/clip on the assemly to the hole on the body.
2. Back: Align the 2 screw holes on the assembly to those on the back of the car.
8. Push the assembly forward (toward to the front) until it is in (front pin/clip engaged)
9. Tighten the 2 screws in the back, and put on the plastic covers.
10. DONE with the outer assembly.
## B. Taillight Inner Assembly Replacement
1. Lift the tailgate to access its back.
2. Open the plastic cover on the side for access to the light connectors.
3. Remove light connectors.
4. Remove 2 nuts with 8mm socket, with a swivel joint and extension if necessary.
5. Remove 2 cap nuts on the side, outside the cover/opening. 8mm again.
6. Lower the tailgate but do not close it.
7. Wiggle the inner assembly, pull it back while sliding it to the side to remove it.
* It may help to pry the tailgate latch handle a bit.
8. Install lights in the new assembly, if it doesn't come with them.
9. Pry the tailgate latch/handle cover, and slide the new assembly in.
10. Make sure it is aligned on the tailgate, and push the assembly to engage its clips.
11. Tighten nuts on the inside and cap nuts on the outside.
12. Plug the light connectors.
13. DONE with the inner assembly.
Start the car and test the lights. It is all DONE.
Hope this video is informative.
Be safe, stay dirty. Enjoy the work!
God bless!
45
views
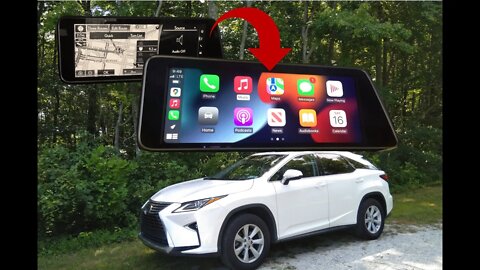
Lexus Apple CarPlay & Android Auto Upgrade Installation Step by Step
# 2017 Lexus RX350
Infotainment/Navigation Upgrade to CarPlay
## Supply
1. CarPlay & Android Auto module + interface cables
In the video, I install a RoadTop CarPlay unit for Lexus:
https://www.ebay.com/itm/384400476740
* I have NO affiliation with them and hope to post a review video after some use.
* For now, I've used CarPlay features but will test Android Auto too.
## Tools
1. Panel removal tools (plastic)
2. Ratchet wrench
3. 10mm socket
4. Some towels
## A. Radio Unit Removal
1. Open storage lid and remove central console panel/trims.
2. Remove (silver) trims around the radio.
3. Remove black trim where Start/Stop button is attached.
4. Disconnect Start/Stop connector.
5. Remove two 10mm bolts holding the radio:
+ one on the driver side
+ the other on the passenger side
6. Push down shift boot and remove shift knob.
7. Cover the shift stick with towels (to protect the radio unit later).
8. Remove the radio unit, and disconnect the connector at the top.
## B. Screen Removal
1. Remove front and back trims around the screen.
2. Remove back cover of the screen.
3. Remove three 10mm bolts/nuts on the screen bracket.
4. Lay towels in the front.
5. Remove the screen and place it on the towels.
## C. Connect CarPlay Unit Cables
1. Connect LVDS cables.
2. Connect CAN cables.
3. Connect USB / Video cables.
4. Connect RF Antenna cable.
5. Change Toggle Switch according to instructions.
## D. Connect to Radio Unit Host
For each connector, chain them together this way:
1. Remove the original cable;
2. Plug it to the female cable to CarPlay;
3. Plug the carplay male to the host socket, where the original cable is removed.
Do this for the following cables/connectors:
1. Power or CAN cables.
2. Audio out cables.
## E. Connect to Screen
1. Route LVDS cable from the back of the radio to screen.
2. Chain the LVDS connectors with the original cable/connector.
## F. Test CarPlay
1. Reconnect Start/Stop and start the car.
2. Switch Audio Source to AUX.
3. Turn your phone's wifi, bluetooth, and connect to CarPlay.
4. Test the features.
## G. Reassembly
1. Optional: Route the USB cable to glove box. The unit has wireless carplay so USB is not required.
2. Place the CarPlay unit in the back behind Radio. Arrange the cables and tuck them in the back.
3. You can stick the antenna to the side of the radio box.
4. Put the radio unit back, attach to the clips, 10mm bolts, and reattach the trims.
5. Reinstall the screen with 3x10mm bolt/nuts, back cover, front and back trims.
DONE.
Hope this video is informative.
Be safe, stay dirty. Enjoy the work!
God bless!
51
views
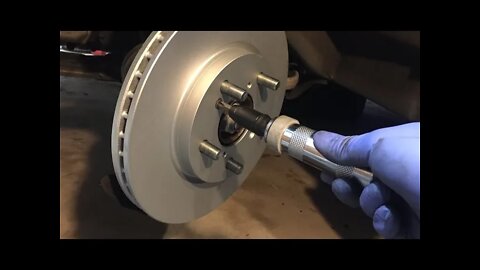
Honda Front Brake Rotor & Pads Replacement
# 2010 Honda Odyssey EX-L
Replacement of Front Brake Rotors and Pads
## Supply
1. Front brake rotor x2
2. Front brake pad x2
3. Brake lubricant / grease
4. Anti-seize paste
5. Brake cleaner
6. Thread locker (blue)
7. Optional: brake fluid
8. Optional: Penetrating oil, e.g. PB blaster or WD40
## Tools
1. Breaker bar or ratchet wrench x1
2. 14mm, 19mm, 22mm sockets
3. Bungee cord x1
4. Torque wrench: 101 ft pounds
5. Caliper piston pressing tool (or a clamp)
6. Manual impact screw driver (recommended)
7. Wire brush
8. Optional: M8 x 1.25 bolt x2
## 1. Safety and Preparation
1. Engage parking brake
2. Chocks
3. Pop the hood, take out some brake fluid
4. Loose the lug nuts (22 mm socket)
5. Raise the car, take off the nuts, and tires
6. Tires under car for additional protection
7. Safety check!!!
## 2. Rotor and Pad Removal
1. Remove brake calliper: bolts 14 mm x2, wrench to prevent spin
2. Hang calliper with bungee cord
3. Remove brake bracket: 19 mm bolts
4. Remove rotor:
I. Impact screw driver to remove factory screws
II. Run 8x1.25 bolts to separate the rotor
## 3. Rotor and Pad Installation
1. Wire brush / prep /clean the wheel bearing hub (remove rust for a clean surface)
2. Clean the rotor with brake cleaner
3. Align the set holes and put the factory screws back on
4. Wire brush / prep /clean the bracket
5. Install brake hardware (shims)
6. Regrease /lubricate the pins
7. Thread lock the bracket bolts (19mm) x2
8. Reinstall the bracket, and torque to 101 ft pounds
9. Grease the new pads: back, top, bottom
10. Install the new pads (slide in with an angle and rotate)
11. Note the brake with wear indicator is inside
12. Press the caliper piston:
I. Make sure they are fully seated in the rubber boots
II. Check brake fluid in the master cylinder (no overflow)
13. Clean and grease piston contact
14. Reinstall the caliper, with 14mm bolts thread-locked
15. Torque to 37 ft pounds
## 4. Finishing
1. Repeat the steps for the other side
2. Reinstall the wheels with lug nuts torqued to 94 ft pounds
3. Lower down the vehicle
4. Add brake fluid back to maximum
5. Pump brake pedals until it is firm
## 5. Breaking in
Follow instructions on the rotors/pads for breaking in procedures.
Hope this video is informative.
Be safe, stay dirty. Enjoy the work!
God bless!
48
views

Honda Engine Oil and Filter Change
Oil and oil filter change for 2010 Honda Odyssey EX-L
# Honda Odyssey Oil Change
## Tools and Supply
1. Rachet socket/box wrench or breaker bar x1
2. 17 mm socket x1
3. Oil filter wrench (strap wrench or adjustable pliers)
4. Torque wrench (set at 33 ft pounds)
5. Gloves: disposable + work gloves
6. Engine oil 5 quarts
7. Engine oil filter
## Safety and Preparation
1. Engage parking brake
2. Chocks
3. Pop the hood
4. Raise the car: using floor jack + jack stands or ramps
5. Safety check!!!
## Oil Change
1. Tip: Warm up the engine, 5 minutes
2. Open the oil cap, read the oil grade (5w20 or 0w20), or owner's manual
3. Remove the drain plug (17mm socket), and drain oil
4. Remove oil filter, with a filter wrench or a glove
5. Replace oil filter, and make sure:
1. clean, no double gasket, as tight as your hand with glove (or 1/8 turn after hand tight)
2. lubricate the rubber gasket with oil
3. optional: oil to prime the new filter first
6. Replace drain plug with new crush washer, clean, and torque to 33 ft pounds
7. With a funnel, add 4+ gallons, check it, and add more if necessary
1. check owner's manual, OR
2. measure the amount you take out
8. Start the engine, check leaks, shut off and measure with dipstick
9. For accurate oil level measurement, you can lower the car at this point
10. Make sure no leak near oil filter and drain plug
## Oil Reset
1. Key to on position but do not start the engine
2. Switch to the oil life page
3. Press and hold the knob for at least 10 seconds
4. When it flashes, release then press and hold for another 5 seconds.
5. And it will reset to 100% oil life
## Final Comments
1. Oil change interval: 5000 miles or 6 months, whichever comes first
2. Oil type: I use synthetic, or whatever you have been using for the car
3. Oil brand: doesn't matter as long as it is 5w20 or 0w20 (check your owner's manual)
4. Recycle the used oil
Be safe, stay dirty. Enjoy the work!
God bless!
53
views