
Radar Renegade AT Pro | First Impressions | Tire Review
#radarrenegade #tirereview #radartires
In this video, I give my unbiased initial first impression of the Radar Renegade AT Pro all-terrain tires.
//CHAPTERS
00:00 - Intro
00:21 - Partnership with Omni United Backstory
03:28 - The "Techy" Stuff / Tire Specs and Features
08:05 - Ride To The Shop / Installation
09:11 - First Look / Dual Sidewall / Measurements
10:51 - Driving / Two First Impressions
12:51 - Doing Full Lockout Turns
14:24 - Final Thoughts
Check out Omni's entire line of tires at:
https://www.omni-united.com
//GEAR I USE:
Main Camera - Canon EOS M50 - https://amzn.to/36jlvVf
Akaso Brave 7 LE - https://amzn.to/3ADVf5H
Microphone - https://amzn.to/2TMW5fX
SD Card - https://amzn.to/36jDdYJ
Samsung Note 9 - https://amzn.to/2UbdAX2
Campark Action Camera - https://amzn.to/3cT2vjU
Sony A7 Full Frame - https://amzn.to/3vFeckN
Adobe Creative Cloud
And be sure to subscribe to my channel!
DISCLAIMER: Links included in this description might be affiliate links. If you purchase a product or service with the links that I provide I may receive a small commission. There is no additional charge to you! Thank you for supporting my channel so I can continue to provide you with free content!
//ABOUT ME
By day I'm a Functional Medicine Doctor and Chiropractic Physician. Outside of the office I have a lot of different hobbies and interests. Everything from cycling, home projects, wood working, and tinkering with my F150. I love doing DIY projects and just being a creator. Some have failed miserably while others have been a huge success. No matter the project there was always something to learn from each. There's a certain satisfaction from making something yourself. I've learned so much from other professionals and DIY'ers here on YouTube. This channel is dedicated to helping you tackle your own DIY projects and hopefully taking some of the mystery and fear out of the equation.
//CONNECT WITH ME:
Facebook: http://facebook.com/willmosbey
Instagram: http://instagram.com/willmosbey
22
views

Radar Renegade AT Pro First Impression | Tire Review
#radarrenegade #tirereview #radartires
In this video, I give my unbiased inital first impression of the Radar Renegade AT Pro all-terrain tires.
//GEAR I USE:
Main Camera - Canon EOS M50 - https://amzn.to/36jlvVf
Akaso Brave 7 LE - https://amzn.to/3ADVf5H
Microphone - https://amzn.to/2TMW5fX
SD Card - https://amzn.to/36jDdYJ
Samsung Note 9 - https://amzn.to/2UbdAX2
Campark Action Camera - https://amzn.to/3cT2vjU
Sony A7 Full Frame - https://amzn.to/3vFeckN
Adobe Creative Cloud
And be sure to subscribe to my channel!
DISCLAIMER: Links included in this description might be affiliate links. If you purchase a product or service with the links that I provide I may receive a small commission. There is no additional charge to you! Thank you for supporting my channel so I can continue to provide you with free content!
//ABOUT ME
By day I'm a Functional Medicine Doctor and Chiropractic Physician. Outside of the office I have a lot of different hobbies and interests. Everything from cycling, home projects, wood working, and tinkering with my F150. I love doing DIY projects and just being a creator. Some have failed miserably while others have been a huge success. No matter the project there was always something to learn from each. There's a certain satisfaction from making something yourself. I've learned so much from other professionals and DIY'ers here on YouTube. This channel is dedicated to helping you tackle your own DIY projects and hopefully taking some of the mystery and fear out of the equation.
//CONNECT WITH ME:
Facebook: http://facebook.com/willmosbey
Instagram: http://instagram.com/willmosbey
16
views

DIY Mobile Solar Panel Cart | Renogy 100 Watt Panels
In this video I show you how to build a mobile solar panel cart. These are the 2 Renogy panels that power my solar powered shed. I'll do a video on that setup later. But I didn't want to mount these to the roof of the shed and risk creating a leak. So I came up with this cart idea so I could easily roll it around and maneuver it toward the sun.
//MATERIALS
(4) 2x4x8
(2) 7" lawn mower wheels
(2) 3" lag screws and washers for wheels
(2) 3 1/2" lag bolts with nut and washers
(1) handle for easy pickup and move
//GEAR I USE:
Main Camera - Canon EOS M50 - https://amzn.to/36jlvVf
Akaso Brave 7 LE - https://amzn.to/3ADVf5H
Microphone - https://amzn.to/2TMW5fX
SD Card - https://amzn.to/36jDdYJ
Samsung Note 9 - https://amzn.to/2UbdAX2
Campark Action Camera - https://amzn.to/3cT2vjU
Sony A7 Full Frame - https://amzn.to/3vFeckN
Adobe Creative Cloud
And be sure to subscribe to my channel!
DISCLAIMER: Links included in this description might be affiliate links. If you purchase a product or service with the links that I provide I may receive a small commission. There is no additional charge to you! Thank you for supporting my channel so I can continue to provide you with free content!
//ABOUT ME
By day I'm a Functional Medicine Doctor and Chiropractic Physician. Outside of the office I have a lot of different hobbies and interests. Everything from cycling, home projects, wood working, and tinkering with my F150. I love doing DIY projects and just being a creator. Some have failed miserably while others have been a huge success. No matter the project there was always something to learn from each. There's a certain satisfaction from making something yourself. I've learned so much from other professionals and DIY'ers here on YouTube. This channel is dedicated to helping you tackle your own DIY projects and hopefully taking some of the mystery and fear out of the equation.
//CONNECT WITH ME:
Facebook: http://facebook.com/willmosbey
Instagram: http://instagram.com/willmosbey
34
views
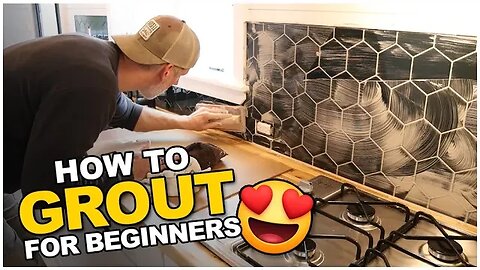
How To Grout | DIY For Beginners
#grout #doityourself #beginners
Learn how to grout tile like a pro. In this video I'll show you my method for grouting a tile backsplash and a tile shower.
Both the shower surround and the backsplash in this video is a "tile-like" product that's actually a PVC panel. It's light weight and easy to install. To learn more about this product and how cool it is visit https://six3tile.com
//CHAPTERS
00:00 - Intro
00:53 - All about Six3 Tile
06:48 - Materials and Tools Used
10:23 - Let's Grout
13:14 - The Wipe Down
15:34 - The Finished Product
//GEAR I USE:
Main Camera - Canon EOS M50 - https://amzn.to/36jlvVf
Akaso Brave 7 LE - https://amzn.to/3ADVf5H
Microphone - https://amzn.to/2TMW5fX
SD Card - https://amzn.to/36jDdYJ
Samsung Note 9 - https://amzn.to/2UbdAX2
Campark Action Camera - https://amzn.to/3cT2vjU
Sony A7 Full Frame - https://amzn.to/3vFeckN
Adobe Creative Cloud
And be sure to subscribe to my channel!
DISCLAIMER: Links included in this description might be affiliate links. If you purchase a product or service with the links that I provide I may receive a small commission. There is no additional charge to you! Thank you for supporting my channel so I can continue to provide you with free content!
//ABOUT ME
By day I'm a Functional Medicine Doctor and Chiropractic Physician. Outside of the office I have a lot of different hobbies and interests. Everything from cycling, home projects, wood working, and tinkering with my F150. I love doing DIY projects and just being a creator. Some have failed miserably while others have been a huge success. No matter the project there was always something to learn from each. There's a certain satisfaction from making something yourself. I've learned so much from other professionals and DIY'ers here on YouTube. This channel is dedicated to helping you tackle your own DIY projects and hopefully taking some of the mystery and fear out of the equation.
//CONNECT WITH ME:
Facebook: http://facebook.com/willmosbey
Instagram: http://instagram.com/willmosbey
51
views
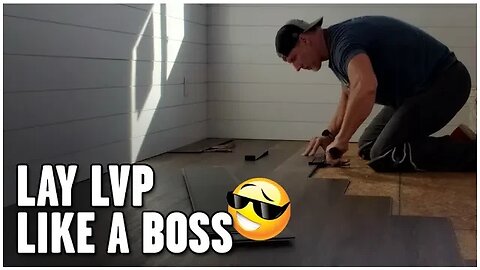
How To Lay LVP Flooring
#lvp #luxuryvinylplank #flooring
In this video I'll show you how to lay LVP or luxury vinyl plank flooring.
//GEAR I USE:
Main Camera - Canon EOS M50 - https://amzn.to/36jlvVf
Akaso Brave 7 LE - https://amzn.to/3ADVf5H
Microphone - https://amzn.to/2TMW5fX
SD Card - https://amzn.to/36jDdYJ
Samsung Note 9 - https://amzn.to/2UbdAX2
Campark Action Camera - https://amzn.to/3cT2vjU
Sony A7 Full Frame - https://amzn.to/3vFeckN
Adobe Creative Cloud
And be sure to subscribe to my channel!
DISCLAIMER: Links included in this description might be affiliate links. If you purchase a product or service with the links that I provide I may receive a small commission. There is no additional charge to you! Thank you for supporting my channel so I can continue to provide you with free content!
//ABOUT ME
I love doing DIY projects and just being a creator. Some have failed miserably while others have been a huge success. No matter the project there was always something to learn from each. There's a certain satisfaction from making something yourself. I've learned so much from other professionals and DIY'ers here on YouTube. This channel is dedicated to helping you tackle your own DIY projects and hopefully taking some of the mystery and fear out of the equation.
//CONNECT WITH ME:
Facebook: http://facebook.com/willmosbey
Instagram: http://instagram.com/willmosbey
27
views
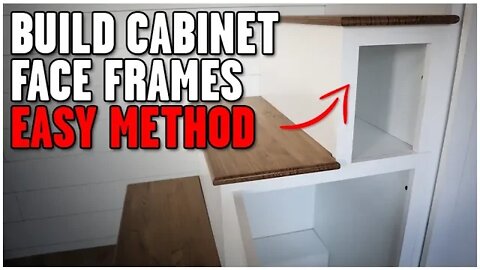
Build Cabinet Face Frames FINAL
In this video I show you how to put a face frame on your cabinet carcass. If you haven't seen how to build a cabinet carcass go check that video out here: https://youtu.be/9b5MEKLRT5w
//CHAPTERS
0:17 - Measuring the frame size
1:33 - Drilling pocket holes
2:25 - Assemble the frame
4:21 - Gluing and Nailing the frame to the cabinet
6:10 - Ending
//GEAR I USE:
Main Camera - Canon EOS M50 - https://amzn.to/36jlvVf
Akaso Brave 7 LE - https://amzn.to/3ADVf5H
Microphone - https://amzn.to/2TMW5fX
SD Card - https://amzn.to/36jDdYJ
Samsung Note 9 - https://amzn.to/2UbdAX2
Campark Action Camera - https://amzn.to/3cT2vjU
Sony A7 Full Frame - https://amzn.to/3vFeckN
Adobe Creative Cloud
And be sure to subscribe to my channel!
DISCLAIMER: Links included in this description might be affiliate links. If you purchase a product or service with the links that I provide I may receive a small commission. There is no additional charge to you! Thank you for supporting my channel so I can continue to provide you with free content!
//ABOUT ME
By day I'm a Functional Medicine Doctor and Chiropractic Physician. Outside of the office I have a lot of different hobbies and interests. Everything from cycling, home projects, wood working, and tinkering with my F150. I love doing DIY projects and just being a creator. Some have failed miserably while others have been a huge success. No matter the project there was always something to learn from each. There's a certain satisfaction from making something yourself. I've learned so much from other professionals and DIY'ers here on YouTube. This channel is dedicated to helping you tackle your own DIY projects and hopefully taking some of the mystery and fear out of the equation.
//CONNECT WITH ME:
Facebook: http://facebook.com/willmosbey
Instagram: http://instagram.com/willmosbey
28
views
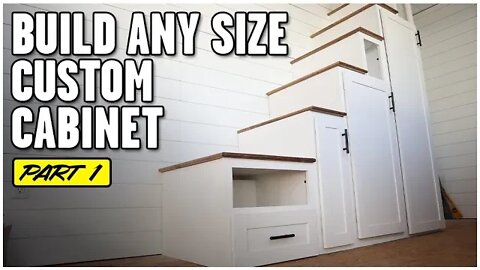
How To Build Any Size Custom Cabinet Carcass
In this video I show you my process of how to build any sized custom cabinet carcass. This is video 1 in a series of 3 videos. Later I will show you how to make the face frame for your cabinet carcass and then lastly show you how to create a drawer for your cabinet.
//GEAR I USE:
Main Camera - Canon EOS M50 - https://amzn.to/36jlvVf
Akaso Brave 7 LE - https://amzn.to/3ADVf5H
Microphone - https://amzn.to/2TMW5fX
SD Card - https://amzn.to/36jDdYJ
Samsung Note 9 - https://amzn.to/2UbdAX2
Campark Action Camera - https://amzn.to/3cT2vjU
Sony A7 Full Frame - https://amzn.to/3vFeckN
Adobe Creative Cloud
And be sure to subscribe to my channel!
DISCLAIMER: Links included in this description might be affiliate links. If you purchase a product or service with the links that I provide I may receive a small commission. There is no additional charge to you! Thank you for supporting my channel so I can continue to provide you with free content!
//ABOUT ME
By day I'm a Functional Medicine Doctor and Chiropractic Physician. Outside of the office I have a lot of different hobbies and interests. Everything from cycling, home projects, wood working, and tinkering with my F150. I love doing DIY projects and just being a creator. Some have failed miserably while others have been a huge success. No matter the project there was always something to learn from each. There's a certain satisfaction from making something yourself. I've learned so much from other professionals and DIY'ers here on YouTube. This channel is dedicated to helping you tackle your own DIY projects and hopefully taking some of the mystery and fear out of the equation.
//CONNECT WITH ME:
Facebook: http://facebook.com/willmosbey
Instagram: http://instagram.com/willmosbey
20
views
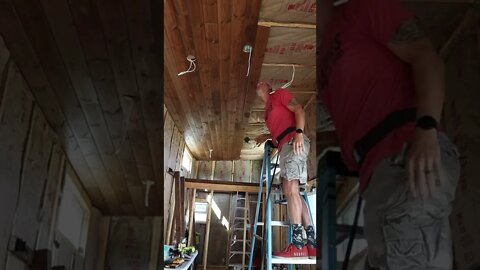
Installing Tongue and Groove Ceiling Planks | Tiny House Build
#shorts
This is how I install tongue and groove pine planks on my tiny house ceiling.
//GEAR I USE:
Main Camera - Canon EOS M50 - https://amzn.to/36jlvVf
Akaso Brave 7 LE - https://amzn.to/3ADVf5H
Microphone - https://amzn.to/2TMW5fX
SD Card - https://amzn.to/36jDdYJ
Samsung Note 9 - https://amzn.to/2UbdAX2
Campark Action Camera - https://amzn.to/3cT2vjU
Sony A7 Full Frame - https://amzn.to/3vFeckN
Adobe Creative Cloud
And be sure to subscribe to my channel!
DISCLAIMER: Links included in this description might be affiliate links. If you purchase a product or service with the links that I provide I may receive a small commission. There is no additional charge to you! Thank you for supporting my channel so I can continue to provide you with free content!
//ABOUT ME
By day I'm a Functional Medicine Doctor and Chiropractic Physician. Outside of the office I have a lot of different hobbies and interests. Everything from cycling, home projects, wood working, and tinkering with my F150. I love doing DIY projects and just being a creator. Some have failed miserably while others have been a huge success. No matter the project there was always something to learn from each. There's a certain satisfaction from making something yourself. I've learned so much from other professionals and DIY'ers here on YouTube. This channel is dedicated to helping you tackle your own DIY projects and hopefully taking some of the mystery and fear out of the equation.
//CONNECT WITH ME:
Facebook: http://facebook.com/willmosbey
Instagram: http://instagram.com/willmosbey
14
views
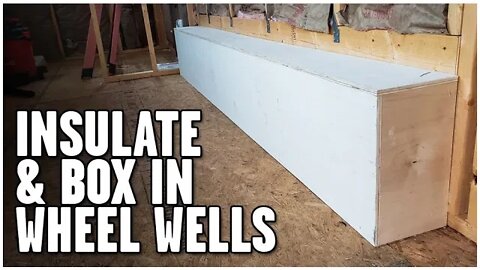
How To Box In and Insulate Wheel Wells | Tiny House Build
In this video I show you how I boxed in and insulated the wheel wells on the tiny house.
//MATERIALS USED
4x8 sheet of 1/2" plywood
18 gauge 1 1/2" brad nails
Wood glue
Ryobi 18 gauge Brad Nail Cordless Gun
//CHAPTERS
0:00 - Intro
6:27 - The Build Process
9:52 - Closing Thoughts
Shout out to fellow YouTubers Actually Tiny for the inspiration on how to box in and insulate the wheel wells. You can check out their video here:
https://youtu.be/wm0gLz4DXV0
//GEAR I USE:
Main Camera - Canon EOS M50 - https://amzn.to/36jlvVf
Akaso Brave 7 LE - https://amzn.to/3ADVf5H
Microphone - https://amzn.to/2TMW5fX
SD Card - https://amzn.to/36jDdYJ
Samsung Note 9 - https://amzn.to/2UbdAX2
Campark Action Camera - https://amzn.to/3cT2vjU
Sony A7 Full Frame - https://amzn.to/3vFeckN
Adobe Creative Cloud
And be sure to subscribe to my channel!
DISCLAIMER: Links included in this description might be affiliate links. If you purchase a product or service with the links that I provide I may receive a small commission. There is no additional charge to you! Thank you for supporting my channel so I can continue to provide you with free content!
//ABOUT ME
By day I'm a Functional Medicine Doctor and Chiropractic Physician. Outside of the office I have a lot of different hobbies and interests. Everything from cycling, home projects, wood working, and tinkering with my F150. I love doing DIY projects and just being a creator. Some have failed miserably while others have been a huge success. No matter the project there was always something to learn from each. There's a certain satisfaction from making something yourself. I've learned so much from other professionals and DIY'ers here on YouTube. This channel is dedicated to helping you tackle your own DIY projects and hopefully taking some of the mystery and fear out of the equation.
//CONNECT WITH ME:
Facebook: http://facebook.com/willmosbey
Instagram: http://instagram.com/willmosbey
19
views

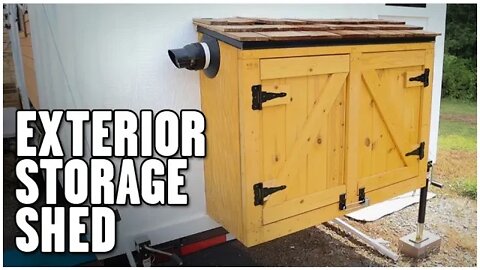
How To Build An Exterior Storage Shed | Tiny House Build
In this video I show you how to build an exterior utility shed for a tiny house.
0:00 - Intro
2:45 - Building the Frames
4:34 - Building the Face Frames
5:46 - Applying the Roof Underlayment and Drip Edge
7:02 - Construct the Doors and Install Them
9:29 - Attaching the Cedar Plank Shingles
12:25 - Finished Product
//GEAR I USE:
Main Camera - Canon EOS M50 - https://amzn.to/36jlvVf
Akaso Brave 7 LE - https://amzn.to/3ADVf5H
Microphone - https://amzn.to/2TMW5fX
SD Card - https://amzn.to/36jDdYJ
Samsung Note 9 - https://amzn.to/2UbdAX2
Campark Action Camera - https://amzn.to/3cT2vjU
Sony A7 Full Frame - https://amzn.to/3vFeckN
Adobe Creative Cloud
And be sure to subscribe to my channel!
DISCLAIMER: Links included in this description might be affiliate links. If you purchase a product or service with the links that I provide I may receive a small commission. There is no additional charge to you! Thank you for supporting my channel so I can continue to provide you with free content!
//ABOUT ME
By day I'm a Functional Medicine Doctor and Chiropractic Physician. Outside of the office I have a lot of different hobbies and interests. Everything from cycling, home projects, wood working, and tinkering with my F150. I love doing DIY projects and just being a creator. Some have failed miserably while others have been a huge success. No matter the project there was always something to learn from each. There's a certain satisfaction from making something yourself. I've learned so much from other professionals and DIY'ers here on YouTube. This channel is dedicated to helping you tackle your own DIY projects and hopefully taking some of the mystery and fear out of the equation.
//CONNECT WITH ME:
Facebook: http://facebook.com/willmosbey
Instagram: http://instagram.com/willmosbey
45
views
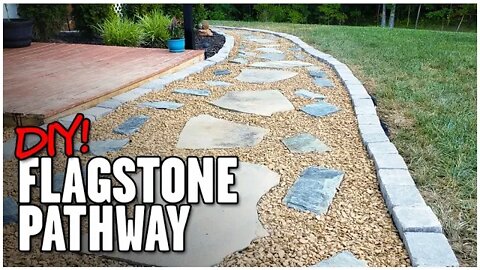
How To Build A Flagstone Pathway | DIY
#flagstonepathway #diy #pathway #walkway
In this video I show you how to build a flagstone pathway.
//MATERIALS
960 lbs of flagstone ($0.25 per pound) = $240
114 pavers for border (6x9 pavers) - $120
1 ton bag of gravel (1/2" - 3/4" pebbles) - $150
3 rolls of 50' landscaping fabric (Aldi) - $30
Total Project Cost - $540
//TOOLS NEEDED
Shovel
Rake
Wheelbarrow or Cart
//CHAPTERS
00:00 - Introduction
00:25 - The Explanation
09:07 - The Build Process
//GEAR I USE:
Main Camera - Canon EOS M50 - https://amzn.to/36jlvVf
Akaso Brave 7 LE - https://amzn.to/3ADVf5H
Microphone - https://amzn.to/2TMW5fX
SD Card - https://amzn.to/36jDdYJ
Samsung Note 9 - https://amzn.to/2UbdAX2
Campark Action Camera - https://amzn.to/3cT2vjU
Sony A7 Full Frame - https://amzn.to/3vFeckN
Adobe Creative Cloud
And be sure to subscribe to my channel!
DISCLAIMER: Links included in this description might be affiliate links. If you purchase a product or service with the links that I provide I may receive a small commission. There is no additional charge to you! Thank you for supporting my channel so I can continue to provide you with free content!
//ABOUT ME
By day I'm a Functional Medicine Doctor and Chiropractic Physician. Outside of the office I have a lot of different hobbies and interests. Everything from cycling, home projects, wood working, and tinkering with my F150. I love doing DIY projects and just being a creator. Some have failed miserably while others have been a huge success. No matter the project there was always something to learn from each. There's a certain satisfaction from making something yourself. I've learned so much from other professionals and DIY'ers here on YouTube. This channel is dedicated to helping you tackle your own DIY projects and hopefully taking some of the mystery and fear out of the equation.
//CONNECT WITH ME:
Facebook: http://facebook.com/willmosbey
Instagram: http://instagram.com/willmosbey
00:00 Introduction
00:25 The Explanation
09:07 The Build Process
52
views
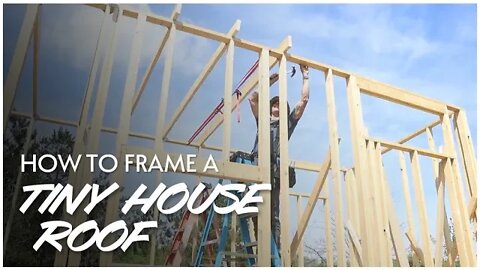
How To Frame A Roof | DIY Tiny House Build
#tinyhouse #tinyhousebuild #framingroof
In this video I walk you through how to install rafters and frame the roof of the tiny house. I also go over the hardware I used. My tiny house build uses a 24" on center framing method and for it to pass inspection I had to line up the rafters with that exact 24" on center so I could go with a single top plate. This insured strength and at the same time saved a little precious weight.
If you haven't seen how to cut the birds mouth notch you can check out that video here: https://youtu.be/DO-9A3BRrk0
//GEAR I USE:
Main Camera - Canon EOS M50 - https://amzn.to/36jlvVf
Akaso Brave 7 LE - https://amzn.to/3ADVf5H
Microphone - https://amzn.to/2TMW5fX
SD Card - https://amzn.to/36jDdYJ
Samsung Note 9 - https://amzn.to/2UbdAX2
Campark Action Camera - https://amzn.to/3cT2vjU
Sony A7 Full Frame - https://amzn.to/3vFeckN
Adobe Creative Cloud
And be sure to subscribe to my channel!
DISCLAIMER: Links included in this description might be affiliate links. If you purchase a product or service with the links that I provide I may receive a small commission. There is no additional charge to you! Thank you for supporting my channel so I can continue to provide you with free content!
//ABOUT ME
I'm a "semi-retired" Functional Medicine Doctor and Chiropractic Physician. Outside of the office I have a lot of different hobbies and interests. Everything from cycling, home projects, wood working, and tinkering with my F150. I love doing DIY projects and just being a creator. Some have failed miserably while others have been a huge success. No matter the project there was always something to learn from each. There's a certain satisfaction from making something yourself. I've learned so much from other professionals and DIY'ers here on YouTube. This channel is dedicated to helping you tackle your own DIY projects and hopefully taking some of the mystery and fear out of the equation.
//CONNECT WITH ME:
Facebook: http://facebook.com/willmosbey
Instagram: http://instagram.com/willmosbey
51
views
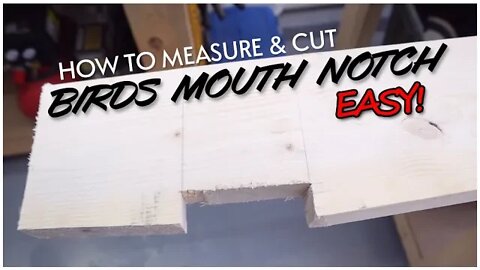
How To Cut Birds Mouth Rafter Notch | Tiny House Build
#birdsmouth #tinyhousebuild #tinyhouse
In this video I show you how I measure and cut the birds mouth notch on both the upper end and the lower end of the rafters. This is the template rafter that I made transferred this design to all 15 rafters.
//TOOLS I USED:
Speed square
90 degree square
Circular Saw
Jig Saw
Small Chisel
//GEAR I USE:
Main Camera - Canon EOS M50 - https://amzn.to/36jlvVf
Akaso Brave 7 LE - https://amzn.to/3ADVf5H
Microphone - https://amzn.to/2TMW5fX
SD Card - https://amzn.to/36jDdYJ
Samsung Note 9 - https://amzn.to/2UbdAX2
Campark Action Camera - https://amzn.to/3cT2vjU
Sony A7 Full Frame - https://amzn.to/3vFeckN
Adobe Creative Cloud
And be sure to subscribe to my channel!
DISCLAIMER: Links included in this description might be affiliate links. If you purchase a product or service with the links that I provide I may receive a small commission. There is no additional charge to you! Thank you for supporting my channel so I can continue to provide you with free content!
//ABOUT ME
By day I'm a Functional Medicine Doctor and Chiropractic Physician. Outside of the office I have a lot of different hobbies and interests. Everything from cycling, home projects, wood working, and tinkering with my F150. I love doing DIY projects and just being a creator. Some have failed miserably while others have been a huge success. No matter the project there was always something to learn from each. There's a certain satisfaction from making something yourself. I've learned so much from other professionals and DIY'ers here on YouTube. This channel is dedicated to helping you tackle your own DIY projects and hopefully taking some of the mystery and fear out of the equation.
//CONNECT WITH ME:
Facebook: http://facebook.com/willmosbey
Instagram: http://instagram.com/willmosbey
55
views
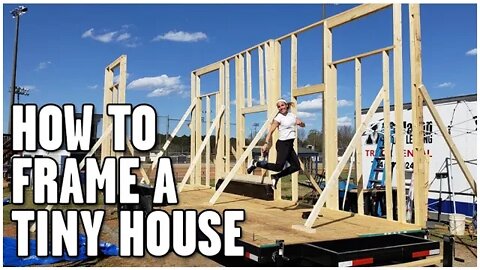
How To Build And Frame A Tiny House | Tiny House Build
#tinyhouseframing #tinyhousebuild #framingtinyhouse
In this video I go through in detail How To Build And Frame the walls of a tiny house. In addition I show you how to stand the walls safely, even if you are by yourself sometimes.
//CHAPTERS
0:00 - Intro
1:07 - The Plan / Working Efficiently
3:32 - Building Walls in Sections
6:11 - Framing the Front Right Section Explained
8:28 - Dealing With Warped Boards
9:36 - Using The 3-4-5 Method
11:26 - Framing The Back Wall On The Trailer Deck
18:27 - Standing Walls
19:30 - Framing The End Walls
25:00 - Standing The End Wall By Yourself
//GEAR I USE:
Main Camera - Canon EOS M50 - https://amzn.to/36jlvVf
Akaso Brave 7 LE - https://amzn.to/3ADVf5H
Microphone - https://amzn.to/2TMW5fX
SD Card - https://amzn.to/36jDdYJ
Samsung Note 9 - https://amzn.to/2UbdAX2
Campark Action Camera - https://amzn.to/3cT2vjU
Sony A7 Full Frame - https://amzn.to/3vFeckN
Adobe Creative Cloud
And be sure to subscribe to my channel!
DISCLAIMER: Links included in this description might be affiliate links. If you purchase a product or service with the links that I provide I may receive a small commission. There is no additional charge to you! Thank you for supporting my channel so I can continue to provide you with free content!
//ABOUT ME
By day I'm a Functional Medicine Doctor and Chiropractic Physician. Outside of the office I have a lot of different hobbies and interests. Everything from cycling, home projects, wood working, and tinkering with my F150. I love doing DIY projects and just being a creator. Some have failed miserably while others have been a huge success. No matter the project there was always something to learn from each. There's a certain satisfaction from making something yourself. I've learned so much from other professionals and DIY'ers here on YouTube. This channel is dedicated to helping you tackle your own DIY projects and hopefully taking some of the mystery and fear out of the equation.
//CONNECT WITH ME:
Facebook: http://facebook.com/willmosbey
Instagram: http://instagram.com/willmosbey
31
views

How To Install The Subfloor For A Tiny House | Tiny House Build
#tinyhouse #tinyhousesubfloor #tinyhousebuild
In this video I walk you through the steps to install the aluminum flashing (aka belly pan) and the subfloor for a tiny house on wheels. In addition, I show you how to install the insulation below the subfloor.
// MATERIALS
3 rolls aluminum flashing 20" x 50'
Hillman #8 x 3/4" Socket Drive Self Tapping Sheet Metal Screws
(3 packs) Owens Corning R-13 Fiberglass Batt Insulation 15" W x 93" L
(9) R-6.5 1" x 4 x 8' Rigid Foam Board Insulation
Loctite PL400 Subfloor Adhesive (Wood to Metal)
(9) 23/32" x 4' x 8' Tongue and Groove OSB Subfloor
Power Pro #10 1 1/2" Multi Material Screws
//GEAR I USE:
Main Camera - Canon EOS M50 - https://amzn.to/36jlvVf
Akaso Brave 7 LE - https://amzn.to/3ADVf5H
Microphone - https://amzn.to/2TMW5fX
SD Card - https://amzn.to/36jDdYJ
Samsung Note 9 - https://amzn.to/2UbdAX2
Campark Action Camera - https://amzn.to/3cT2vjU
Sony A7 Full Frame - https://amzn.to/3vFeckN
Adobe Creative Cloud
And be sure to subscribe to my channel!
DISCLAIMER: Links included in this description might be affiliate links. If you purchase a product or service with the links that I provide I may receive a small commission. There is no additional charge to you! Thank you for supporting my channel so I can continue to provide you with free content!
//ABOUT ME
By day I'm a Functional Medicine Doctor and Chiropractic Physician. Outside of the office I have a lot of different hobbies and interests. Everything from Crossfit, home projects, wood working, and tinkering with my F150. I love doing DIY projects and just being a creator. Some have failed miserably while others have been a huge success. No matter the project there was always something to learn from each. There's a certain satisfaction from making something yourself. I've learned so much from other professionals and DIY'ers here on YouTube. This channel is dedicated to helping you tackle your own DIY projects and hopefully taking some of the mystery and fear out of the equation.
//CONNECT WITH ME:
Facebook: http://facebook.com/willmosbey
Instagram: http://instagram.com/willmosbey
33
views
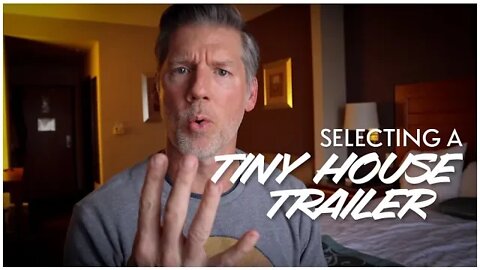
How To Select The Right Tiny House Trailer
#tinyhouse #thow #tinyhousetrailer
In this video, I go over the criteria I used when selecting my tiny house trailer. This is an important step in the tiny house build process. So selecting the right trailer for your build is key. I'll also share who I ended up going with as my tiny house trailer manufacturer.
00:00 - Intro
03:36 - Price
04:24 - Location
05:37 - Customization
06:25 - Lead Times
07:18 - Customer Service
//GEAR I USE:
Main Camera - Canon EOS M50 - https://amzn.to/36jlvVf
Akaso Brave 7 LE - https://amzn.to/3ADVf5H
Microphone - https://amzn.to/2TMW5fX
SD Card - https://amzn.to/36jDdYJ
Samsung Note 9 - https://amzn.to/2UbdAX2
Campark Action Camera - https://amzn.to/3cT2vjU
Sony A7 Full Frame - https://amzn.to/3vFeckN
Adobe Creative Cloud
And be sure to subscribe to my channel!
DISCLAIMER: Links included in this description might be affiliate links. If you purchase a product or service with the links that I provide I may receive a small commission. There is no additional charge to you! Thank you for supporting my channel so I can continue to provide you with free content!
//ABOUT ME
By day I'm a Functional Medicine Doctor and Chiropractic Physician. Outside of the office I have a lot of different hobbies and interests. Everything from cycling, home projects, wood working, and tinkering with my F150. I love doing DIY projects and just being a creator. Some have failed miserably while others have been a huge success. No matter the project there was always something to learn from each. There's a certain satisfaction from making something yourself. I've learned so much from other professionals and DIY'ers here on YouTube. This channel is dedicated to helping you tackle your own DIY projects and hopefully taking some of the mystery and fear out of the equation.
//CONNECT WITH ME:
My site: http://drwillmosbey.com
My Facebook: http://facebook.com/willmosbey
My Clinic: http://thrivefamilyhealthcenter.com
22
views
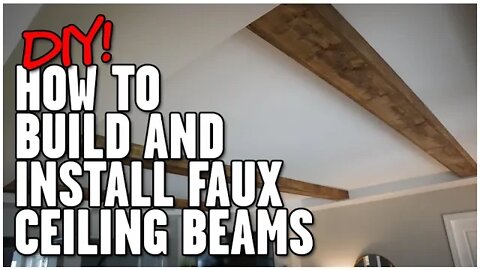
How To Build And Install Faux Ceiling Beams | DIY
In this video I show you how to build and install faux beams that you can add to any ceiling.
I used 1x8 as the support board and the bottom of the beam itself. This made it easy when it came time to build the beams and then mount them to the ceiling. I ripped 1x10s down the middle which acted as the sides of the beams. My tray ceiling was just over 5 1/2" so I made the beams 4 1/2" on the sides to have a 1" reveal at the bottom.
//MATERIALS
(6) 1x8x14'
(3) 1x10x14'
Minwax Walnut stain
//CHAPTERS
0:00 - Intro
00:59 - The Build
07:47 - Staining
13:49 - Securing To Support Board
14:27 - Finished Product and Wrap-Up
//GEAR I USE:
Main Camera - Canon EOS M50 - https://amzn.to/36jlvVf
Akaso Brave 7 LE - https://amzn.to/3ADVf5H
Microphone - https://amzn.to/2TMW5fX
SD Card - https://amzn.to/36jDdYJ
Samsung Note 9 - https://amzn.to/2UbdAX2
Campark Action Camera - https://amzn.to/3cT2vjU
Sony A7 Full Frame - https://amzn.to/3vFeckN
Adobe Creative Cloud
And be sure to subscribe to my channel!
DISCLAIMER: Links included in this description might be affiliate links. If you purchase a product or service with the links that I provide I may receive a small commission. There is no additional charge to you! Thank you for supporting my channel so I can continue to provide you with free content!
//ABOUT ME
By day I'm a Functional Medicine Doctor and Chiropractic Physician. Outside of the office I have a lot of different hobbies and interests. Everything from cycling, home projects, wood working, and tinkering with my F150. I love doing DIY projects and just being a creator. Some have failed miserably while others have been a huge success. No matter the project there was always something to learn from each. There's a certain satisfaction from making something yourself. I've learned so much from other professionals and DIY'ers here on YouTube. This channel is dedicated to helping you tackle your own DIY projects and hopefully taking some of the mystery and fear out of the equation.
//CONNECT WITH ME:
Instagram: https://www.instagram.com/drwillmosbey/
Facebook: http://facebook.com/willmosbey
30
views
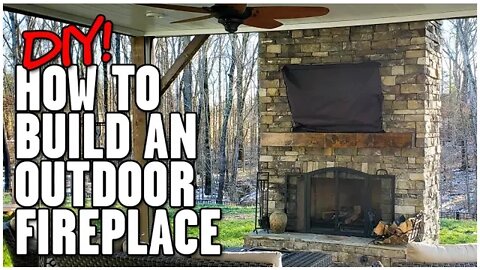
How To Build An Outdoor Fireplace In 20 Minutes | DIY
In this video I show you how I built our outdoor fireplace. This was a project that took 7 months to complete. And that's only because my wife and I could only work on this on the weekends. We worked on this project during the winter months so we didn't have extra daylight in the evening after work. The fireplace is 80" wide and 14' tall with a 43" wide firebox. So yeah it's pretty big. It took 34 bags of 60lb concrete for the footing and approximately 360 cinder blocks to create the structure. The outside is finished off with a veneer stone.
We tapped onto our natural gas line coming off the house to use as our fire starter. No more lighting kindling.
Even though the project took 7 months to complete it has been well worth it. It has given us an extension off of our living room and a true outdoor living space for entertaining and just cozying up my the fire!
0:00 - Intro
11:55 - Start Of The Build
22:49 - Laying The Firebrick For The Firebox
27:25 - Explaining The Gas Line
28:19 - Making The Faux Mantle Beam
32:55 - Making The Hearth From Leftover Flagstone
35:03 - Putting On The Flue Chimney Cover
//THE PLANS I USED:
http://www.backyardflare.com/
https://www.diyoutdoorfireplaces.com/
//FLUE CHIMNEY COVER
https://www.amazon.com/gp/product/B00XND5I8K/ref=ppx_yo_dt_b_asin_title_o03_s00?ie=UTF8&psc=1
//GEAR I USE:
Main Camera - Canon EOS M50 - https://amzn.to/36jlvVf
Akaso Brave 7 LE - https://amzn.to/3ADVf5H
Microphone - https://amzn.to/2TMW5fX
SD Card - https://amzn.to/36jDdYJ
Samsung Note 9 - https://amzn.to/2UbdAX2
Campark Action Camera - https://amzn.to/3cT2vjU
Sony A7 Full Frame - https://amzn.to/3vFeckN
Adobe Creative Cloud
And be sure to subscribe to my channel!
DISCLAIMER: Links included in this description might be affiliate links. If you purchase a product or service with the links that I provide I may receive a small commission. There is no additional charge to you! Thank you for supporting my channel so I can continue to provide you with free content!
//ABOUT ME
By day I'm a Functional Medicine Doctor and Chiropractic Physician. Outside of the office I have a lot of different hobbies and interests. Everything from cycling, home projects, wood working, and tinkering with my F150. I love doing DIY projects and just being a creator. Some have failed miserably while others have been a huge success. No matter the project there was always something to learn from each. There's a certain satisfaction from making something yourself. I've learned so much from other professionals and DIY'ers here on YouTube. This channel is dedicated to helping you tackle your own DIY projects and hopefully taking some of the mystery and fear out of the equation.
//CONNECT WITH ME:
My site: http://drwillmosbey.com
My Facebook: http://facebook.com/willmosbey
My Clinic: http://thrivefamilyhealthcenter.com
77
views

ISSYAUTO Armrest Center Console Cover Review | 2015-2020 Ford F150
In this video I have the honor of reviewing a much needed product. I was super surprised and excited when ISSYAUTO reached out to me to see if I would like to review their center console cover that fits my 2015 Ford F150. I of course jumped at the opportunity. They sent me the super soft velvet armrest cover with the embroidered USA flag. I love the look and feel and it's very well made! Very easy to clean as well. Just toss it in the wash.
You can check it out here...
ISSYAUTO Center Console Cover
https://www.amazon.com/ISSYAUTO-Compatible-2015-2020-2017-2020-Embroidered/dp/B0995W1QV1/ref=sr_1_14?m=A3HFUC27WX97EL&marketplaceID=ATVPDKIKX0DER&qid=1638804513&s=merchant-items&sr=1-14
ISSYAUTO Amazon Storefront
https://www.amazon.com/s?me=A3HFUC27WX97EL&marketplaceID=ATVPDKIKX0DER
//GEAR I USE:
Main Camera - Canon EOS M50 - https://amzn.to/36jlvVf
Akaso Brave 7 LE - https://amzn.to/3ADVf5H
Microphone - https://amzn.to/2TMW5fX
SD Card - https://amzn.to/36jDdYJ
Samsung Note 9 - https://amzn.to/2UbdAX2
Campark Action Camera - https://amzn.to/3cT2vjU
Sony A7 Full Frame - https://amzn.to/3vFeckN
Adobe Creative Cloud
And be sure to subscribe to my channel!
DISCLAIMER: Links included in this description might be affiliate links. If you purchase a product or service with the links that I provide I may receive a small commission. There is no additional charge to you! Thank you for supporting my channel so I can continue to provide you with free content!
//ABOUT ME
By day I'm a Functional Medicine Doctor and Chiropractic Physician. Outside of the office I have a lot of different hobbies and interests. Everything from cycling, home projects, wood working, and tinkering with my F150. I love doing DIY projects and just being a creator. Some have failed miserably while others have been a huge success. No matter the project there was always something to learn from each. There's a certain satisfaction from making something yourself. I've learned so much from other professionals and DIY'ers here on YouTube. This channel is dedicated to helping you tackle your own DIY projects and hopefully taking some of the mystery and fear out of the equation.
//CONNECT WITH ME:
My site: http://drwillmosbey.com
My Facebook: http://facebook.com/willmosbey
My Clinic: http://thrivefamilyhealthcenter.com
21
views

Are The Radar Renegade RT+ Tires Any Good? | First Impressions
In this video I give my first impressions of my new tires, the Radar Renegade RT+. I just couldn't take the road hum coming from my Kanati Mudhogs MT any longer so I switched to these Radar Renegades which are a hybrid tire. Check out the entire video to get my full review!
I'm going to share with you my 6 benefits to owning a set of Radar Renegade RT+ tires!
The Radar Renegade R/T+ offer both aggressive and rugged looks with great on/off-road performance making it a combination between an All-Terrain and Mud-Terrain tire and offers the best of both worlds. The cool part is they offer a customizable sidewall. You can choose either the Skull & Piston design on one side or the mud penetrating dagger shaped lugs on the other.
Available in over 50 sizes ranging from 16”-24” rim diameter and with an option of F load range sizes. All sizes carry up to a 45,000 mile (72,000 kilometer) treadwear limited warranty and road hazard warranty for the United States and Canada.
0:00 - Intro
2:37 - Benefit #1 - Low Road Noise
4:00 - Benefit #2 - RT+ Hybrid
4:54 - Benefit #3 - Warranty
5:10 - Benefit #4 - Customization
6:03 - Benefit #5 - Tread Pattern
7:46 - Benefit #6 - The Company
9:51 - Road Test
13:16 - Wrap Up
//GEAR I USE:
Main Camera - Canon EOS M50 - https://amzn.to/36jlvVf
Akaso Brave 7 LE - https://amzn.to/3ADVf5H
Microphone - https://amzn.to/2TMW5fX
SD Card - https://amzn.to/36jDdYJ
Samsung Note 9 - https://amzn.to/2UbdAX2
Campark Action Camera - https://amzn.to/3cT2vjU
Sony A7 Full Frame - https://amzn.to/3vFeckN
Adobe Creative Cloud
And be sure to subscribe to my channel!
DISCLAIMER: Links included in this description might be affiliate links. If you purchase a product or service with the links that I provide I may receive a small commission. There is no additional charge to you! Thank you for supporting my channel so I can continue to provide you with free content!
//ABOUT ME
By day I'm a Functional Medicine Doctor and Chiropractic Physician. Outside of the office I have a lot of different hobbies and interests. Everything from cycling, home projects, wood working, and tinkering with my F150. I love doing DIY projects and just being a creator. Some have failed miserably while others have been a huge success. No matter the project there was always something to learn from each. There's a certain satisfaction from making something yourself. I've learned so much from other professionals and DIY'ers here on YouTube. This channel is dedicated to helping you tackle your own DIY projects and hopefully taking some of the mystery and fear out of the equation.
//CONNECT WITH ME:
My site: http://drwillmosbey.com
My Facebook: http://facebook.com/willmosbey
My Clinic: http://thrivefamilyhealthcenter.com
73
views
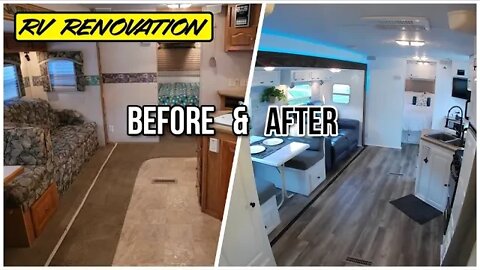
RV Renovation Before and After | 2006 Forest River Flagstaff Makeover
In this video, my wife, Stephanie, and I give you a before and after tour of our RV renovation on the 2006 Forest River Flagstaff. Super excited to share this project with you. We had a lot of fun with this remodel!
Subscribe to my channel at:
https://www.youtube.com/channel/UCDg9mSLEEwf04H_1dynjjXg
//CHAPTERS
Intro - 0:00
The Tour - 1:55
The Wrap Up/Gag Reel - 14:45
//GEAR I USE:
Main Camera - Canon EOS M50 - https://amzn.to/36jlvVf
Akaso Brave 7 LE - https://amzn.to/3ADVf5H
Microphone - https://amzn.to/2TMW5fX
SD Card - https://amzn.to/36jDdYJ
Samsung Note 9 - https://amzn.to/2UbdAX2
Campark Action Camera - https://amzn.to/3cT2vjU
Sony A7 Full Frame - https://amzn.to/3vFeckN
Adobe Creative Cloud
DISCLAIMER: Links included in this description might be affiliate links. If you purchase a product or service with the links that I provide I may receive a small commission. There is no additional charge to you! Thank you for supporting my channel so I can continue to provide you with free content!
//ABOUT ME
By day I'm a Functional Medicine Doctor and Chiropractic Physician. Outside of the office I have a lot of different hobbies and interests. Everything from cycling, home projects, wood working, and tinkering with my F150. I love doing DIY projects and just being a creator. Some have failed miserably while others have been a huge success. No matter the project there was always something to learn from each. There's a certain satisfaction from making something yourself. I've learned so much from other professionals and DIY'ers here on YouTube. This channel is dedicated to helping you tackle your own DIY projects and hopefully taking some of the mystery and fear out of the equation.
//CONNECT WITH ME:
My site: http://drwillmosbey.com
My Facebook: http://facebook.com/willmosbey
My Clinic: http://thrivefamilyhealthcenter.com
37
views
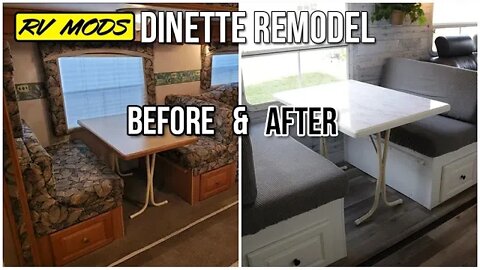
RV Renovation | Dinette Remodel Before & After | DIY Camper
In this video, I show you how I redesigned and remodeled our camper dinette. The original was pretty old looking but had some good points. The cushions were still usable and very good but the benches themselves needed some serious updating to get rid of that old, tired, dingy look and give it a more modern and fresh look.
//THINGS YOU'LL NEED FOR THIS PROJECT
4x8 sheet of 1/4" plywood
1x5x8' piece of white trim board
Table Saw
Circular Saw
Drills
Primer
White Paint
Cushion Covers - https://www.amazon.com/Hokway-Slipcovers-Reversible-Protector-Loveseat/dp/B07BKW1Z1P/ref=sr_1_5?crid=CLDZBV3W729B&keywords=rv+cushion+covers+dinette+booth&qid=1636296063&sprefix=rv+cushion+co%2Caps%2C157&sr=8-5
//GEAR I USE:
Main Camera - Canon EOS M50 - https://amzn.to/36jlvVf
Akaso Brave 7 LE - https://amzn.to/3ADVf5H
Microphone - https://amzn.to/2TMW5fX
SD Card - https://amzn.to/36jDdYJ
Samsung Note 9 - https://amzn.to/2UbdAX2
Campark Action Camera - https://amzn.to/3cT2vjU
Sony A7 Full Frame - https://amzn.to/3vFeckN
Adobe Creative Cloud
And be sure to subscribe to my channel!
DISCLAIMER: Links included in this description might be affiliate links. If you purchase a product or service with the links that I provide I may receive a small commission. There is no additional charge to you! Thank you for supporting my channel so I can continue to provide you with free content!
//ABOUT ME
By day I'm a Functional Medicine Doctor and Chiropractic Physician. Outside of the office I have a lot of different hobbies and interests. Everything from cycling, home projects, wood working, and tinkering with my F150. I love doing DIY projects and just being a creator. Some have failed miserably while others have been a huge success. No matter the project there was always something to learn from each. There's a certain satisfaction from making something yourself. I've learned so much from other professionals and DIY'ers here on YouTube. This channel is dedicated to helping you tackle your own DIY projects and hopefully taking some of the mystery and fear out of the equation.
//CONNECT WITH ME:
My site: http://drwillmosbey.com
My Facebook: http://facebook.com/willmosbey
My Clinic: http://thrivefamilyhealthcenter.com
42
views
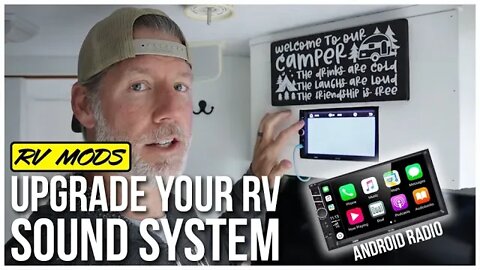
REPLACE Your RV Sound System with NEW Technology | Android Car Stereo
#RVandroidradio #rvsoundsystem #rvmods
The sound system in the old 2006 Flagstaff had to go. In this video I show you how to upgrade your old sound system to a new system that has great sound and all of the new technology that you would expect like Bluetooth, WIFI, aux input, etc. The new stereo also came with a backup camera (not needed) and a remote (needed) so you can easily change modes or turn the volume up/down from anywhere in the RV.
It wasn't hard to take out the old stereo. Just be sure to get the wiring harness from the old stereo. You'll need this to connect the old one with the new one so you can easily plug into the system.
I'm very please with the functionality of the Podofo. This was a very inexpensive solution that just works.
//PRODUCTS PURCHASED
Podofo Double Din 7" Radio - https://amzn.to/3EdorS3
Soldering Iron Kit - https://amzn.to/3Eb03k7
Wire Connector Kit - https://amzn.to/30NXHcn
//GEAR I USE:
Main Camera - Canon EOS M50 - https://amzn.to/36jlvVf
Akaso Brave 7 LE - https://amzn.to/3ADVf5H
Microphone - https://amzn.to/2TMW5fX
SD Card - https://amzn.to/36jDdYJ
Samsung Note 9 - https://amzn.to/2UbdAX2
Campark Action Camera - https://amzn.to/3cT2vjU
Sony A7 Full Frame - https://amzn.to/3vFeckN
Adobe Creative Cloud
And be sure to subscribe to my channel!
DISCLAIMER: Links included in this description might be affiliate links. If you purchase a product or service with the links that I provide I may receive a small commission. There is no additional charge to you! Thank you for supporting my channel so I can continue to provide you with free content!
//ABOUT ME
By day I'm a Functional Medicine Doctor and Chiropractic Physician. Outside of the office I have a lot of different hobbies and interests. Everything from cycling, home projects, wood working, and tinkering with my F150. I love doing DIY projects and just being a creator. Some have failed miserably while others have been a huge success. No matter the project there was always something to learn from each. There's a certain satisfaction from making something yourself. I've learned so much from other professionals and DIY'ers here on YouTube. This channel is dedicated to helping you tackle your own DIY projects and hopefully taking some of the mystery and fear out of the equation.
//CONNECT WITH ME:
My site: http://drwillmosbey.com
My Facebook: http://facebook.com/willmosbey
My Clinic: http://thrivefamilyhealthcenter.com
23
views
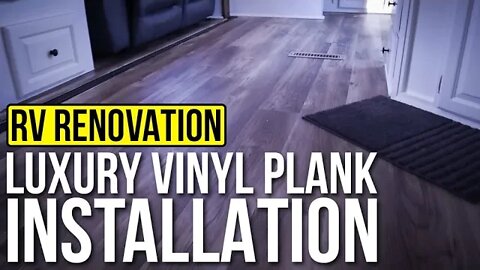
RV Renovation | DIY Luxury Vinyl Plank Installation and Subfloor Repair
This is the first video in my RV Renovation Series. In this video, I walk through the full process I used to fix and repair the subfloor and install new luxury vinyl plank flooring in our 2006 Forest River Flagstaff.
The LVP I used came from Lowes. It's called Dockside Hickory. The trim piece reducer for the slide out was also in Dockside Hickory color. Who knew!
//Flooring Install Kit: Block, Pull Bar, Spacers
https://amzn.to/2YFImK7
SUBSCRIBE to my channel here:
https://www.youtube.com/channel/UCDg9mSLEEwf04H_1dynjjXg
2:22 - Demolition and removal of rotted subfloor
4:33 - Install new support framing and rigid foam insulation in subfloor
6:58 - Finished Subfloor
7:08 - Installing Luxury Vinyl Plank
9:39 - Install LVP on the Slide Out
11:56 - The Finished Product
MORE ABOUT THIS EPISODE:
Our new purchase had a little subfloor damage but I didn't quite no how much. So once I started ripping everything out I knew I was going to have to replace the subfloor in a couple of main areas. I mean you can't have mold in your RV. So we ripped everything out and started with a new subfloor.
One thing I had to do was add some new framing for support as you walked across the floor. This really made the floor feel more solid and took out the soft spots.
I chose to start laying the new luxury vinyl plank in the bedroom along the back wall (driver's side) and work my way into and through the living room. This worked out just fine. It is a good idea to snap a chalk line to keep yourself on track and lined up with the slide.
//GEAR I USE:
Main Camera - Canon EOS M50 - https://amzn.to/36jlvVf
Akaso Brave 7 LE - https://amzn.to/3ADVf5H
Microphone - https://amzn.to/2TMW5fX
SD Card - https://amzn.to/36jDdYJ
Samsung Note 9 - https://amzn.to/2UbdAX2
Campark Action Camera - https://amzn.to/3cT2vjU
Sony A7 Full Frame - https://amzn.to/3vFeckN
Adobe Creative Cloud
DISCLAIMER: Links included in this description might be affiliate links. If you purchase a product or service with the links that I provide I may receive a small commission. There is no additional charge to you! Thank you for supporting my channel so I can continue to provide you with free content!
//ABOUT ME
By day I'm a Functional Medicine Doctor and Chiropractic Physician. Outside of the office I have a lot of different hobbies and interests. Everything from cycling, home projects, wood working, and tinkering with my F150. I love doing DIY projects and just being a creator. Some have failed miserably while others have been a huge success. No matter the project there was always something to learn from each. There's a certain satisfaction from making something yourself. I've learned so much from other professionals and DIY'ers here on YouTube. This channel is dedicated to helping you tackle your own DIY projects and hopefully taking some of the mystery and fear out of the equation.
//CONNECT WITH ME:
My site: http://drwillmosbey.com
My Facebook: http://facebook.com/willmosbey
My Clinic: http://thrivefamilyhealthcenter.com
129
views