

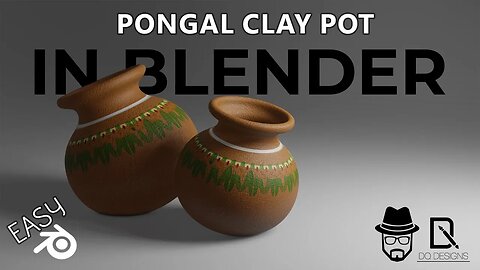
Realistic Pongal Pot (பொங்கல் பானை) in Blender | DQ Design in Tamil
In this video, we are going to see how we can create a Realistic Pongal Clay Pot in Blender.
In this we will be seeing
1. Screw Modifier
2. UV-Unwrapping Use
3. Bump Node
If you want to start 3D Modelling or want to sharpen your existing skills as a CG Artist, this tutorial is for you!
Show me your creations by tagging your final renders on
Instagram - https://www.instagram.com/dqdesign.lk
Facebook - https://www.facebook.com/IvanDQB/
Let us know in the comments!
Chapter Breakdown
0:00 - Channel Intro
0:14 - Final Result
0:50 - Import Reference Image
1:19 - First Vertex
2:06 - Subdivision Surface
3:07 - Tweaks
3:39 - Base shape and Screw Modifier
5:24 - Material/Texture using Photoshop
7:29 - Add Material in Blender
8:22 - UV Editing
9:08 - Shader Editor
9:25 - Bump Node
10:47 - Final Scene Composition
12:09 - Final Setup and Outro
3D Modelling தொடங்க விரும்பினால் அல்லது CG கலைஞராக உங்கள் தற்போதைய திறங்களை கூர்மைப்படுத்த விரும்பினால், இந்த டுடோரியல் உங்களுக்கானது!
Blenderஇல் realisticஅ பொங்கல் பானை எப்படி செய்றதுனு இந்த வீடியோல பாக்க போறோம். இதேமாதிரி நீங்களும் Create பண்ணி Social Mediaல Upload பண்றப்போ என் பேஜையும் tag பண்ணுங்க.
Music by QubeSounds from Pixabay - https://pixabay.com/users/qubesounds-24397640/
2
views
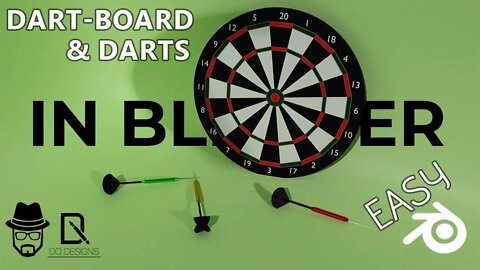
Easy Dartboard and Darts in Blender Tutorial | DQ Designs in Tamil
In this video, we are going to see how we can create a Dartboard and Darts in Blender.
In this we will be seeing
1. Joining to edges with faces
2. Bevel Modifier
3. Mirror Modifier
If you want to start 3D Modelling or want to sharpen your existing skills as a CG Artist, this tutorial is for you!
Show me your creations by tagging your final renders on
Instagram - https://www.instagram.com/dqdesign.lk
Facebook - https://www.facebook.com/IvanDQB/
Let us know in the comments!
Chapter Breakdown
0:00 - Introduction
0:14 - Channel Intro
0:33 - Board Base
1:35 - Reference Image
2:07 - Top Face
2:12 - 3D Cursor positioning
2:36 - Dartboard points face
3:42 - Merge Vertices
4:02 - Metal borders
4:29 - Bevel Modifier
5:13 - Fill faces between two edges
6:40 - Materials for the Dartboard
10:47 - Points Texts
11:16 - Thickness for the Texts
11:51 - Finishing up Dartboard
12:21 - Dart Base
13:20 - Bevel
13:43 - Dart Flight base
14:49 - Mirror Modifier
15:30 - Dart Barrel Details
16:31 - Dart Materials/Colours
17:47 - Final Render
17:51 - Outro
3D Modelling தொடங்க விரும்பினால் அல்லது CG கலைஞராக உங்கள் தற்போதைய திறங்களை கூர்மைப்படுத்த விரும்பினால், இந்த டுடோரியல் உங்களுக்கானது!
Blenderஇல் Dartboardஉம் Dartsஐயும் எப்படி செய்றதுனு இந்த வீடியோல பாக்க போறோம். இதேமாதிரி நீங்களும் Create பண்ணி Social Mediaல Upload பண்றப்போ என் பேஜையும் tag பண்ணுங்க.
10
views
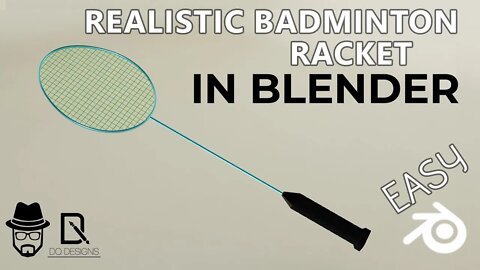
Badminton Racket in Blender Tamil Tutorial | DQ Design in Tamil
In this video, we are going to see how we can create a Badminton Racket in Blender.
In this we will be seeing
1. Using Wireframe Modifier
2. BoolTools Add-on
and
3. Solidify Modifier
If you want to start 3D Modelling or want to sharpen your existing skills as a CG Artist, this tutorial is for you!
Show me your creations by tagging your final renders on
Instagram - https://www.instagram.com/dqdesign.lk
Facebook - https://www.facebook.com/IvanDQB/
Let us know in the comments!
Chapter Breakdown
0:00 - Channel Trailer
0:22 - Introduction
0:44 - Racket Handle
2:33 - LoopTools Add-on
3:02 - Shaft
4:08 - Racket Head
5:10 - Solidify Modifier
5:30 - Subdivision Surface Modifier
5:46 - Stringed Area
6:10 - Subdivide
6:45 - Boolean Modifier or BoolTools Addon
7:32 - Separate Mesh
8:08 - Wireframe Modifier
8:52 - Finished Racket Head
10:05 - Add Materials
10:13 - Shader Editor
12:10 - Material for Faces
14:52 - Loop Cut & Bevel - Handle Fine Details
15:40 - Outro
3D Modelling தொடங்க விரும்பினால் அல்லது CG கலைஞராக உங்கள் தற்போதைய திறங்களை கூர்மைப்படுத்த விரும்பினால், இந்த டுடோரியல் உங்களுக்கானது!
Blenderஇல் Badminton Racket ஒன்றை எப்படி செய்றதுனு இந்த வீடியோல பாக்க போறோம். இதேமாதிரி நீங்களும் Create பண்ணி Social Mediaல Upload பண்றப்போ என் பேஜையும் tag பண்ணுங்க.
7
views
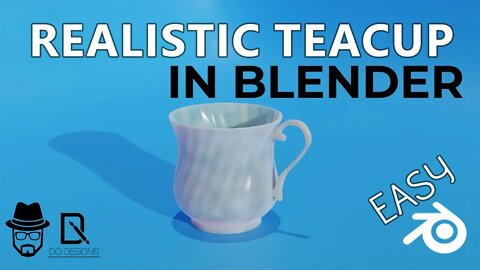
Teacup in Blender Tamil Tutorial | DQ Design in Tamil
In this video, we are going to see how we can create a tea cup in Blender.
In this we will be seeing
1. Using Simple Deform Modifier
2. LoopTools Add-on
and
3. Solidify Modifier
If you want to start 3D Modelling or want to sharpen your existing skills as a CG Artist, this tutorial is for you!
Show me your creations by tagging your final renders on
Instagram - https://www.instagram.com/dqdesign.lk
Facebook - https://www.facebook.com/IvanDQB/
Let us know in the comments!
Chapter Breakdown
0:00 - Channel Trailer
0:22 - Introduction
0:47 - Cylinder Base
1:28 - Loop cuts
1:47 - Cup Shape
2:56 - Subdivision Surface Modifier
3:11 - Enable LoopTools Add-on
3:50 - Loop Selection
3:58 - Checker Deselect
4:18 - Edge-Loop Selection
5:16 - Shrink/Flatten
6:45 - Simple-Deform Modifier
7:16 - Minor Tweaks
10:19 - Solidify Modifier
12:19 - Inner Base
13:17 - Handle
14:06 - Handle Start and End Preparation
16:28 - Handle Creation
17:20 - Handle Shaping
18:26 - Circular Handle
18:47 - Fine Tuning
20:30 - Final Joints
21:38 - Outro
3D Modelling தொடங்க விரும்பினால் அல்லது CG கலைஞராக உங்கள் தற்போதைய திறங்களை கூர்மைப்படுத்த விரும்பினால், இந்த டுடோரியல் உங்களுக்கானது!
Blenderஇல் Tea Cup ஒன்றை எப்படி செய்றதுனு இந்த வீடியோல பாக்க போறோம். இதேமாதிரி நீங்களும் Create பண்ணி Social Mediaல Upload பண்றப்போ என் பேஜையும் tag பண்ணுங்க.
2
views
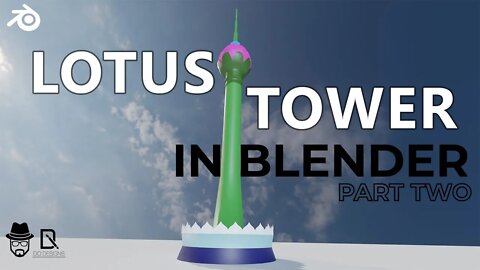
Sri Lankan Lotus Tower in Blender Eevee - Part 02 | DQ Design in Tamil
In this video, we are going to see how we can create and finalise the model of Sri Lankan Lotus Tower in Blender.
This is the second part of the video,
Watch the fist part here: https://www.youtube.com/watch?v=5qxoPHLpNa4
In this we will be seeing
1. Using Array modifier with Object Offset
and
2. Modifying the HDRI's variables
If you want to start 3D Modelling or want to sharpen your existing skills as a CG Artist, this tutorial is for you!
Show me your creations by tagging your final renders on
Instagram - https://www.instagram.com/dqdesign.lk
Facebook - https://www.facebook.com/IvanDQB/
Let us know in the comments!
Chapter Breakdown
0:00 - Channel Trailer
0:22 - Introduction
0:48 - Array Modifier with Object Offset Introduction
2:29 - Petal Shape for the tower
3:42 - Positioning the Petal shape
5:32 - Array Modifier on the Petal
6:02 - Second and Third Layers of Petals
7:12 - Solid Mode with Random Colours
8:00 - Add Material
8:13 - Final Top Layer of Petals
11:00 - Leaf
14:39 - Materials for Individual Faces
15:40 - Petal Shape on the Bottom
17:01 - Adjustments
17:23 - Add HDRI
19:51 - Final Render
19:55 - Outro
3D Modelling தொடங்க விரும்பினால் அல்லது CG கலைஞராக உங்கள் தற்போதைய திறங்களை கூர்மைப்படுத்த விரும்பினால், இந்த டுடோரியல் உங்களுக்கானது!
Blenderஇல் இலங்கையிலுள்ள தாமரை கோபுரத்தை(Lotus Tower) எப்படி செய்றதுனு இந்த வீடியோல பாக்க போறோம். இதேமாதிரி நீங்களும் Create பண்ணி Social Mediaல Upload பண்றப்போ என் பேஜையும் tag பண்ணுங்க.
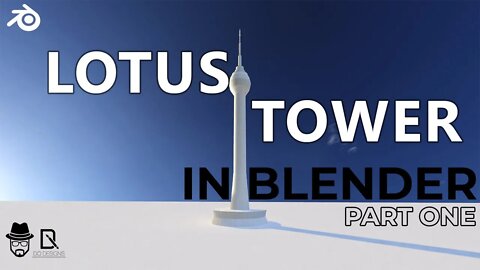
Sri Lankan Lotus Tower in Blender Eevee - Part 01 | DQ Design in Tamil
In this video, we are going to see how we can create the basic structure of the Sri Lankan Lotus Tower in Blender.
This is going to be a two part video, in this we will be seeing
1. Using a reference image as plane
and
2. Creating the Base model.
If you want to start 3D Modelling or want to sharpen your existing skills as a CG Artist, this tutorial is for you!
Show me your creations by tagging your final renders on
Instagram - https://www.instagram.com/dqdesign.lk
Facebook - https://www.facebook.com/IvanDQB/
Let us know in the comments!
Chapter Breakdown
0:00 - Channel Trailer
0:22 - Introduction
1:38 - Enable "Image as plane" Add-on
2:03 - Add Reference Image as plane
2:22 - View using Rendered or Material Preview
2:41 - Placing the Reference Image
3:01 - Add Circle Mesh
3:44 - Editing the Mesh according to the shape
5:22 - Outro
3D Modelling தொடங்க விரும்பினால் அல்லது CG கலைஞராக உங்கள் தற்போதைய திறங்களை கூர்மைப்படுத்த விரும்பினால், இந்த டுடோரியல் உங்களுக்கானது!
Blenderஇல் இலங்கையிலுள்ள தாமரை கோபுரத்தை(Lotus Tower) எப்படி செய்றதுனு இந்த வீடியோல பாக்க போறோம். இதேமாதிரி நீங்களும் Create பண்ணி Social Mediaல Upload பண்றப்போ என் பேஜையும் tag பண்ணுங்க.
1
view
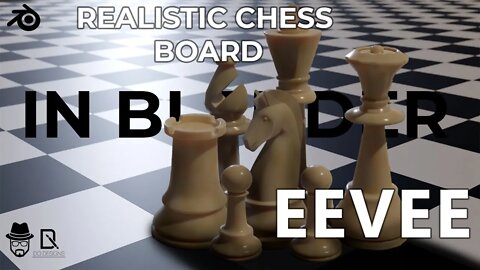
Easy Realistic Chess Full set in Blender Eevee | DQ Design in Tamil
In this video, We are going to see how to create the final piece in the Realistic Chess set in Eevee Render - "The Chess Board" and how to place the chess pieces without too much memory load
We will be seeing how to do
1. Creating the Chess Board
2. Setting Materials for specific Faces in the Mesh
3. Importing Premade Models/Meshes
4. Creating Linked Duplicate - Alt+D in Blender
5. Changing Premade Material Values
6.
in to our scene here.
If you want to start 3D Modelling or want to sharpen your existing skills as a CG Artist, this tutorial is for you!
Show me your creations by tagging your final renders on
Instagram - https://www.instagram.com/dqdesign.lk
Facebook - https://www.facebook.com/profile.php?...
Let us know in the comments!
❤️ If you love what I do, please subscribe and like this video to get notified when I release more tasty content.
Chapter Breakdown
0:00 - Channel Trailer
0:22 - Introduction
1:27 - Chess board model creation
1:53 - Scale Shortcut - S + "Scale Value"
2:02 - Specific number of Loop cuts Shortcut - Ctrl+R → Number
2:28 - Material for specific face
5:52 - Import Premade models
6:12 - Positioning
8:24 - Array Modifier
9:10 - Linked Duplicate - Alt+D
9:48 - Renaming
10:05 - Collection
10:19 - Duplicate for Black
10:52 - Changing Premade Material Values
12:43 - Scene Setting
13:18 - Final Render
13:23 - Outro
3D Modelling தொடங்க விரும்பினால் அல்லது CG கலைஞராக உங்கள் தற்போதைய திறங்களை கூர்மைப்படுத்த விரும்பினால், இந்த டுடோரியல் உங்களுக்கானது!
Blenderஇல் ஒரு chess setஇலுள்ள எல்லா காய்களையும் எப்படி செய்றதுனு நாங்க இதுக்கு முதல் வீடியோல பார்த்தோம். இந்த வீடியோல அதெல்லாம் Showcase பண்ண ஒரு Chess Board எப்படி செய்றது, முதல் செஞ்ச Models எப்படி import பண்ணி Overload ஆகாம Duplicate பண்றதுனு பாக்க போறோம். இதேமாதிரி நீங்களும் Create பண்ணி Social Mediaல Upload பண்றப்போ என் பேஜையும் tag பண்ணுங்க.
33
views
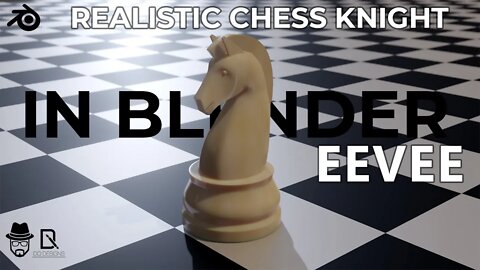
Easy Realistic Chess Knight in Blender Eevee Time-lapse Commentary | DQ Design in Tamil
In this time-lapse video, I am going to create a realistic looking Chess Knight in Blender in Eevee render engine without Sculpting
We will be seeing how to do
1. Knight Model Creation
2. Mirror Modifier
3. Auto Merge Vertex
4. Bevel Modifier
5. Mean Bevel Weight
6. Importing Premade Material
in to our scene here.
Knight Reference Images: https://bit.ly/BlenderKnight
If you want to start 3D Modelling or want to sharpen your existing skills as a CG Artist, this tutorial is for you!
Show me your creations by tagging your final renders on
Instagram - https://www.instagram.com/dqdesign.lk
Facebook - https://www.facebook.com/profile.php?...
Let us know in the comments!
❤️ If you love what I do, please subscribe and like this video to get notified when I release more tasty content.
Chapter Breakdown
0:00 - Channel Trailer
0:22 - Introduction
1:18 - Import Reference Image as Background
2:31 - Knight Model Base Creation
3:11 - Subdivision Surface Modifier & Fine Tune
3:43 - Knight Body Creation
4:31 - Mirror Modifier with Clipping
5:24 - Loop-cuts and Vertex positioning
6:48 - Hide/unhide Vertex using H & Alt+H
7:43 - Extrude & Scale
8:27 - Hide/unhide Vertex using H & Alt+H
10:11 - Vertex Duplicate Shift+D
10:50 - Select Linked with L
11:05 - Option → Auto Merge
11:35 - Fill Nearby Face with F
11:49 - Extruding Vertex and Edge and Vertex Positioning
12:26 - Preparing for Eye-socket
13:12 - Vertex Extrusion for eye-socket
14:49 - Eye Socket
16:14 - Quad Filling
17:21 - Mouth
18:35 - Head and Body attaching
20:00 - Gap Filling
20:47 - Mane
21:08 - Clearing my Mistakes
22:25 - Adding Missing Vertexes
23:42 - Ears
24:30 - Minor adjustments
24:44 - Eyes
25:38 - Bevel Modifier and Model Normals Error
26:19 - Edge Selection for Mean Bevel Weight
27:07 - Mean Bevel Weight
27:30 - Bevel Modifier
28:01 - Final Tweaks
28:54 - Import Materials
29:07 - Scene Setting
29:55 - Final Render Image
30:00 - Outro
Thank you for watching
Blenderஐ பாவித்து இப்படி Realistic ஒரு சதுரங்க மறவனை(Knight) எப்படி செய்றதுனு இந்த வீடியோல பார்ப்போம். 3D Modelling தொடங்க விரும்பினால் அல்லது CG கலைஞராக உங்கள் தற்போதைய திறங்களை கூர்மைப்படுத்த விரும்பினால், இந்த டுடோரியல் உங்களுக்கானது!
Blenderஇல் ஒரு Modelஐ Create பண்ணி அதற்கு Material Add பண்ணி Lighting Set பண்றது எப்படினு இந்த வீடியோல பார்க்க போறோம். இதேமாதிரி நீங்களும் Create பண்ணி Social Mediaல Upload பண்றப்போ என் பேஜையும் tag பண்ணுங்க.
14
views
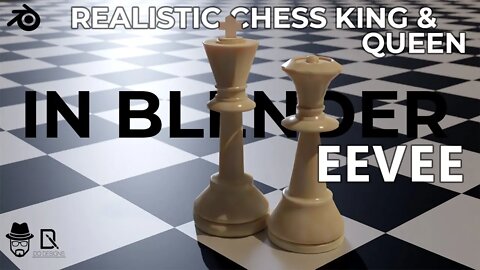
Realistic Chess King & Queen in Blender Eevee Time-lapse | DQ Design in Tamil
In this time lapse video, I am going to create a realistic looking Chess King and Queen in Blender in Eevee render engine.
We will be seeing how to do
1. King and Queen Model Creation
2. Importing Premade Material
in to our scene here.
If you want to start 3D Modelling or want to sharpen your existing skills as a CG Artist, this tutorial is for you!
Show me your creations by tagging your final renders on
Instagram - https://www.instagram.com/dqdesign.lk
Facebook - https://www.facebook.com/profile.php?...
Let us know in the comments!
❤️ If you love what I do, please subscribe and like this video to get notified when I release more tasty content.
Chapter Breakdown
0:00 - Channel Trailer
0:22 - Introduction
0:46 - Queen Model Creation Time-lapse
1:47 - Select - Checker Deselect
2:08 - Subdivision Surface Modifier
2:14 - Fine-tuning Queen Model
2:59 - Grid Fill
3:52 - Proportional Scale
4:34 - King Model Creation
5:52 - Cross on the King
6:58 - Scaling King Model details
8:17 - Subdivision Surface Modifier
8:19 - Fine-tuning King Model
10:02 - Import Materials
10:16 - Light and Render Mode
10:44 - Final Render
10:49 - Outro
Blenderஐ பாவித்து இப்படி Realistic ஒரு சதுரங்க ராஜாவையும் ராணியையும் எப்படி செய்றதுனு இந்த வீடியோல பார்ப்போம். 3D Modelling தொடங்க விரும்பினால் அல்லது CG கலைஞராக உங்கள் தற்போதைய திறங்களை கூர்மைப்படுத்த விரும்பினால், இந்த டுடோரியல் உங்களுக்கானது!
Blenderஇல் ஒரு Modelஐ Create பண்ணி அதற்கு Material Add பண்ணி Lighting Set பண்றது எப்படினு இந்த வீடியோல பார்க்க போறோம். இதேமாதிரி நீங்களும் Create பண்ணி Social Mediaல Upload பண்றப்போ என் பேஜையும் tag பண்ணுங்க.
10
views
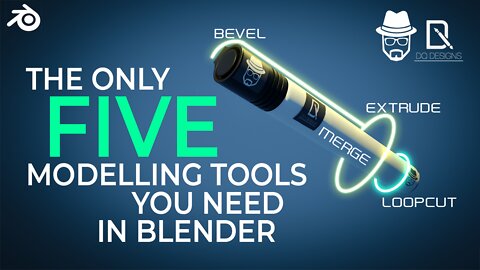
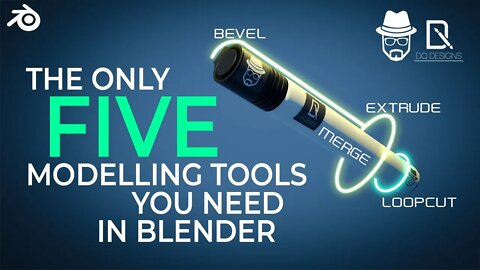
The Only 5 Modelling tools you need in Blender in Tamil | DQ DESIGNS
We look at top 5 Blender beginner modelling tools you need to model ANYTHING in Blender! Starting from the basic cube in blender and using these tools, we can model almost anything. If you want to start 3D modelling or want to sharpen your existing skills as a CG artist, this tutorial is for you! What do you think are the top 5 modelling tools shown in this tutorial? Let us know in the comments!
❤️ If you love what I do, please subscribe and like this video to get notified when I release more tasty content.
This video covers the five modelling tools to make anything in Blender
Chapters:
0:00 - Getting started
1:14 - Bevel Tool
3:27 - Merge Tool
5:08 - Extrude Tool
7:01 - Loop Cut + Bevel
8:21 - Grid Fill
நீங்கள் Blenderல் எந்த 3D உருவையும் உருவாக்க தேவையான இலகுவான 5 Tools. Blenderல் உள்ள Basic Cubeஐ இவ்Toolsகளை பயன்படுத்தி எந்தவொரு உருவையும் உருவாக்கலாம். நீங்கள் 3D Modelling தொடங்க விரும்பினால் அல்லது CG கலைஞராக உங்கள் தற்போதைய திறன்களைக் கூர்மைப்படுத்த விரும்பினால், இந்த டுடோரியல் உங்களுக்கானது! இந்த டுடோரியலில் காட்டப்பட்டுள்ள 5 Modelling Tools பற்றி உங்கள் கருத்துக்கள் என்ன? நீங்கள் பயன்படுத்தும் Tools எவை என Commentsஇல் தெரியப்படுத்துங்கள்!
22
views
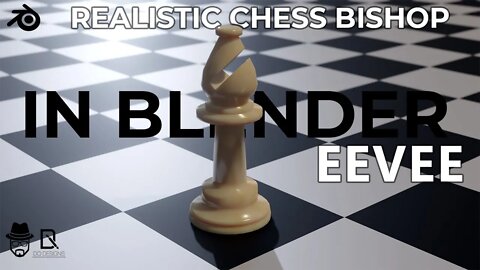
Realistic Chess Bishop in Blender Eevee Tutorial | DQ Design in Tamil
In this video, I am going to create a realistic looking Chess Bishop in Blender in Eevee render engine.
We will be seeing
1. Bishop Model Creation
2. Importing Premade Material, and
3. Using Boolean Modifier(Again)
4. Shape irregularity when Applying a Modifier
to our scene here.
If you want to start 3D Modelling or want to sharpen your existing skills as a CG Artist, this tutorial is for you!
Show me your creations by tagging your final renders on
Instagram - https://www.instagram.com/dqdesign.lk
Facebook - https://www.facebook.com/profile.php?...
Let us know in the comments!
❤️ If you love what I do, please subscribe and like this video to get notified when I release more tasty content.
Chapter Breakdown
0:00 - Channel Trailer
0:22 - Introduction
1:00 - Bishop Modelling
5:20 - Alter using x-ray Mode (Shift+Z)
6:46 - Scaling in Two Directions (S then "Shift+Locked Direction")
7:17 - Subdivision Surface Modifier
7:36 - Model Fine Tuning
8:17 - Grid Fill
8:57 - Import Materials
9:13 - Apply Material, Light Source
10:02 - Cube for Cutting off
10:27 - Rotate = R + Direction + Degree
11:17 - Apply Modifier Issue
11:51 - Bevel (Ctrl+B)
12:28 - Material on Selected Faces
13:26 - Final Product
13:30 - Outro
Blenderஐ பாவித்து இப்படி Realistic ஒரு சதுரங்க மந்திரிய எப்படி செய்றதுனு இந்த வீடியோல பார்ப்போம். 3D Modelling தொடங்க விரும்பினால் அல்லது CG கலைஞராக உங்கள் தற்போதைய திறங்களை கூர்மைப்படுத்த விரும்பினால், இந்த டுடோரியல் உங்களுக்கானது!
Blenderஇல் ஒரு Modelஐ Create பண்ணி அதற்கு Material Add பண்ணி Lighting Set பண்றது எப்படினு இந்த வீடியோல பார்க்க போறோம். இதேமாதிரி நீங்களும் Create பண்ணி Social Mediaல Upload பண்றப்போ என் பேஜையும் tag பண்ணுங்க.
2
views
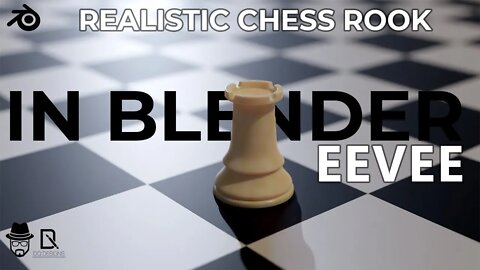
Realistic Chess Rook in Blender Eevee Tutorial | DQ Design in Tamil
In this video, I am going to create a realistic looking Chess Rook in Blender in Eevee render engine.
We will be seeing
1. Rook Model Creation
2. Importing Premade Material, and
3. Using Boolean Modifier(Again)
to our scene here.
We will be also seeing adding HDRI from (polyhaven.com) in Shader Editor with to change the scene world in Blender. If you want to start 3D Modelling or want to sharpen your existing skills as a CG Artist, this tutorial is for you!
Show me your creations by tagging your final renders on
Instagram - https://www.instagram.com/dqdesign.lk
Facebook - https://www.facebook.com/profile.php?id=100085043628672
Let us know in the comments!
❤️ If you love what I do, please subscribe and like this video to get notified when I release more tasty content.
Chapter Breakdown
0:00 - Channel Trailer
0:22 - Introduction
1:06 - 1. Rook Modelling
1:23 - Extrude and Scalings
4:06 - Grid Fill
4:18 - Subdivision Surface
4:34 - Loop cut Refine details
7:25 - Replace F-Fill with Grid Fill
8:59 - Model for removing chunk off
10:06 - Boolean Modifier
11:00 - Apply modifier
11:17 - Import/Append Material
11:55 - Add Light for Render Mode
12:09 - Select Material from List
13:09 - Camera & Scene Setting
18:22 - Scene World
19:17 - HDRI Resource - PolyHaven.com
20:45 - Camera Options
22:45 - Model Import Problem Solving
23:28 - Outro
23:38 - Upcoming Videos
Blenderஐ பாவித்து இப்படி Realisticஅ ஒரு சதுரங்க கோட்டைய எப்படி செய்றதுனு இந்த வீடியோல பார்ப்போம். 3D Modelling தொடங்க விரும்பினால் அல்லது CG கலைஞ்சராக உங்கள் தற்போதைய திறங்களை கூர்மைப்படுத்த விரும்பினால், இந்த டுடோரியல் உங்களுக்கானது!
Blenderஇல் ஒரு Modelஐ Create பண்ணி அதற்கு Material Add பண்ணி Lighting Set பண்றது எப்படினு இந்த வீடியோல பார்க்க போறோம். இதேமாதிரி நீங்களும் Create பண்ணி Social Mediaல Upload பண்றப்போ என் பேஜையும் tag பண்ணுங்க.
6
views
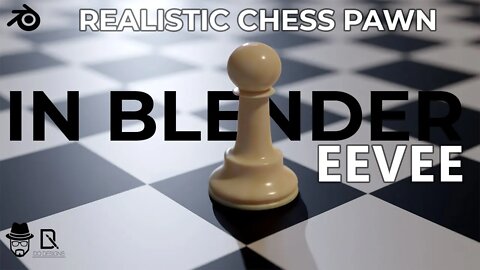
Realistic Chess Pawn in Blender Eevee Tutorial | DQ Design in Tamil
In this video, I am going to create a realistic looking Chess Pawn in Blender in Eevee render engine.
We will be seeing
1. Pawn Model Creation
2. Adding Material, and
3. Adding Light
to our scene here.
We will be also seeing adding Checker Texture in Shader Editor with some Subdivision Surface Modifiers too. If you want to start 3D Modelling or want to sharpen your existing skills as a CG Artist, this tutorial is for you!
Show me your creations by tagging your final renders on
Instagram - https://www.instagram.com/dqdesign.lk
Facebook - https://www.facebook.com/profile.php?id=100085043628672
Let me know in the comments!
❤️ If you love what I do, please subscribe and like this video to get notified when I release more tasty content.
Chapter Breakdown
0:00 - Channel Trailer
0:22 - Introduction
1:17 - About Shortcut Keys
1:25 - 1. Modelling the Pawn
5:18 - Two Selection Methods
5:22 - X-ray Mode Method
5:38 - Ctrl + Numpad + Method
5:59 - "To Sphere" Mesh Transformation
7:36 - Fill Face
8:02 - Subdivision Surface
9:15 - X-ray view Opacity
9:34 - Detailing
11:42 - Render View
11:52 - Add First Sun Light
12:04 - Material Introduction
12:14 - Material Properties
12:22 - Multi-Viewport
12:56 - New Material
13:19 - Base Colour
13:53 - Adding Camera
14:28 - Camera Positioning
14:56 - Camera Lock to View
15:33 - Plane for the object to be placed
16:04 - Shader Editor Introduction
16:28 - Viewport Shading/Scene World
17:13 - Roughness/Reflection
18:24 - Subsurface/Refraction(Light Absorb)
19:13 - Chess Board/Checker Pattern
19:42 - Checker Texture
20:46 - Light Setting
21:45 - Eevee Render Settings
22:42 - Light Colour
23:02 - Camera/Lens Setting
24:09 - Rendering Final Image
24:17 - Outro
Blenderஐ பாவித்து இப்படி Realisticஅ ஒரு சதுரங்க சிப்பாய் எப்படி செய்றதுனு இந்த வீடியோல பார்ப்போம். 3D Modelling தொடங்க விரும்பினால் அல்லது CG கலைஞ்சராக உங்கள் தற்போதைய திறங்களை கூர்மைப்படுத்த விரும்பினால், இந்த டுடோரியல் உங்களுக்கானது!
Blenderஇல் ஒரு Modelஐ Create பண்ணி அதற்கு Material Add பண்ணி Lighting Set பண்றது எப்படினு இந்த வீடியோல பார்க்க போறோம். இதேமாதிரி நீங்களும் Create பண்ணி Social Mediaல Upload பண்றப்போ என் பேஜையும் tag பண்ணுங்க.
13
views
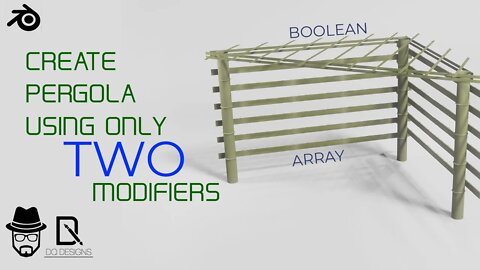
Pergola Model in Blender Using only Two Modifiers | DQ Design in Tamil
In this video, we will be looking at creating the pergola which I made at home into a low poly 3D model only with two modifiers – Array and Boolean. If you want to start 3D modelling or want to sharpen your existing skills as a CG artist, this tutorial is for you!
Create something from your own home surrounding and post it on your socials tagging me
Instagram - https://www.instagram.com/dqdesign.lk
Facebook - https://www.facebook.com/profile.php?id=100085043628672
Let us know in the comments!
❤️ If you love what I do, please subscribe and like this video to get notified when I release more tasty content.
This video uses both Array Modifier and Boolean Modifier with a bit of Proportional Editing
0:00 - Channel Trailer
0:22 - What is Pergola?
1:03 - Getting Started
1:10 - Base Node of Bamboo
2:05 - Proportional Editing
2:20 - Mirror Modifier
2:36 - X-Ray Mode
3:05 - Array Modifier - Bamboo Pillar
3:28 - Duplicating - Three Pillars
4:04 - Cube into Bamboo Piece
5:30 - Bamboo piece knots
7:30 - Array Modifier - Panels
8:13 - Duplicate Sides finished
8:53 - Roof Base
12:07 - Array Modifier - Roof
13:12 - Boolean Modifier
14:01 - Viewport Display - Bounds
14:28 - Final Result
14:36 - Your Submissions?
Blenderஐ பாவித்து இவ்வாறான ஒரு Pergola ஒன்றை எப்படி அமைப்பதென்று இக்காணொளியில் பார்ப்போம். நீங்கள் 3D Modelling தொடங்க விரும்பினால் அல்லது CG கலைஞராக உங்கள் தற்போதைய திறன்களைக் கூர்மைப்படுத்த விரும்பினால், இந்த டுடோரியல் உங்களுக்கானது! Blenderஇலுள்ள இரண்டே இரண்டு Modifiers மூலம் இதை எவ்வாறு உருவாக்கலாம் என பார்ப்போம். உங்கள் வீட்டை சுற்றியுள்ளவைகளில் எதாவது ஒன்றை இவ்வாறு செய்து எனது சமூகவலைத்தள பக்கத்தை Tag செய்யுங்கள்.
7
views
The Only 5 Modelling tools you need in Blender in Tamil | DQ DESIGNS
We look at top 5 Blender beginner modelling tools you need to model ANYTHING in Blender! Starting from the basic cube in blender and using these tools, we can model almost anything. If you want to start 3D modelling or want to sharpen your existing skills as a CG artist, this tutorial is for you! What do you think are the top 5 modelling tools shown in this tutorial? Let us know in the comments!
❤️ If you love what I do, please subscribe and like this video to get notified when I release more tasty content.
This video covers the five modelling tools to make anything in Blender
Chapters:
0:00 - Getting started
1:14 - Bevel Tool
3:27 - Merge Tool
5:08 - Extrude Tool
7:01 - Loop Cut + Bevel
8:21 - Grid Fill
நீங்கள் Blenderல் எந்த 3D உருவையும் உருவாக்க தேவையான இலகுவான 5 Tools. Blenderல் உள்ள Basic Cubeஐ இவ்Toolsகளை பயன்படுத்தி எந்தவொரு உருவையும் உருவாக்கலாம். நீங்கள் 3D Modelling தொடங்க விரும்பினால் அல்லது CG கலைஞராக உங்கள் தற்போதைய திறன்களைக் கூர்மைப்படுத்த விரும்பினால், இந்த டுடோரியல் உங்களுக்கானது! இந்த டுடோரியலில் காட்டப்பட்டுள்ள 5 Modelling Tools பற்றி உங்கள் கருத்துக்கள் என்ன? நீங்கள் பயன்படுத்தும் Tools எவை என Commentsஇல் தெரியப்படுத்துங்கள்!
#blender #blender3d #dqdesign #graphicdesign #blendertamil #blendertutorial #graphicdesigntutorialsforbeginners #blenderbeginner #tamilgraphicdesign
6
views