

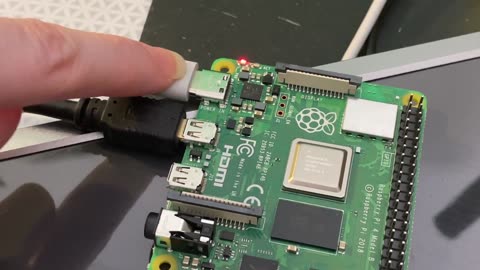
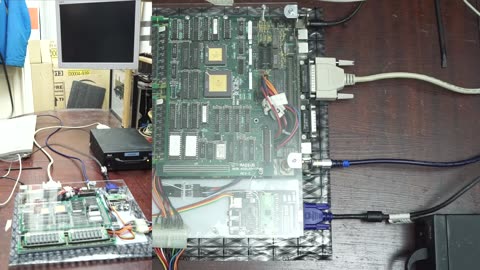
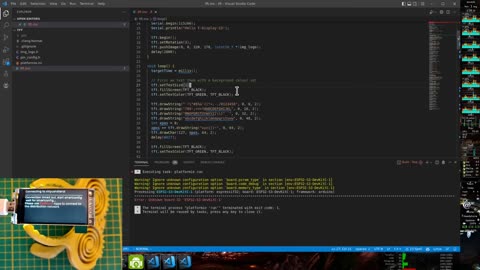
"Bare metal" CircuitPython on a Raspberry Pi, HDMI, and e-ink
Ok! This is super fun, Scott is working on a port of CircuitPython that runs on "bare metal" on the Raspberry Pi. So of course I wanted to see what works with HDMI since we can show the REPL... and I happen to have an e-ink HDMI display. It's AWESOME.
One of the plans is to make a little computer with a keyboard, that is just CircuitPython. Write code, make art ... with HDMI, have the output go to a little portable projector... kids could make cool kaleidoscopes, or make a Haiku computer that shows the last one made when the power is off since this one is e-ink :)
Code is here for now, and watch Scott's Deep Dive each week at 5pm EDT on our socialz' for more!
https://github.com/tannewt/circuitpyt...
#raspberrypi #eink #python
Visit the Adafruit shop online - http://www.adafruit.com
-----------------------------------------
LIVE CHAT IS HERE! http://adafru.it/discord
Adafruit on Instagram: https://www.instagram.com/adafruit
Subscribe to Adafruit on YouTube: http://adafru.it/subscribe
New tutorials on the Adafruit Learning System: http://learn.adafruit.com/
79
views

Is The Raspberry Pi A Desktop Replacement?
During the three months without a home computer, I faced the challenge of being without my trusty device. For the initial two months, I managed to get by without one, although it wasn't the most convenient situation. However, in the third month, I decided to experiment with using a Raspberry Pi 4 as a desktop replacement.
The experience was a mix of ups and downs. On the positive side, the Raspberry Pi 4 performed surprisingly well as a basic desktop machine. It handled everyday tasks like web browsing, word processing, and light multimedia consumption quite smoothly. The compact size and energy efficiency of the Pi were definite advantages.
However, there were limitations too. The processing power and RAM constraints of the Raspberry Pi sometimes led to slower performance when multitasking or running resource-intensive applications. Additionally, certain software and applications that I was used to on a regular desktop were not available or compatible with the ARM architecture of the Pi.
Overall, the experiment was an interesting one, and the Raspberry Pi proved its versatility as a budget-friendly desktop substitute. While it couldn't match the speed and capabilities of a full-fledged computer, it served its purpose well during that period of time. The experience made me appreciate the convenience of having a dedicated home computer, but also made me admire the ingenuity behind the Raspberry Pi as a versatile little device.
57
views

Volumio 3 music player for the Raspberry Pi updated
Right from the start I followed Volumio, the free software player for the Raspberry Pi. It’s not the only player for the Pi, but for me it worked better than others at that time. Since it is impossible to keep track of all players, I kept on checking out Volumio. And now there is version 3.
Contents of this video
00:00 - Intro
00:29 - Start of program
01:00 - Volumio Premium
02:06 - Manifest user interface
03:26 - Setup menu
05:10 - The plug-ins
05:52 - MiniDLNA server
07:25 - Sound quality
08:00 - The wrap
Manufacturer:
https://volumio.com/en/
Equipment used:
NanoSound One: • NanoSound 1 DAC i...
Allo Boss: • Allo Boss 2: € 2...
Allo Katana: • Allo Katana Playe...
Audiophonics RaspTouch: • Audiophonics Rasp...
Allo USBridge Signature : • Allo USBridge Sig...
47
views
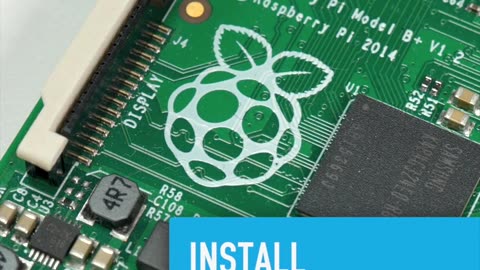
Installing Raspberry Pi OS - Collin’s Lab Notes
"Installing Raspberry Pi OS - Collin’s Lab Notes" is a comprehensive guide that walks you through the process of setting up Raspberry Pi OS, a popular operating system for the Raspberry Pi. Collin's Lab Notes provide detailed step-by-step instructions, making it easier for both beginners and experienced users to install the OS on their Raspberry Pi boards.
The guide covers essential topics, including the preparation of the microSD card, downloading the Raspberry Pi OS image, and flashing it onto the card using recommended tools. Collin's Lab Notes also provide valuable insights into the different editions and flavors of Raspberry Pi OS, helping users choose the most suitable version for their specific projects and requirements.
Additionally, the guide might delve into post-installation tasks, such as updating the system, configuring Wi-Fi, and enabling SSH for remote access. Collin's Lab Notes serve as a valuable resource for those eager to explore the potential of the Raspberry Pi, making it an essential reference for anyone looking to embark on exciting DIY projects, programming experiments, or home automation endeavors.
Shop Raspberry Pi at Adafruit:
https://www.adafruit.com/category/105
Setting up an OS on your Raspberry Pi is easier than ever #adafruit #collinslabnotes
Visit the Adafruit shop online - http://www.adafruit.com
-----------------------------------------
LIVE CHAT IS HERE! http://adafru.it/discord
Adafruit on Instagram: https://www.instagram.com/adafruit
Subscribe to Adafruit on YouTube: http://adafru.it/subscribe
New tutorials on the Adafruit Learning System: http://learn.adafruit.com/
163
views
Raspberry pi pico - USB host
This example makes a USB hid host application. Specifically I'm going to hook up a keyboard up.
The Raspberry Pi Pico, a small yet powerful microcontroller board, has recently gained USB host functionality, enabling it to communicate with and control USB devices. This exciting development opens up a whole new realm of possibilities for DIY projects and automation tasks.
With USB host support, the Raspberry Pi Pico can now connect to a wide range of USB peripherals, such as keyboards, mice, USB drives, and even web cameras. This means you can create custom interfaces, automate tasks, and interact with various USB devices seamlessly.
Setting up the USB host functionality on the Raspberry Pi Pico is straightforward, thanks to the available libraries and examples. You can dive into the world of USB communication, allowing your Pico to become a versatile USB host controller for your projects.
Whether you want to build a custom input device, create a USB data logger, or implement computer vision with a USB camera, the Raspberry Pi Pico with USB host capabilities offers endless possibilities for makers, hobbyists, and enthusiasts alike.
Unleash the full potential of your Raspberry Pi Pico by harnessing the power of USB host functionality and explore the exciting realm of USB-based projects with this versatile microcontroller board. Get started on your USB host journey and see where your creativity takes you!
If your looking for a finalized version of the code you can grab it here. It's only slightly more modified then the one in the video.
https://github.com/brendena/raspberry...
How to install openOCD
https://datasheets.raspberrypi.com/pi...
Go to chapter 5
0:00 - getting code
2:30 - setting up pico probe
6:50 - pushing code to pico
8:20 - keyboard working
9:00 - deeper dive into code
19:00 - caps lock works
177
views
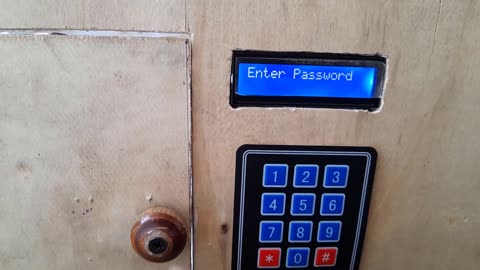
How to make password Door lock Keypad 4x3 using Arduino Uno
Hi guys his is a simple Arduino project. In this video, you can learn how to make a simple password-based door lock system using Arduino, Solenoid lock, and 3*4 matrix keypad. It is a very useful project for school and college projects.
This video will show you how can control your door’s lock by using Arduino at home.
Part of list:
1. Arduino uno
2. 12volt Solenoid lock
3. Relay 5 volt
4. Battery 12volt
5. Jumper wire
6. Keypad 4x3
55
views

Raspberry Pi Camera Car Demo
Their dad and they built a model railroad in the early 2000's when they were in middle/high school. After 10+ years of mostly neglect, they're doing some new projects and upgrades. A lot has happened in the electronics hobby since then, and it's fun to get their dad involved with Arduino, Raspberry Pi, and other programming/electronics projects. They've wanted to stick a camera in a model train for a long time, but now it is technically possible to stick a full-blown Linux quad-core computer on board and stream real-time 1080p video for an incredible first-person view. They built a little train car out of scraps that lets the camera rotate with the wheels.
The railroad uses DCC with the Digitrax DB150 base station. They've connected it to a Raspberry Pi 3 running JMRI so they can drive trains with the Engine Driver app or the web throttle, in addition to the physical Digitrax controllers. The next project is replacing all of the toggle switches that run turnouts with Arduino-based controllers that can receive control from DCC.
More information here:
https://twitter.com/CalcProgrammer1/s...
58
views
Bringing a Mac SE back to life with a Raspberry Pi Pico
For Marchintosh 2023, I've put together a description of how I brought the logicboard of my childhood Macintosh SE back to life using a VGA video adapter board I made using a Raspberry Pi Pico. More details are available at https://github.com/guruthree/mac-se-v....
Description: In March 2023, I embarked on a nostalgic journey to revive the logic board of my beloved childhood Macintosh SE. Armed with creativity and technical know-how, I managed to breathe new life into this vintage computer using a custom VGA video adapter board that I crafted using a Raspberry Pi Pico.
The process was not without its challenges, but the satisfaction of witnessing the classic Macintosh SE display come alive once again made it all worth it. I meticulously documented the entire journey and have shared the step-by-step process on my GitHub repository, offering a comprehensive guide for others who wish to undertake a similar project.
With this ingenious adaptation, the Macintosh SE now boasts enhanced graphics capabilities, thanks to the VGA video adapter board driven by the powerful Raspberry Pi Pico. As I reminisce about the days of my childhood, I feel a deep sense of accomplishment in preserving this vintage gem and giving it a new lease of life.
Visit my GitHub repository to explore the detailed instructions and witness the magic of combining nostalgia with modern technology to restore a piece of computing history. Relive the joy of vintage Macintosh computing with a touch of innovation and the Raspberry Pi Pico.
94
views
Pi SSD Media Server
Build your own media server using #RaspberryPi 4 and an external SSD. Stream live TV and movies with Plex using the Chromium web browser.
Learn guide
https://learn.adafruit.com/pi-ssd-med...
Raspberry Pi 4
https://www.adafruit.com/product/4295
1.9in TFT Display
https://www.adafruit.com/product/5394
Pimoroni Nano HAT
https://www.adafruit.com/product/3577
Visit the Adafruit shop online - http://www.adafruit.com
-----------------------------------------
LIVE CHAT IS HERE! http://adafru.it/discord
Adafruit on Instagram: https://www.instagram.com/adafruit
Subscribe to Adafruit on YouTube: http://adafru.it/subscribe
New tutorials on the Adafruit Learning System: http://learn.adafruit.com/
Description: Create your very own media server with the power of Raspberry Pi 4 and an external SSD! Unlock a world of entertainment as you stream live TV and movies effortlessly with Plex, all within the Chromium web browser.
Building your media server is now easier than ever. The Raspberry Pi 4, paired with an external SSD, provides the perfect combination of performance and storage capacity to handle your media library. Store and organize your favorite TV shows, movies, and music with ease, and access them from any device connected to your home network.
Thanks to Plex, you can enjoy seamless streaming of your media collection, making movie nights and TV binge-watching a breeze. The Chromium web browser adds versatility, allowing you to access online content and streaming services right from your media server.
Immerse yourself in the world of entertainment with this DIY project that combines the power of Raspberry Pi 4, the convenience of an external SSD, and the streaming capabilities of Plex and Chromium. Get ready to indulge in endless hours of fun and relaxation as you embark on a journey to create your very own media hub.
Transform your Raspberry Pi 4 into the ultimate media server, and take your home entertainment to new heights. Embrace the world of streaming with Plex and Chromium, and enjoy the convenience of having your favorite content at your fingertips. Start your media server project today and elevate your entertainment experience like never before!
105
views
How to connect Arduino UNO and MH-ET LIVE Scanner V3 Barcode QR Code Module
In this step-by-step tutorial, we'll guide you on how to seamlessly connect your Arduino UNO board with the MH-ET LIVE Scanner V3 Barcode QR Code Module. Get ready to integrate barcode and QR code scanning capabilities into your Arduino projects.
First, we'll provide an overview of the MH-ET LIVE Scanner V3 module and its functionalities. Then, we'll walk you through the necessary hardware connections between the module and your Arduino UNO board.
Next, we'll show you how to install any required libraries and set up the necessary configurations for the module to communicate with Arduino UNO.
Once everything is set up, we'll demonstrate how to write a simple Arduino sketch to read and decode barcodes and QR codes from the MH-ET LIVE Scanner V3 module.
This powerful combination of Arduino UNO and the MH-ET LIVE Scanner V3 Barcode QR Code Module opens up a world of possibilities for inventory management, access control systems, and various other applications.
Join us as we delve into the exciting realm of barcode and QR code scanning with Arduino UNO. Unleash the potential of this versatile module and take your projects to the next level with this comprehensive tutorial!
215
views

Tutorial: Magic AI Storybook with ChatGPT, Raspberry Pi and Voice Recognition with Open AI #adafruit
Build a magic neverending story book with a Raspberry Pi and touchscreen, and ChatGPT. We've added a voice recognition module using Open AI, so all you need to do is speak to the storybook and ask for the story you want, and your book will give you endless stories.
Full build tutorial: https://learn.adafruit.com/magic-stor...
We live in an age of wonder. Every day, new innovations and inventions change the way we interact with the world around us and with each other. Many of the marvels we read about in the science fiction stories of our youth are suddenly, magically possible with a little clever engineering and a healthy dose of imagination.
This guide will show you how to create your own never-ending story book using a Raspberry Pi and a touch screen display. Speak your request out loud, and the book will write you an original story based on your prompt. The software uses Open AI to leverage ChatGPT, a language-based AI, to fill an endless storybook with imaginative stories.
31
views
TFT Display and Arduino: Setup and Programming | How to connect LCD to arduino 1.8" 2.8" 3.5"
Discover the captivating world of TFT displays and Arduino as we take you on a journey to set up and program these vibrant screens. Whether you have a 1.8", 2.8", or 3.5" TFT display, the process remains excitingly similar.
In this comprehensive guide, we'll walk you through the steps to connect your TFT display to Arduino, unlocking a whole new dimension of visual possibilities. Get ready to bring your projects to life with colorful graphics, text, and images that can dynamically change and respond to user input.
Learn the basics of connecting your TFT display to Arduino, including wiring and pin configurations. Delve into the intricacies of programming, as we explore libraries and code examples to make the most of your TFT screen.
From displaying sensor data in real-time to creating interactive user interfaces, the TFT display opens up a world of endless opportunities for your Arduino projects. Elevate your craftsmanship and innovation as you build stunning visuals that captivate and engage your audience.
Join us on this thrilling adventure of TFT displays and Arduino, and witness the magic of technology fused with artistry. Embrace the potential of these colorful screens and transform your Arduino projects into eye-catching wonders. Let's dive in and create something extraordinary together!
144
views
ESP32S3 LilyGO T-Display S3 Unboxing and Official PlatformIO (Arduino project) test
Welcome to the unboxing of the ESP32S3 LilyGO T-Display S3, a feature-packed microcontroller that promises to elevate your Arduino projects to new heights. In this video, we'll explore what's inside the box and take a closer look at the board's impressive features.
The ESP32S3 LilyGO T-Display S3 comes equipped with a high-resolution TFT display, built-in Wi-Fi and Bluetooth connectivity, and an array of GPIO pins for seamless integration with various sensors and peripherals.
After unboxing, we'll dive straight into testing the board using the official PlatformIO environment for Arduino. Follow along as we upload a sample Arduino project and witness the ESP32S3 LilyGO T-Display S3 in action.
From real-time data display to creating interactive user interfaces, this versatile board opens up a world of possibilities. Whether you're a hobbyist or a professional developer, the ESP32S3 LilyGO T-Display S3 is a valuable addition to your toolkit.
Join us on this exciting journey as we unbox and test the ESP32S3 LilyGO T-Display S3 with PlatformIO. Get ready to unleash the full potential of this remarkable microcontroller and embark on an Arduino adventure like never before!
56
views
New App for programming your Arduino/ESP board | How to program Arduino and ESP board In Android
Introducing the latest app that revolutionizes the way you program your Arduino and ESP boards – all from the convenience of your Android device! Say goodbye to traditional setups and embrace the power of mobile programming.
With this user-friendly app, you can now upload sketches, modify code, and control your Arduino and ESP boards with ease. Whether you're a seasoned developer or just starting your coding journey, this app offers an intuitive interface that simplifies the entire programming process.
Learn how to program your Arduino and ESP boards directly from your Android smartphone or tablet. No need for a computer or complex setups – everything you need is right at your fingertips. Seamlessly connect to your boards via Bluetooth or Wi-Fi and unleash the full potential of your projects on the go.
From automating your home to creating IoT gadgets, the possibilities are limitless. Explore a world of creativity as you bring your ideas to life with just a few taps on your Android device.
Don't wait any longer – embark on this new and exciting programming adventure with our cutting-edge app. Join the ever-growing community of mobile Arduino and ESP enthusiasts and elevate your projects to a whole new level. Download the app now and let your creativity soar!
58
views
How to program Arduino/ESP32/ESP8266 using Arduino Studio | Program Arduino using Arduino Studio App
To program your Arduino, ESP32, or ESP8266 boards, you can leverage the powerful Arduino Studio application. Follow these simple steps to get started:
1. **Download and Install Arduino Studio**: First, download the Arduino Studio application from the official website and install it on your computer. It's available for Windows, macOS, and Linux, ensuring compatibility with various operating systems.
2. **Connect Your Board**: Connect your Arduino, ESP32, or ESP8266 board to your computer using a USB cable. Make sure it's properly recognized by your operating system.
3. **Select the Board and Port**: Open Arduino Studio and navigate to the "Tools" menu. Select the appropriate board from the "Board" submenu. Choose "Arduino Uno" for Arduino boards, or select the specific ESP32 or ESP8266 board model you are using. Next, go to the "Port" submenu and choose the corresponding COM port for your connected board.
4. **Write Your Code**: In the Arduino Studio interface, you'll find a code editor where you can write your Arduino sketches. This is where you define the actions and behaviors of your project. Arduino Studio provides a user-friendly and syntax-highlighted editor to streamline the coding process.
5. **Verify and Upload**: Once your code is ready, click on the "Verify" button to check for any errors in your sketch. If the verification is successful, proceed to upload the code to your board by clicking on the "Upload" button. The code will be compiled and transferred to your Arduino or ESP board.
6. **Monitor the Serial Output (Optional)**: If your project includes serial communication, you can open the "Serial Monitor" in Arduino Studio to view debug messages and output from your board. This can be helpful for troubleshooting and monitoring your project's behavior.
7. **Explore Libraries and Examples**: Arduino Studio comes with a vast collection of libraries and example codes that you can use to enhance your projects. These libraries offer pre-built functions for various sensors, modules, and components, saving you time and effort in your programming journey.
With Arduino Studio, you have a powerful tool at your disposal to unleash your creativity and build exciting projects with Arduino, ESP32, or ESP8266 boards. Whether you're a beginner or an experienced developer, Arduino Studio provides an intuitive and feature-rich environment for all your programming needs. Happy tinkering and programming!
347
views
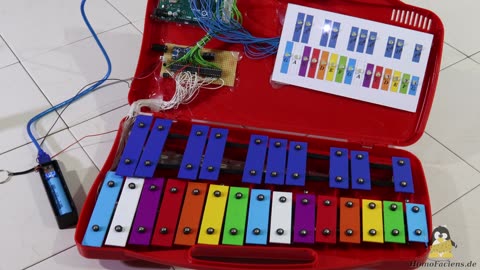
Automatic Xylophone with an Arduino MEGA
Step into the world of music and technology with an automatic xylophone powered by an Arduino MEGA. This mesmerizing project combines the elegance of music with the sophistication of electronics, creating a symphony of harmonious tones.
Using a network of solenoids controlled by the Arduino MEGA, each solenoid strikes a tuned xylophone bar, producing delightful melodies and captivating rhythms. With precise timing and clever programming, the Arduino orchestrates the notes, transforming the xylophone into a self-playing instrument.
The possibilities are endless with this musical marvel. You can compose your own melodies, recreate famous tunes, or experiment with unique harmonies. Let your imagination soar as you dive into the realm of music and automation.
Discover the joy of fusing art and technology, as the Automatic Xylophone brings music to life with the ingenuity of Arduino MEGA. Embrace the magic of this musical journey and create your own symphonies with a touch of creativity and technology. Unleash the power of Arduino and let the music play!
26
views
First experiments with the Arduino GIGA R1 WiFi - shorts
Embark on an exciting adventure of Arduino GIGA R1 WiFi experimentation with us. As we dive into the world of microcontrollers and wireless connectivity, the possibilities are endless.
With the Arduino GIGA R1 WiFi, we unlock a realm of innovation and creativity. Its powerful capabilities and user-friendly interface make it a perfect choice for beginners and experienced tinkerers alike. Get ready to create smart home automation projects, IoT devices, and remote control applications that redefine the way we interact with technology.
In this series of shorts, we'll explore the basics of Arduino GIGA R1 WiFi, from setting up the board to connecting it to your local Wi-Fi network. We'll delve into coding fundamentals, learning how to program the board to perform various tasks.
From controlling LED lights to reading sensor data and sending it to the cloud, we'll witness the magic of Arduino GIGA R1 WiFi in action. Each short experiment will open up new possibilities, inspiring you to push the boundaries of what's possible with this versatile microcontroller.
Join us as we embark on this journey of discovery, creativity, and innovation with the Arduino GIGA R1 WiFi. Let's bring our ideas to life and revolutionize the way we interact with technology in our daily lives. Get ready to unleash the true potential of the Arduino GIGA R1 WiFi!
39
views
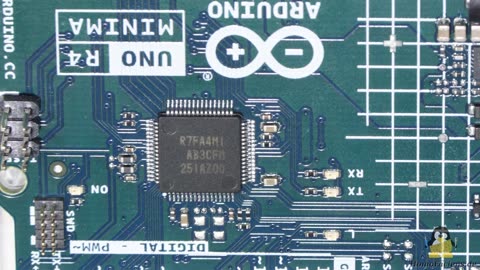
Opinion: The brand new UNO R4, a not so good UNO reimplementation?
The brand new UNO R4, a not so good UNO reimplementation
You would like to spend me a bag of gummy bears or a bar of chocolate or both or even more as a svery pecial thank you for my work on my open source projects?
23
views
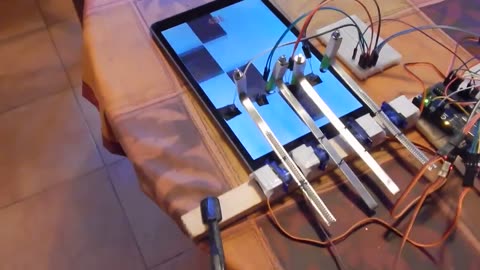
Arduino vs Piano Tiles 2 (servo edition)
Arduino vs Piano Tiles 2 (servo edition)
Ingredients:
- 1 tablet with Piano Tiles 2
- 1 Arduino Uno
- 4 photo resistors
- 4 mini servo motors
- 4 artificial fingers :)
- ~50 lines of arduino code
15
views

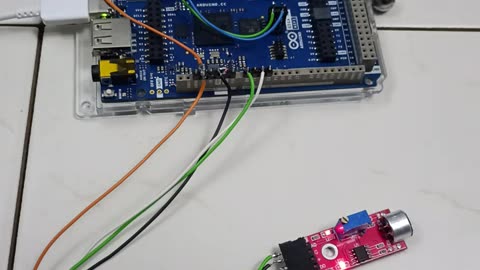
Building a Rain Detection Machine with Arduino and Rain Sensor
Building a Rain Detection Machine with Arduino and Rain Sensor
18
views