

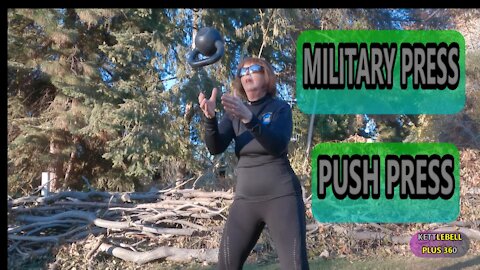
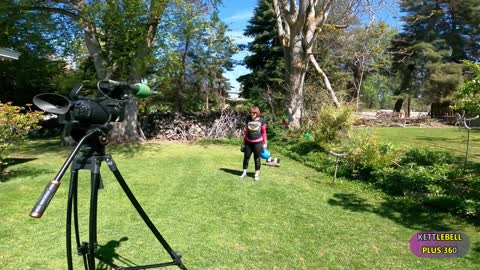
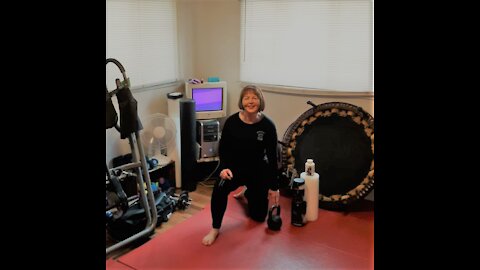
Kettlebell Military & Push Press in the Safety Zone
Kettlebell Military Press & Push Press in the Safety Zone
By Mastery Coach Leanne Wylet
Caution: Overhead movements work not only the shoulder joints but require thoracic spine flexibility. Before doing overhead exercises your first priority is to ask yourself these questions:
1. Am I sitting or standing too much without extending my arms overhead?
2. Am I able to rotate my trunk from left to right with my hip’s stationary?
3. Am I able to raise my arms over head in a lock out position without pain?
4. Am I able to imprint my back to the floor for slight crunch flex of thoracic spine?
How did you do with this self-test? How many of the 4 questions did you answer “yes” to? Did you experience pain of discomfort? If you answered yes to any of these questions you need more thoracic spine flexibility before adding overhead exercises that could lead to back & shoulder injuries. There are exercises to correct this with videos you can ask me for.
The RKC Military Press, Push Pres & Jerk are push/pull exercises.
The hip hinge to a swing is the foundation of these kettlebell exercises.
Place the kettlebell on the floor slightly in front of you, weight on the heels of your feet.
Feet straight ahead or pointed out at a slight angle.
Sit back like you are going to set on a chair with your knees slightly bent.
Grasp the kettlebell hike back between your legs which are shoulder width apart.
Drive shoulders down away from the ears, pull you kneecaps up to engage quads & your lats, rib cage down (rib to hip connection), drive your hips forward, straighten your back.
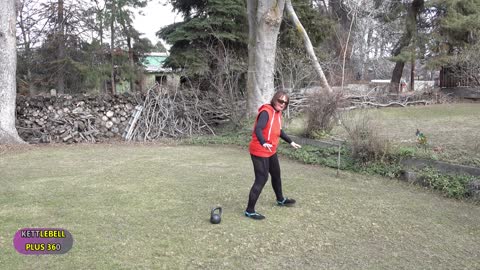
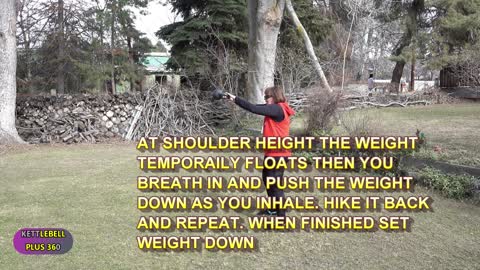
Drive your hips forward, breathing out, swing the kettlebell up to the top to lock out.
Breath in at the top of the move brace yourself, engage your abs, lats, core, setting back when the kettlebell goes down into the rack position.
Keep your rib cage down, squeeze your glutes inward, engage lats, abs, core to fire all the muscles of the body under controlled tension.
When you start downward breath in with intra ab pressure to protect your back, engaging your core of your body with the appropriate muscles in reverse of the movement to the starting point.
Once the kettlebell passes just below your ribs, gently pull kettlebell back & slide your fist around and under the bell like putting on a glove. The kettlebell handle should rest softly on the back of your wrist with the kettlebell inside the palm of your hand & bent elbow close to your side. This is known as the “rack position” (see rack position video).
Side note: Military Press, Push Press are kettlebell exercises using BOTH push/pull force production and force absorption.
You can go to a more advance training of universal strength with 5 to 20 reps for a short period of time or ten minutes once you have the basics grooved in. You can also use high intensity interval training doing a combination of the clean variations as mentioned above.
It is important to always leave your ego at the door for there will be another day to train. Be in tune with your body stopping when you feel you could do one more rep because when you get fatigued the form can break down leading to an injury or when a transition is made into other movement such as a clean to a press. **I have exercises you can do to build your shoulders & thoracic spine. If you would like them please let me know. Your body will thank you!
Daily keep moving to maintain flexibility at all ages by reclaiming yourself. It begins with You!
Mastery Coach Kettlebell Lady of Iron with Kettlebell Plus 360 takes your health, fitness & relationships full circle. You can contact me for a strategy appointment on how you can get started. To your continued success!
Leanne Wylet, BA, ACE- NCCA, Specialties: Orthopedic Exercise, Functional Movement Screening (FMS), Hard Style/High Intensify Kettlebell Fitness, Be Fit Group Instructor, Lurn, Inc., Certified Mastery Coach, Copywriter & Marketing Consultant
252
views
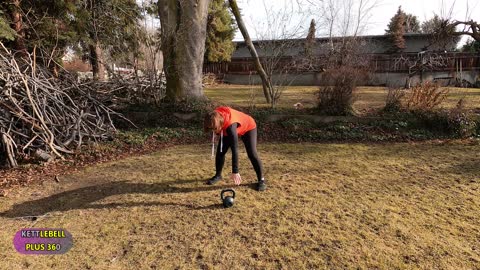
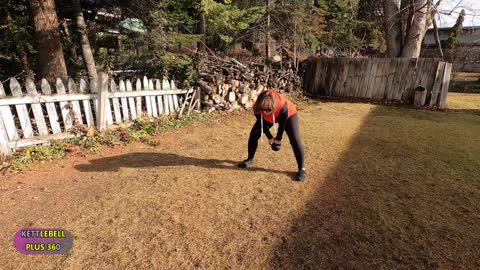
Kettlebell Swing Correctives in the Safety zone
Most kettlebell injuries occur with the kettlebell is improperly parked. You need to have your feet straight ahead, thumbs inward on the kettlebell to avoid it sticking out which could lead to an injury, sit back, reach out with 2 hands in front of you, fists to fingers & index fingers pinkies on the outside of the kettlebell handle.
Always stop when you feel you could do one more rep because when you get fatigued the form can break down leading to an injury or when a transition is made into other movement such as a clean to a press.
The hip hinge is the fundamental of the kettlebell swing, with more weight on the heels of your foot, sit back like you are going to set on a chair & hike the kettlebell back between your legs drive shoulders down away from the ears, engaging your lats, breathing out & the swing should be parallel looking like a plank at the top of the move. Be sure to keep your rib cage down, squeeze your glutes inward, rib cage down to engage lats, abs & core to fire all the muscles of the body under tension. When you start downward breath in engaging your core of your body with the appropriate muscles in reverse of the movement from when you went up. You can use more advance training universal strength 5 to 20 reps for a short period of times or ten minutes once you have the basics grooved in. You can also use high intensity interval training.
Note: When you use time under tension (learning when to tighten up the muscles & relax them controlled by your breathing) the main core contracts to avoid hurting your back, breathing behind the shield. You can add complexity to build your foundation by learning to pull knee caps up for glute development. Reset the starting position each time to make sure the setup is correct. When the set-up is correct with your anatomical breathing pattern matches the movement, the pattern is correct.
Mastery Coach Kettlebell Lady of Iron with Kettlebell Plus 360 takes your health, fitness & relationships full circle. You can contact me for a strategy appointment. To your continues success!
47
views
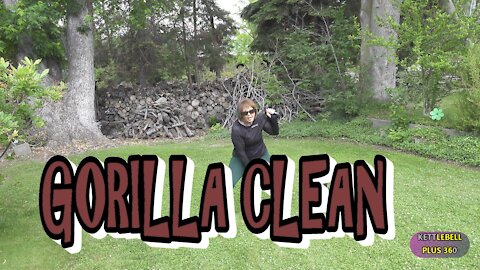
Kettlebell Clean Variations in the Safety Zone
Most kettlebell injuries occur with the kettlebell is improperly parked.
Feet straight ahead or pointed out at a slight angle.
Sit back like you are going to sit in a chair, hinge at hips, with more weight on heels.
Thumbs inward on the kettlebell to avoid it sticking out which could lead to an injury.
Locked wrist saves injuries.
Power training with the clean is about being aware of your position & posture in space with both force production, force absorption, acceleration & deceleration.
The kettlebell clean is a deceptive exercise because it's not a barbell clean.
A clean is a swing in disguise. The RKC standard for the clean clearly states, “. . .the swing, minus the straight arm position at the top of the rep are required".
The hip hinge is the fundament of the kettlebell clean just as it is with the swing.
Place the kettlebell on the floor slightly in front of you, weight on the heels of your feet.
Sit back like you are going to set on a chair with your knees slightly bent.
Grasp the kettlebell hike back between your legs which are shoulder width apart.
Drive shoulders down away from the ears, pull you kneecaps up to engage quads & your lats, rib cage down (rib to hip connection), drive your hips forward, straighten your back.
Drive your hips forward, breathing out, swing the kettlebell up at the top a plank position.
Breath in at the top of the move brace yourself, engage your abs, lats, core, setting back when the kettlebell goes down into the rack position.
Keep your rib cage down, squeeze your glutes inward, engage lats, abs, core to fire all the muscles of the body under controlled tension.
When you start downward breath in with intra ab pressure to protect your back, engaging your core of your body with the appropriate muscles in reverse of the movement to the starting point.
Once the kettlebell passes just below your ribs, gently pull kettlebell back & slide your fist around and under the bell like putting on a glove. The kettlebell handle should rest softly on the back of your wrist with the kettlebell inside the palm of your hand & bent elbow close to your side. This is known as the “rack position”.
The Kettlebell Clean is a great exercise for teaching BOTH force production and force absorption. One of the most frustrating things about learning The Kettlebell Clean is trying to avoid "banging" your forearm with the kettlebell as you try to secure the kettlebell in the rack.
146
views
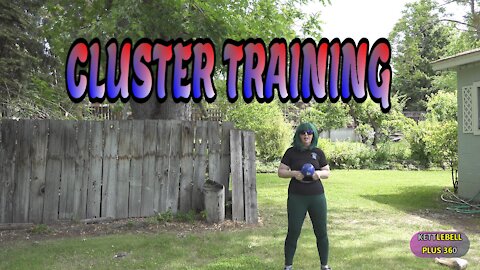
Kettlebell Cluster Strength Training
Kettlebell Cluster Strength Training in the Safety Zone
by Kettlebell Lady Leanne, Mastery Coach
What do you want to achieve? Weight loss, conditioning, flexibility, cardo, strength or maintain a full active life to do what you enjoy doing? This video is about how to gain more strength, tone up & lose weight in one easy, fun way using the principle of Cluster Training. Cluster training was created to make strength gains quickly, ramping up your metabolism to burn calories the rest of the day.
Here you go:
Your body requires a variety of methods to make progressive gains with your fitness goals so instead of doing reps you do this instead.
1. Choose a kettlebell that is your normal weight or next weight up.
2. Do 1 or 2 or 3 reps at a time.
3. Set the weight down with a 10 second rest.
4. Pick the kettlebell back up and repeat 1 or two more time.
For example: Instead of doing 5 reps do 1 or 2 or 3 reps at a time, set the kettlebell down for five to ten seconds depending on your fitness level, pick it back up & repeat 1 or 2 or 3 more time to achieve your goal.
I recommend you keep a log to measure your progress of how you’ve progressed with your fitness goals.
To learn more about breathing and how it helps to train safely to avoid injury to your body such as back and shoulders contact Mastery Coach Kettlebell Lady of Iron at: kettlebelllady.com Let’s talk soon! Leanne Wylet, BA, ACE- NCCA, Specialties: Orthopedic Exercise, Functional Movement Screening (FMS), Hard Style/High Intensify Kettlebell Fitness, Be Fit Group Instructor, Lurn, Inc., Certified Mastery Coach, Copywriter & Marketing Consultant.
24
views
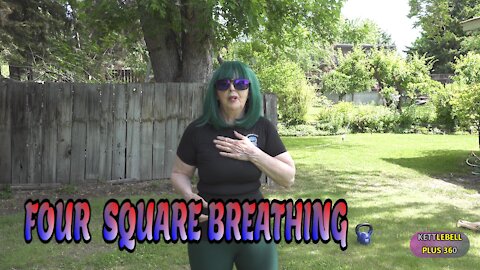
Four Square Breathing in the Safety Zone
Reset Your Breath With Box Breathing
By Leanne Wylet, Mastery Coach
Breath is vital to your health & is an automatic anatomical subconscious response such as the heart beating and the stomach digesting food. Relax your body from the fight, flight mode to a sense of calm for focus and clarity. Let’s reset our breathing to it’s normal rhythm by using a technique called Box Breathing you can do in just 5 minutes a day or as needed during the day to help stay relaxed and calm to counter daily stresses. People in high stress jobs such as the Navy Seals, soldiers, and police officers, often use Box Breathing when their bodies are in fear fight-or-flight mode. This technique is also relevant for anyone interested in re-centering themselves or improving their concentration and can be done anywhere in just four to five minutes by following the instructions below:
Close your eyes.
Breathe in through your nose while counting to four slowly. Feel the air enter your lungs.
Hold your breath inside while counting slowly to four. Try not to clamp your mouth or nose shut. Simply avoid inhaling or exhaling for 4 seconds.
Begin to slowly exhale for 4 seconds or if this is too challenging start to a count of three.
Repeat steps 1 to 3 at least three times.
Ideally, repeat the three steps for five minutes, or until calm returns to your body. Check out this video on how to Box Breath.
To learn more about breathing and how it helps to train safely to avoid injury to your body such as back and shoulders contact Mastery Coach Kettlebell Lady of Iron at: MasteryCoach@prtonmail.com, https://kettlebelllady.com Let’s talk soon! Leanne Wylet, BA, ACE- NCCA, Specialties: Orthopedic Exercise, Functional Movement Screening (FMS), Hard Style/High Intensify Kettlebell Fitness, Be Fit Group Instructor, Lurn, Inc., Certified Mastery Coach, Copywriter & Marketing Consultant.
31
views
Kettlebell HIIT in the Safety Zone
Total Body Workout in the Safety Zone
Kettlebell(s) or with dumbbell(s) or body weight workouts are easily to fit into a busy schedule in just 5 to 15 minutes broken up during the day. Especially with kettlebells you can complete a total body workout for cardio, strength, flexibility, weight resistance, core strength & more! It’s important to find actives you enjoy, keep moving and have fun.
This combination was done with 12 different kettlebell exercises using compound muscle groups. You can repeat these exercises for a total time of ten or fifteen minutes. It’s important to choose exercises you like and mix them up. Stop when you feel you could do one more round to help avoid strains and injury.
It’s important to get your body core temperature and muscles warmed up before you begin your training. Once your heart rate is increased keep moving until your heart rate drops to normal. Cooling down after training will help reduce muscles soreness and you will recover quicker.
An easy way to check how hard you are breathing when exercising is the Rate of Perceived Exertion (RPE) The RPE scale runs from 0 - 10. The numbers below relate to phrases used to rate how easy or difficult you find an activity. For example, 0 (nothing at all) would be how you feel when sitting in a chair; 10 (very, very heavy) is how you feel at the end of an exercise stress test or after a very difficult activity.
Here is what this combination looked like: Warm-Up - 5 Kettlebell Stop Start -Swing Two Handed 10 - Swing one arm 5 each side - Swing Hand to Hand 10 - Clean 5 each side - Rows 10 inside legs -5 each side outside legs - Cross-Over to a Single Leg Deadlift - Push Press 5 each side - High Pulls 5 each side - Snatch 5 each side, - Squats single arm each side 5 - Cool Down. https://youtu.be/BF7sa4PeOiI
Mastery Coach is wearing Luna sandals. They can be checked out at: https://lunasandals.net
Mastery Coach Kettlebell Lady is an ACE- NCCA, Specialties: Orthopedic Exercise, Functional Movement Screening (FMS), Hard Style/High Intensify Kettlebell Fitness, Be Fit Group Instructor, Lurn, Inc., Certified Mastery Coach, Copywriter & Marketing Consultant
73
views
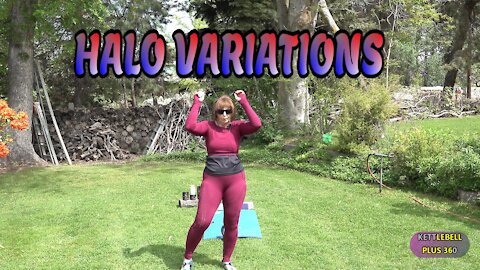
Kettlebell Halo Variation in the Safety Zone
Kettlebell Halo to Warm-Up the Shoulders Variations
The Kettlebell Halo is a great warm-up exercise for the shoulder girdle muscles, trapezius, rhomboids, forearms and back. The Kettlebell Halo can be done as part of your warm-up before starting your training or for a active recovery in between exercises.
Teaching Points:
1. Stand or sit tall
2. Tip kettlebell upside down and hold by the horns
3. Keep elbows tucked in, close to your body, chin up, eyes forward
4. Breathe deep, engage core, keep hips stable
5. Relax your shoulders and allow weight to rotate around your head.
Note: The closer you keep the kettlebell to your neck the more you will work on improving your shoulder mobility. When you are working off a mat will help stretch out your hamstrings.
Halo Variation: If you sit a lot, you probably have tight hamstrings so an option to stretch your hamstrings take a pillow or Yoga Block and sit on it with your legs out to the side on a Yoga Mat, take a deep breath, hinge at the hips reaching for your toes. It is important not to compensate by allowing your glutes, hips, and legs to come off the mat, pick up a lightweight kettlebell or dumbbell to do you halos as instructed above. Besides doing halos you can also do a Triceps Overhead.
Let me know how this works for you. I am available for individual and group coaching virtually by contacting me at masterycoach@protonmail.com Mastery Coach Kettlebell Lady Leanne is a certified Mastery Coach, Personal Trainer, Hard Style & High Intensity Kettlebell Fitness, Functional Movement Systems and Silver Sneakers Group Instructor. She takes your health, fitness, and relationships full circle with Kettlebell Plus 360
54
views
Kettlebell Famers Walk Variation 1 In the Safety Zone
Farmers Walk Variation in the Safety Zone
Learn the benefits of the Famers Walk for your daily activities. Before you start this exercise, I recommend you try balancing on one leg and compare how your balance looks in comparison on the opposite side. Are you able to stand tall or are you leaning laterally towards the outside of your body on either the left or right side?
Often tines we develop a compensation pattern for the injured left or right side. Variations of the Farmers Walk help with correcting imbalances between your hips and back. Another factor is when you sit without getting up to move around about every hour to an hour and a half muscle stiffness sets in along with tight hamstrings leading to hip and back tightness.
The Famers Walk variation includes starting out with one weight on one side and switch to the other side(Demonstrated in another video) . This helps to build stability, mobility, and motor control. Doing the Farmers Walk on just one side is a remedial to help reduce lower back pain for degenerative disc disease and with sports injuries. The more advance move as demonstrated in the video is a heavier weight used on the weaker side and a light weight on the stronger side. It is important to roll the shoulder blades back toward the middle of your spine, look straight ahead, walk heel, ball toe, ribs down connected to hips, breathing deep to protect your back as you go for a walk.
The Farmers walk is also an excellent exercise to do regularly because it is a fundamental movement pattern needed to carry groceries, pick up objects to carry a load under controlled tension to help reduce injuries, build strong connective tissues and bones.
Give this a try and let me know how it goes.
Mastery Coach Kettlebell Lady of Iron Fitness Instructor &Functional Systems certified is available for group and individual coaching. Would you like to know what is a safe zone for exercise? I offer a ten-minute screening designed to identify muscle imbalances that comes with a printout of corrective exercises. To learn about the services, I offer and how you can get started email: MasteryCoach@protonmail.com. Let’s talk soon!
66
views

Kettlebell Round A Bout Workout in the Safety Zone
The Kettlebell is a handheld tool you can get a crazy workout anywhere any time. You can get in shape in five to fifteen minutes three to four days a week. To obtain results, you can break up a fifteen-minute workout into segments that works into your schedule. When I was healing from a seat belt injury, I was amazed how I got in the best shape of my life by using this principle getting stronger & rebuilt torn muscles from the injury.
Functional movement training translates into doing daily activities safely building strong bones, muscles & connective tissues. You choose what motivates you to keep moving. The kettlebell swing metabolically demands recruitment of large muscle areas & reinforces key athletic movements: hip flexion & extension besides working the posterior chain. Be sure to plant your tripod foot, breathe deep into your gut to brace your abs to protect your back moving under controlled tension.
Total Body Workout Warm Up: Pass-Arounds, Figure 8 to a hold, Over Head Triceps Hallows
10 kettlebell two handed swings
5 Each side one Arm Swings
5 kettlebell swing hand to hand transfers
2 Cleans to 2 Push-Press each side
5 Goblet Squats
5 High-Pulls
2 Deadlift to 2 Goblet Squats to 2 Rows
4 Up-Right Rows – left side to outside leg, 2 inside left leg, switch to 2 inside right leg & switch to right side leg & do 2
Note: Breathe out to the top of the move & at the top of the move as come down breathe in (Exhale at top & Inhale at the bottom). Your anatomical breathing pattern should match the move.
Keep moving as long as your heart rate is up with a cool down afterwards which has been covered on a previous video.
Give it a try & leave me a comment of how it works for you! Master Coach, Kettlebell Lady of Iron Leanne
67
views
Farmers Walk Variation in the Safety Zone
Learn the benefits of the Famers Walk for your daily activities. Before you start this exercise, I recommend you try balancing on one leg and compare how your balance looks in comparison on the opposite side. Are you able to stand tall or are you leaning laterally towards the outside of your body on either the left or right side?
Often tines we develop a compensation pattern for the injured left or right side. Variations of the Farmers Walk help with correcting imbalances between your hips and back. Another factor is when you sit without getting up to move around about every hour to an hour and a half muscle stiffness sets in along with tight hamstrings leading to hip and back tightness.
The Famers Walk variation includes starting out with one weight on one side and switch to the other side(Demonstrated in another video) . This helps to build stability, mobility, and motor control. Doing the Farmers Walk on just one side is a remedial to help reduce lower back pain for degenerative disc disease and with sports injuries. The more advance move as demonstrated in the video is a heavier weight used on the weaker side and a light weight on the stronger side. It is important to roll the shoulder blades back toward the middle of your spine, look straight ahead, walk heel, ball toe, ribs down connected to hips, breathing deep to protect your back as you go for a walk.
The Farmers walk is also an excellent exercise to do regularly because it is a fundamental movement pattern needed to carry groceries, pick up objects to carry a load under controlled tension to help reduce injuries, build strong connective tissues and bones.
Give this a try and let me know how it goes.
Mastery Coach Kettlebell Lady of Iron Fitness Instructor &Functional Systems certified is available for group and individual coaching. Would you like to know what is a safe zone for exercise? I offer a ten-minute screening designed to identify muscle imbalances that comes with a printout of corrective exercises. To learn about the services, I offer and how you can get started email: MasteryCoach@protonmail.com. Let’s talk soon!
41
views
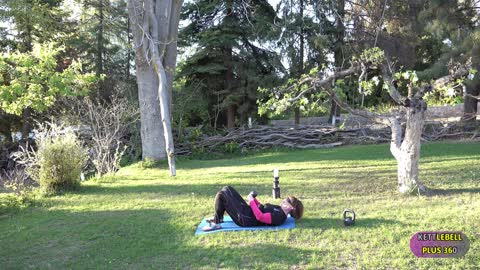
Modified Crunch with Kettlebell in the Safety Zone
Modified Crunch with Kettlebell in the Safety Zone
Crunches help to activate your core muscles & is an effective compound-muscle ab exercise. The crunch is safer than a set-up when done correctly, they target your upper abdominal, lower abdominal, oblique, and lower back muscles.
The Pull Over with a kettlebell or dumbbell exercise is one of the best because it puts the long head of the triceps into a fully lengthened extension state & during the lowering phase into flexion with the elbows bent flat on the mat.
How to Perform in the Safety Zone
Lie down on a mat, breathe deep with your back always imprinted to the mat. Plant your feet on the floor with a little more weight on your heels to activate the glutes, hip-width apart. Bend your knees and place your arms across your chest. Contract your abs and inhale.
Exhale and lift your upper body but, keep your back imprinted to mat, use a yoga block or pillow under your head if needed, keep your head and neck relaxed.
Inhale, lowing yourself one vertebra at a time under controlled tension returning to the starting position.
Next: Take either a kettlebell or a dumbbell in both hands from the top, let the shoulders go into 180 degrees of flexion, then drop the dumbbell straight down to fully lengthen the triceps.
The initiation into the concentric is done via elbow extension (which is the primary function of the triceps, of course) until completion.
Safety tips:
Use your core to raise your upper body. If the movement comes from your head or neck, you’ll increase the risk for injury.
Move in a slow, controlled manner. Rapid movements won’t engage the right muscles.
You can place your hands behind your head, but this can strain your neck. It’s best to try this hand placement after you’ve mastered the proper form.
When doing the Triceps Pull Over be sure to keep your core engaged & back imprinted to the mat. Breath out to the top of the move & breath in during the lowering phase.
If you have even a tinge of pain at any time stop & evaluate yourself.
This exercise can be done using the principle of movement under tension for a minute, go to another exercise & repeat a couple more times.
Give these exercises a try & let me know how they work for you. Mastery Coach Kettlebell Lady of Iron Leanne
41
views
Kettlebell Total Body HIT Long Cycle Workout
1. Push the weight upward with your breath under tension deep into your diaphragm, brace your abs, squeeze your glutes to protect your back.
2. Anchor your feet into the ground to control the weight as it works against gravity.
3. Hinge at the hips instead of folding at the waist.
4. Hike the kettlebell back between your legs, your arms swing like a pendulum, elbows locked.
5. Tame the ark with a plank position at the top floating briefly at the top
6. Breathe in deep & push the weight down between your legs parking kettlebell in front of you.
Side Note: All kettlebell exercises by nature are resistance exercises that work against gravity with their cast iron cannon shape kettlebell with the handle attached to the top of the weight. A well-designed kettlebell program is essential. Why? To correctly learn the fundamental moves, you use every day to push, pull, squat, bend, lunge, rotate & turn controlled by how you breathe, Once the fundamentals of movement are grooved in intensities, loads, and progressions can bolster a physical defense against osteoporosis.
High Intensity Interval Training (HIIT) is a form of "cardio" training, the bouts are done in intervals, with high intensity during the active bouts and an active recovery during the rest bouts because once your heart rate is up it is too hard on your heart to suddenly stop. HIIT burns a lot of fat burning calories in a short period of time. When performing a HIIT interval, usually aim to achieve a max heart rate of 80% — (220-your age) x0.8.v.
Safety Tops: When you use time under tension (learning when to tighten up the muscles & relax them controlled by your breathing) the main core contracts to avoid hurting your back, breathing behind the shield. You can add complexity to build your foundation by learning to pull knee caps up for glute development. Reset the starting position each time to make sure the setup is correct. When the set-up is correct with your anatomical breathing pattern matches the movement, the pattern is correct. (A reset can occur with a clean to a press before each move when you are doing a Long Cycle)
Luna Sandals (my favorites) https://lunasandals.net
FNX High Performance Products (increases my work capacity & recovery) FNX products are made in USA with a 30 day no questions asked money back guarantee. For every item purchased a gallon of water is donated to a child in need of pure clean drinking water.
https://fnx.grsm.io/leannewylet78388332 To receive 15% off your order enter code: FNXSznG
Mastery Coach Kettlebell Lady of Iron with Kettlebell Plus 360 takes your health, fitness & relationships full circle. To get started set-up your strategy appointment by leaving me a message at: MasteryCoach@protonmail.com. To your continued success!
72
views
Review of Mastery Coach Kettlebell Lady of Iron
Review of Mastery Coach Kettlebell Lady of Iron Leanne
Yvonne M. thank you for the review of you experience overcoming a major hilliness & your health recovery. I am humbled & grateful for you & how you preserved against all odds to live a full active live! I am looking forward to how the next chapter of your live on folds.
18
views
Kettlebell Swing Hard Style & Soft Style in the Safety Zone
Kettlebell Swing “Soft Style” in the Safety Zone There are two styles of kettlebell training that I am certified to instruct Hard Style & Soft Style. Hard style uses radiant strength under tension while Soft Style is more efficient requiring using the lats more. With the Soft Style the elbows remain bent is an option to consider as you age putting less stress on the adjoining joints such as the elbow. The Soft Style also works best as your progressively go up to a higher weight putting less stress on your forearms.
I like doing a combo of both mixing them up depending on what kettlebell exercises I decide to do. That is an advantage of using kettlebells because of the versatility of using them to develop power, strength, flexibility & endurance.
Benefits of Hard and Soft Style
Which style you use depends on your goals. Soft style because it requires less energy is easier on the body with efficiency of movement. The Soft Stylet is used for the Long Cycle (increase functional work capacity & endurance doing a clean in between each move such as the Clear & Jerk) & Competition Kettlebell Sport because it works will endurance exercises. It is also used by anyone who likes to vary their exercise between Hard Style & Soft Style forms. For instance, you can use the soft style sport for your warmup with the long cycle or before you start your kettlebell workout.
Restoring Movement with Natural Physics Restoring, optimizing, and maintaining movement and function are central goals for Physical Therapy and rehabilitation. By using functional movements combined with physics which are natural to our body, kettlebells offer a mode of exercise with rehab applications and restorative qualities limited only by one’s ingenuity and willingness to think outside the box.
Safety First: Warm-up before you exercise to help get your muscles ready for exercise. The one in this video is an example. I also like to stretch the entire body by going into a toe touch & staying there (check with your Dr. for clearance for heat & respiratory conditions). The Stop go exercise works will to warm up the hamstrings & grove in the kettlebell swing.
Cool Down Afterwards: When you heart rate is up from exercising keep moving to give your heart rate time to adjust by doing a slow walk around. A a spiked hard 3.5” ball on your back & Si joint gently to help balance out any muscle imbalances between the let & right side of your body to reduce the risk of developing sacroiliitis, which can lead to a muscle injury.
Note: Kettlebells were instrumental in my healing from the soft tissue damage from a seat belt injury. I went from a diagnosis of “permanently disabled” to “full mobility.” I have two kettlebell certifications: Hard Style & High Intensity Interval Training. I am available as a Mastery Coach for individual, group training & accelerating your growth in the areas of fitness, health & relationships. As my gift to you because I know what it is like to fall through the cracks & seek answers that never seem to come offer a complimentary strategy appointment to see if what I have to offer is a good fit. Please see my contact information to get started.
I use FNX performance products shown in the video. You can check them out at: FNX products made in USA with a 30 day no questions asked money back guarantee. For every item purchased a gallon of water is donated to a child in need of pure clean drinking water. https://fnx.grsm.io/leannewylet78388332 To receive 15% off your order enter code: FNXSznG
88
views

Kettlebell Single Deadlift to a Row in the Safety Zone
Single Deadlift to a Row Combination in the Safety Zone
Deadlift is a fundamental move teaching the hip hinge often done before learning the kettlebell swing. The deadlift works the posterior chain getting you strong and fit. No exercise taxes the entire body the way that a deadlift does including your hamstrings & activates the glutes.
The entire body is worked with the deadlift.
Row is a major compound movement using the spinal erectors, hamstrings, glutes, rhomboids, traps, forearms, biceps etc. Maximize mechanical tension to maximize the benefits. creates strong shoulders, backs, lats & traps. Focus on mind-muscle connection with a smooth controlled movement & no swinging the weight or using too much momentum.
One of the safest way to train is seeing how many reps you can do within a set period of time such as a minute on of 4- to 8 reps with a 15 to 30 second rest period 3 too 4 tomes/ repeated depending on how fit
you are.
During the raising phase breath out & the lowering phase breath deep into your diaphragm behind the shield to protect your back.
Give it a try. You will feel amazing, strong, flexible, cardio capacity increase & endurance.
Studies show other benefits of exercise are one of the best therapies to counter gaining weight & depression while building your health & preparing your body for daily activities.
During the day keep moving for even being sedentary for short periods of time is bad for your health & shortening your longevity.
Mastery Coach Kettlebell Lady of Iron is available to take 360 full circle your fitness, health & relationships full circle. To schedule an appointment you can go to: MasteryCoach@protonmail.com
93
views
Tripod Foot Exercises in the Safety Zone
Tripod Foot Exercises in the Safety Zone
Do you use a tripod foot when you walk? A tripod foot is important to maintain your balance, coordination & control of your movement patterns such as squat, how you walk - gate, push, pull & lunge. For the health of your feet choose a shoe you can feel the surface under your feet with such as a minimal shoe or my favorites Luna Sandals that are made in USA. Let your feet be free for all your daily activities: walking, hiking & running. They can be purchased at: https://lunasandals.net
10
views
Kettlebell Swing HIIT Gravity Exercise
Kettlebell Swing HIIT Gravity Exercise
1. Push the weight upward with your breath under tension deep into your diaphragm, brace your abs, squeeze your glutes to protect your back.
2. Anchor your feet into the ground to control the weight as it works against gravity.
3. Hinge at the hips instead of folding at the waist.
4. Hike the kettlebell back between your legs, your arms swing like a pendulum, elbows locked.
5. Tame the ark with a plank position at the top floating briefly at the top
6. Breathe in deep & push the weight down between your legs parking kettlebell in front of you.
Side Note: All kettlebell exercises by nature are resistance exercises that work against gravity with their cast iron cannon shape kettlebell with the handle attached to the top of the weight. A well-designed kettlebell program is essential. Why? To correctly learn the fundamental moves, you use every day to push, pull, squat, bend, lunge, rotate & turn controlled by how you breathe, Once the fundamentals of movement are grooved in intensities, loads, and progressions can bolster a physical defense against osteoporosis. High Intensity Interval Training (HIIT) is a form of "cardio" training, the bouts are done in intervals, with high intensity during the active bouts and an active recovery during the rest bouts because once your heart rate is up it is too hard on your heart to suddenly stop. HIIT burns a lot of fat burning calories in a short period of time. When performing a HIIT interval, usually aim to achieve a max heart rate of 80% — (220-your age) x0.8.v.
Safety Tops: When you use time under tension (learning when to tighten up the muscles & relax them controlled by your breathing) the main core contracts to avoid hurting your back, breathing behind the shield. You can add complexity to build your foundation by learning to pull knee caps up for glute development. Reset the starting position each time to make sure the setup is correct. When the set-up is correct with your anatomical breathing pattern matches the movement, the pattern is correct.
Mastery Coach Kettlebell Lady of Iron with Kettlebell Plus 360 takes your health, fitness & relationships full circle. You can contact me for a strategy appointment. To your success!
33
views
Kettlebell Goblet Squat
Goblet Squat
The Goblet Squat can be done as a body weight exercise to burn fat & is a foundation exercise to reduce back & knee injuries. The Goblet squat works all the major muscle groups in the lower body & build your core, grip & upper body strength. With the weight held close to you in front challenges your body to maintain balance without throwing your weight forward.
Because we need to squat for daily activities doing the Goblet Squat makes them easier & is a natural position with the toes & knees being in alignment, setting back using your “hip hinge”, deep breathes to power your self to a standing position & breathing in during the lowering phase.
The Goblet Squat uses more glute activation and protects the spine, increases hip & ankle mobility which is especially important if your do a lot of setting. To help loosen up tight hips at the bottom of the move take your arms holding the kettlebell in the center & push outwards on your legs. This variation is called “the pry” for a reason. An extra bonus to regular exercise is a stronger, healthier body & is natures anti-depressant.
Give the exercise a try & let me know how it goes for you.
42
views

Hip Hinge in the Safety Zone
Hip Hinge in the Safety Zone
The hip hinge drill is a basic movement pattern that can be modified into the deadlift, squat & kettlebell swing. The hip hinge emphasizes the posterior chain glutes & hamstrings instead of the muscles of the lower back. This is important because it shifts resistance from the lumbar spine to the hip because they're much stronger than the smaller, less powerful muscles that support the spine, the muscles of the legs and hips are better suited for lifting.
The hip hinge movement pattern involves a creasing at the hips and the buttocks being pushed backwards with a flat strong back. This is one of the most essential exercises to learn because improper form can lead to serious lower back injury. This movement should be perfected before adding any additional loads.
All hip hinge exercises heavily target the buttocks (glute muscles) & the hamstring muscles.
How to perform:
• Stand with your feet hip-width apart, feet pointing straight ahead with a little more weight on your heels to help activate the glues with a slight bend in your knees.
• Keeping your back straight and core engaged, push your butt back liking you are going to sit in a chair & hinge forward at your hips. You can place a dowel with contact points of your head, shoulders & lower spine to kinetically teach yourself what it feels like to keep your back straight with head looking straight ahead.
• Stop when you feel a stretch in your hamstrings and glutes. Depending on your level of flexibility’
• Squeeze your glutes (you may want a small ball or a pillow to squeeze placed above your knees to help activate your glutes & placing more weight on your heels to help activate your glutes to fire first bringing your hips forward, reverse the hip hinge to return to a standing position.
Benefits of Hip Hinge Exercises:
• Injury prevention: Improper movement patterns, especially those associated with bending forward, can lead to back pain and injury. By learning to properly hinge you’re reinforcing healthy, natural movement patterns & teaches you how to lift & carry objects safely.
• Functional fitness: The hip hinge is the foundation of countless functional fitness exercises, including the squat, the deadlift & kettlebell swing the foundation for other kettlebell exercises such as presses & snatch It’s important to master the hip hinge for safe lifting for daily activities & athletic performance.
• Glute engagement: As a society plagued by dead butt syndrome from sitting to much & lack of moving throughout the day. Well-developed glute muscles is required for safe lifting & help correct flat glutes
Mastery Coach Kettlebell Lady Leanne is available for coaching to accelerate your health, fitness & relationships that maybe holding you back from living your life to the fullest. I am also available for individual & group instruction. The first appointment is a complementary strategy time to see what is going to be your best fit. To get started please leave me a message. To your continued success!
65
views
Kettlebell HIIT & Osteoporosis in the Safety Zone
Kettlebell HIIT & Osteoporosis: in the Safety Zone
Studies show the importance of resistance exercises for impact loading to reduce bone loss build muscles & connective tissues. As you age keep moving daily walking, climbing stairs, Yoga, Tai Chi, weight resistance exercises, breathing deep, healthy stress, sleep, whole pure foods, pure water & limiting chemicals in your diet are all part of the mix.
McGee-Lawrence work explains it this way, “Building on what is already known to happen in skeletal muscle, that the repair rate is out of tune in older osteocytes, which may contribute to bone loss in aging, that these tears happen in muscle cells and the lack of gravity appears to impair their repair rate of repair.” A previous study shows that repair rate is out of tune in older osteocytes, which may contribute to bone loss in aging, she said. Her work is building on what is already known.
Gravity Exercise
All kettlebell exercises by nature are resistance exercises that work against gravity with their cast iron cannon shape kettlebell with the handle attached to the top of the weight. A well-designed kettlebell program is essential. Why? To correctly learn the fundamental moves, you use every day to push, pull, squat, bend, lunge, rotate & turn controlled by how you breathe, Once the fundamentals of movement are grooved in intensities, loads, and progressions can bolster a physical defense against osteoporosis. High Intensity Interval Training (HIIT) is a form of "cardio" training, the bouts are done in intervals, with high intensity during the active bouts and an active recovery during the rest bouts because once your heart rate is up it is too hard on your heart to suddenly stop. HIIT burns a lot of fat burning calories in a short period of time. When performing a HIIT interval, usually aim to achieve a max heart rate of 80% — (220-your age) x0.8.v.
The dynamics of the kettlebell reinforces uniform development of muscles, strengthen connective tissues & bones. Injuries are reduced when the body mechanics and postural alignment are not in flexion or extension when exercising. Breathing correctly is an important part of this to control the movement pattern & reduce potential for injuries.
Kettlebell are growing in popularity because they dynamically work the entire body with functional movements for strength and conditioning as well as movement, coordination & balance. Kettlebell exercise techniques utilize angular forces and movements that works with the body’s natural mechanics. An extra bonus for doing the kettlebell swing as Pavel Tsatsouline of Strong First states “increases the number of fast twitch fibers that usually decrease with age leading to falls.”
Kettlebell exercises also lend themselves to be restorative and therapeutic; making them an excellent choice for rehab therapy clinicians looking to add an effective, dynamic, and fun option to their repertoire. There have been many claims since the early 2000s on the rehabilitative and human performance benefits of kettlebell exercise.
Restoring Movement with Natural Physics
Restoring, optimizing, and maintaining movement and function are central goals for Physical Therapy and rehabilitation. By using functional movements combined with physics which are natural to our body, kettlebells offer a mode of exercise with rehab applications and restorative qualities limited only by one’s ingenuity and willingness to think outside the box.
Note: Kettlebells were instrumental in my healing from the soft tissue damage from a seat belt injury. I went from a diagnosis of “permanently disabled” to “full mobility.” I have two kettlebell certifications: Hard Style & High Intensity Interval Training. I am available as a Mastery Coach for individual, group training & accelerating your growth in the areas of fitness, health & relationships. As my gift to you because I know what it is like to fall through the cracks & seek answers that never seem to come offer a complimentary strategy appointment to see if what I have to offer is a good fit. Please see my contact information at MasteryCoach@protonmail.com or https://kettlebelllady.com.
196
views

Kettlebell Clean Stop Start in the Safety Zone
Kettlebell Clean Stop Start in the Safety Zone
Most kettlebell injuries occur with the kettlebell is improperly parked. You need to have your feet straight ahead, thumbs inward on the kettlebell to avoid it sticking out which could lead to an injury, sit back, reach out with one hand in front of you, fists to fingers & index fingers pinkies on the outside of the kettlebell handle.
Always stop when you feel you could do one more rep because when you get fatigued the form can break down leading to an injury or when a transition is made into other movement such as a clean to a press.
Power training with the clean is about being aware of your position & posture in space with both force production & force absorption.
The kettlebell clean is a deceptive exercise because it's not a barbell clean but instead, a swing in disguise. The RKC standard for the clean clearly states, “. . .the swing, minus the straight arm position at the top of the rep are required". The hip hinge is the fundamental of the kettlebell clean just as it is with the swing with more weight on the heels of your foot, sit back like you are going to set on a chair & hike the kettlebell back between your legs drive shoulders down away from the ears, pull you knee caps up to engage quads & your lats, rib cage down (rib to hip connection) breathing out, when you swing the kettlebell up, breath in at the top of the move brace yourself, engage your abs, lats, core setting back when the kettlebell goes into the track position. Be sure to keep your rib cage down, squeeze your glutes inward, engage lats, abs & core to fire all the muscles of the body under tension. When you start downward breath in engaging your core of your body with the appropriate muscles in reverse of the movement from when you went up.
The Kettlebell Clean is a great exercise for teaching BOTH force production and force absorption. One of the most frustrating things about learning The Kettlebell Clean is trying to avoid "banging" your forearm with the kettlebell as you try to secure the kettlebell in the rack.
You can use more advance training universal strength 5 to 20 reps for a short period of times or ten minutes once you have the basics grooved in. You can also use high intensity interval training.
Note: When you use time under tension (learning when to tighten up the muscles & relax them controlled by your breathing) the main core contracts to avoid hurting your back, breathing behind the shield. You can add complexity to build your foundation by learning to pull knee caps up for glute development. Reset the starting position each time to make sure the setup is correct. When the set-up is correct with your anatomical breathing pattern matches the movement, the pattern is correct.
Mastery Coach Kettlebell Lady of Iron with Kettlebell Plus 360 takes your health, fitness & relationships full circle. You can contact me for a strategy appointment on how you can get started. To your success!
202
views
Kettlebell Hand to Hand Stop Start Swing in the Safety Zone
Kettlebell Hand to Hand Stop Start Swing in the Safety Zone
Most kettlebell injuries occur with the kettlebell is improperly parked. You need to have your feet straight ahead, thumbs inward on the kettlebell to avoid it sticking out which could lead to an injury, sit back, reach out with 2 hands in front of you, fists to fingers & index fingers pinkies on the outside of the kettlebell handle.
Always stop when you feel you could do one more rep because when you get fatigued the form can break down leading to an injury or when a transition is made into other movement such as a clean to a press.
The hip hinge is the fundamental of the kettlebell swing, with more weight on the heels of your foot, sit back like you are going to set on a chair & hike the kettlebell back between your legs drive shoulders down away from the ears, engaging your lats, breathing out & the swing should be parallel looking like a plank at the top of the move. Be sure to keep your rib cage down, squeeze your glutes inward, rib cage down to engage lats, abs & core to fire all the muscles of the body under tension. When you start downward breath in engaging your core of your body with the appropriate muscles in reverse of the movement from when you went up. You can use more advance training universal strength 5 to 20 reps for a short period of times or ten minutes once you have the basics grooved in. You can also use high intensity interval training.
Note: When you use time under tension (learning when to tighten up the muscles & relax them controlled by your breathing) the main core contracts to avoid hurting your back, breathing behind the shield. You can add complexity to build your foundation by learning to pull knee caps up for glute development. Reset the starting position each time to make sure the setup is correct. When the set-up is correct with your anatomical breathing pattern matches the movement, the pattern is correct.
Mastery Coach Kettlebell Lady of Iron with Kettlebell Plus 360 takes your health, fitness & relationships full circle. You can contact me for a strategy appointment. To your success!
46
views

Spinal Rock
Spinal Rock
Spinal rock is a terrific exercise to improve the mobilization & stabilization of your spine, build strong abs, obliques (core), activate glues, pelvis & hips & more. You can include this as part of your warm-up or cool-down using movement under tension for a minute on go do another exercise repeating for a total of 3 to 4 times.
This is how to perform the Spinal Rock:
• Lie on your back (on a padded exercise mat) and pull the knees towards the chest. Do not pull too far – you should still be able to breathe comfortably.
• Tuck your chin towards the chest and raise the head a few inches off the floor. Feel the spine, making a C-shape exhaling & round your back bracing your abs fleeing your shoulders on the mat into flexion, next snape your hips into extension with your spine stretching long, breathing deep expanding your chest when your hips are flat on the floor & your heels being driven into the mat hip width apart.
• From here gently roll backwards and forwards along the length of your spine. Be sure to maintain your breathing. You can modify this exercise by flexing your hips as you come down from the C-shape curl to give yourself a little more momentum.
• Repeat 3 to 4 times for a minute each time doing another exercise in between using the movement under tension principle to increase strength & endurance.
Spinal Rock is Important because:
• Sedentary lifestyles – including prolonged sitting and standing postures – can cause the spine to stiffen and lose mobility. This can result in movement restrictions which can impair simple everyday movements as well as exercise and sports performance. Restricted spinal movement – especially in the thoracic spine – can result in other body segments becoming more mobile, to compensate for this restriction (and vice versa).
• A typical example is where there is a lack of stability in the shoulder girdle. To compensate the body will often restrict thoracic spine motion to create balance in this area. In these situations, it is essential to not only develop stability through the scapular muscles but also improve mobility in the thoracic spine. The use of the spinal rock (and other spine mobility exercises) will play an essential part in restoring function to this area.
• You can advance the spinal rock can adding an element of core control. As you roll towards the lower end of your spine, engage the abdominal muscles, and roll onto your tail bone. You can balance in this position for a moment – which will require you to keep the core muscles engaged – before slowly rolling back one vertebra at a time under control.
Note: This exercise circulates the energy and relaxes the spine & helps to reprogram the hip snap & get the glutes to fire to help counter prolonged setting & standing.
Mastery Coach Kettlebell Lady of Iron is available for individual & group coaching. https://kettlebelllady.com or MasteryCoach@protonmail.com
36
views
2
comments
Kettlebell Swing Stop Start in the Safety Zone
Kettlebell Swing Stop Start in the Safety Zone
Most kettlebell injuries occur with the kettlebell is improperly parked. You need to have your feet straight ahead, thumbs inward on the kettlebell to avoid it sticking out which could lead to an injury, sit back, reach out with 2 hands in front of you, fists to fingers & index fingers pinkies on the outside of the kettlebell handle.
Always stop when you feel you could do one more rep because when you get fatigued the form can break down leading to an injury or when a transition is made into other movement such as a clean to a press.
The s hip hinge is the fundamental of the kettlebell swing, with more weight on the heels of your foot, sit back like you are going to set on a chair & hike the kettlebell back between your legs drive shoulders down away from the ears, engaging your lats, breathing out & the swing should be parallel looking like a plank at the top of the move. Be sure to keep your rib cage down, squeeze your glutes inward, rib cage down to engage lats, abs & core to fire all the muscles of the body under tension. When you start downward breath in engaging your core of your body with the appropriate muscles in reverse of the movement from when you went up. You can use more advance training universal strength 5 to 20 reps for a short period of times or ten minutes once you have the basics grooved in. You can also use high intensity interval training.
Note: When you use time under tension (learning when to tighten up the muscles & relax them controlled by your breathing) the main core contracts to avoid hurting your back, breathing behind the shield. You can add complexity to build your foundation by learning to pull knee caps up for glute development. Reset the starting position each time to make sure the setup is correct. When the set-up is correct with your anatomical breathing pattern matches the movement, the pattern is correct.
Mastery Coach Kettlebell Lady of Iron with Kettlebell Plus 360 takes your health, fitness & relationships full circle. You can contact me for a strategy appointment. To your success!
79
views
Kettlebell One Arm Swing in the Safety Zone
Swing Technique:
In this video is with the hand-to-hand swings because it is one of the best exercises to active the anterior & pastier cross oblique system to help activate your hips & glutes to fire first with your nervous system. Why? Because the right hip is connected to the left arm & left arm is attached to the right arm. Grove in & master the fundamentals of the kettlebell swing first:
* The kettlebell swing is a hip hinge move not a squat with minimal knee bend
* At the top of the move extend the hips & knees fully * Squeezing your glutes, brace your abs, breath deep & explosively snapping of your hips.
* Use your lats & rotate & lock your arms in their sockets to tame the arc at the top of the move
* The arms are loose arm(s) & at the top in a plank position at shoulder level .
* Keep your head up, straight back & sit back rather than dip down with the body in a straight line
* Breathing in the top of the move explosively driving the kettlebell down hiking the kettlebell back between your upper thighs.
*Anchor your tripod feet to the ground/floor because you are working with a free weight that requires a solid foot to maintain control of the kettlebell for if you lose control nothing good happens after that. Important:
* Before you start a strenuous exercise program check with your doctor first.
*Remember safety is part of not the opposite of performance so check your surrounding area to make sure it is clear, the surface isn’t slick, turn your head away from direct sun light for safety is an
*important part of performance.
*To help avoid injury and over training build up your workloads over time in a progression.
*When exercising once your heart rate is upkeep moving to avoid putting to much strain on your heart.
*When you become fatigue stop before your form goes to reduce the potential for an injury.
*Choses a weight that is challenging taking into account the volume of exercise for upper & lower body
Contact: Leanne Wylet, https://kettlebelllady.com , Email: MasterCoach@protonmail.com, https://kettlebellladpyfitness.com Blog,
28
views