
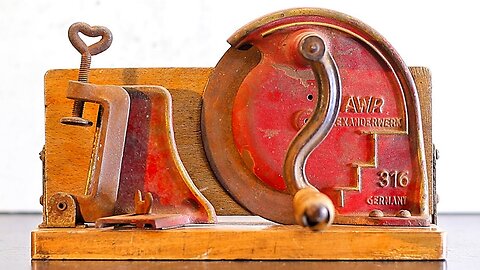
German Bread Cutter - Restoration
German Bread Cutter - Restoration
This restoration took me 10 days to complete and 2 days for video editing.
Bread slicer bread slicer restoration french baguette sandblasting paint removal sandblasting rust epoxy resin wood epoxy resin powder coating
powder paint sanblasting old things never die tysytube restoration rescue & restore my mechanics.
21
views
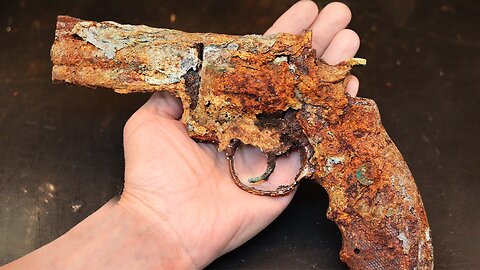
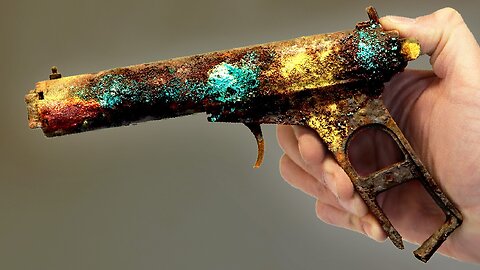
Rare Cannon Lighter Restoration
Rare Cannon Lighter Restoration
Restoration of a gun lighter model Colt Python .357 Magnum. I will restore and repair this cool looking cigarette lighter and make it burn again.
ABOUT THE GUN LIGHTER
Note: this is NOT a firearm it’s a Chinese cigarette lighter that I got from one of my loyal subscribers who send this to me to restore. He is a magnet fisherman and once a while he offers me really trashy objects to restore which he finds at the bottom of the lake.
This lighter is a model of the famous Colt Python .357 Magnum which was introduced 1955 the same year that Smith & Wesson released the .44 Magnum revolver. It’s a very cool and realistic looking gun so do not play around with this in the street.
These cheap Chinese butane lighters have a bad reputation for breaking very fast and the butane gas valve, burner and gas tank can really be challenging repairing once broken!
THE RESTORATION PROCESS
I started brushing the mud, dirt, rust, and mold off the lighter. I gave all the screws a drop of oil and disassemble the whole lighter into many pieces. Unfortunately I did have to drill out 4 of the screws which was half gone because of corrosion.
I sandblasted the gun frame, and I did my best to grind the metal back to normal. There was a lot of pitting in the metal, and I managed to almost remove it all. I gave all the metal a nice polishing and the metal came out really good.
I cleaned all the small parts in my mini tumbler. And used Muriatic acid to clean all the plastic parts. I polished all the plastic parts with car wax to make them nice, clean, and shiny again.
This was a really straight forward restoration to do and the observant watcher may notice that I have restored one of these before (2½ years ago). This of course gave me a big advantage doing this restoration process. I already know exactly how every little spare part works and where it goes.
I hope that you enjoyed this restoration.
23
views
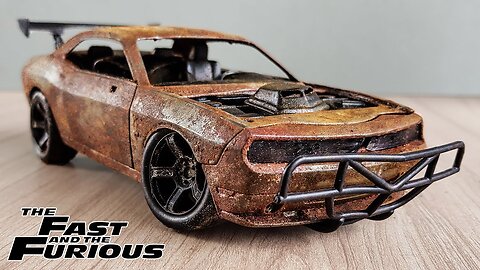
Restoration Fast & Furious Letty's Dodge C
Restoration Fast & Furious Letty's Dodge C
Restoration of Letty's Dodge Challenger, who is Letty ?? Letty is Actually a very Famous Fictional Character of the Movie The Fast and Furious, Wife of Dominic Toretto (Fictional Character) and the Dodge Challenger is a Well-Known Muscle Car .
The Dodge Challenger is the name of three different generations of automobiles (two of those being pony cars) produced by American automobile manufacturer Dodge. However, the first use of the Challenger name by Dodge was in 1959 for marketing a "value version" of the full-sized Coronet Silver Challenger.
13
views

Rare Cannon Lighter Restoration
Rare Cannon Lighter Restoration
The cannon lighter seems very authentic and was in a really bad condition. There was rust and the metal was very thin with a big hole I had to repair.
The lighter part was stuck, old and in a bad condition. Luckily for the project and me, the gas container, gas valves and sealings was in an OK condition and still worked fine after some minor repairs.
There was no inscription, soldier or brand name on the lighter, so If you know anything about Vietnam war lighters, please leave a comment below. I really like to know more about this. Thanks.
I enjoyed doing this restoration video and this I my third time doing a war lighter restoration – Beautiful experience. Sorry that I added chrome wheel to the lighter. Please forgive me for that it didn't turn out as expected 😉
18
views
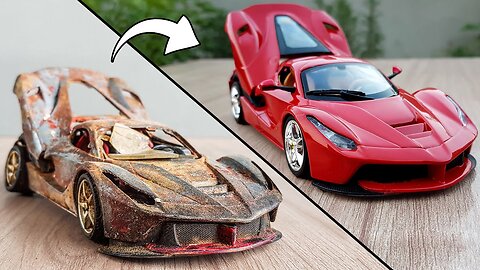
Ferrari LaFerrari SuperCar Model Restoration
Ferrari LaFerrari SuperCar Model Restoration
LaFerrari, project name F150 is a limited production hybrid sports car built by Italian automotive manufacturer Ferrari. LaFerrari means "The Ferrari" in Italian and some other Romance languages, in the sense that it is the "definitive" Ferrari.
Ferrari states that the car has a top speed of 350 km/h (220 mph), similar to the Enzo's top speed. 0–100 km/h (0–62 mph) in under 3 seconds, 0–200 km/h (0–124 mph) in under 7 seconds, and 0–300 km/h (0–186 mph) in 15 seconds were announced by Ferrari.
2
views
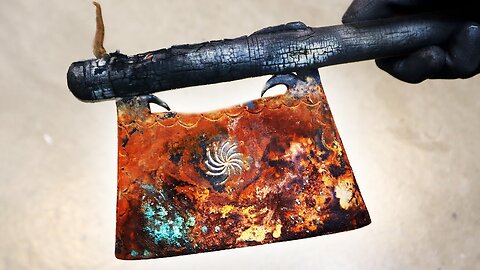
Celtic BATTLE AXE Restoration – With COOL original engravings
Celtic BATTLE AXE Restoration – With COOL original engravings
About the Celtic battle axe
I bought this very old axe from an antique store in Italy. I had a long chat with the owner of the store, and he could assure me that this was an authentic Celtic relic used for battle for many centuries ago. Latest battle it participated in was a fire in the previous owner’s house. That is why the wooden handle was almost burned away when I started the restoration. The metal on this relic looked very old and had a lot of cracks.
The restoration process
I started by removing the handle from the axe head and went directly to sandblasting. Then I straighten the metal taps who hold the axe head and handle together. I also welded a lot of cracks in the metal and cleaned it up with a metal cleaning disc on my angle grinder. I hardened the cutting edge of the axe and tempered the metal twice in the oven. I sharpened it in a 25-degree angle and polished the edge as well. I made a very simple wooden handle of an old wooden stick we have used as a hiking stick. I painted it black and mounted the axe head using fire to heat up the metal pins to prevent them from breaking. I also attached the original metal decoration nail from the old battle axe.
18
views
1
comment

Antique Hatchet Restoration with AWESOME VIKING modifications
Antique Hatchet Restoration with AWESOME VIKING modifications
Restoration of an antique hatchet with AWESOME VIKING engravings and modifications. See the amazing outcome!
THE ANTIQUE HATCHET
I do not know much about it. I got it in a bundle with 8 very rusty and molded old axes no doubt that this is an antique restoration though. The handle looks like something from an old hammer and is definitely not the original handle.
THE RESTORATION PROCESS
I disassembled the hatchet from the handle and sandblasted the metal. There was a lot of cracks in the metal, so I decided to reshape and cut of some metal instead of welding it. I did go for a more Nordic battle viking hatchet look and I think that I accomplished just that. I also did a lot of grinding and polishing to get rid of all the scars and craters after many years of hard work. I hardened the metal in my hardening oven, and I used a new handle for this hatchet and fitted it to the head very well.
THE LASER ENGRAVINGS
I’d sketched some Nordic Viking symbols, The Vegvisir (which shows the way), the triskelion which symbolize the 3 horns in the myth of Odin and some viking knots with a dragon who was often seen engraved in the Vikings long boats. I used many hours on the laptop to get this design right and after that I engraved it into the metal. I also engraved the viking triskelion on the metal piece inserted in the handle.
I am VERY satisfied with this restoration video and I hope that you enjoy it too.
15
views
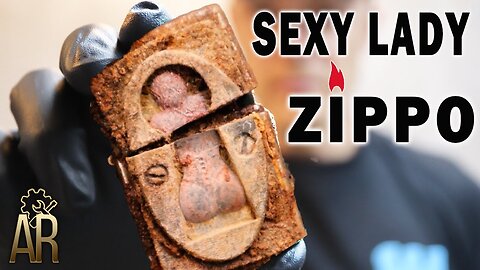
Zippo Lighter Restoration repair and refill
Zippo Lighter Restoration repair and refill
Restoration and repair of broken zippo lighter plus correct fluid refill. Today I restore a relatively new lighter with a beautiful sexy lady keyhole motive on it.
This zippo lighter is not very old. A subscriber on YouTube sent it to me to restore. He wrote that it has been laying in the water outside his house for some time now and wanted to challenge me do the restoration and make it work again. I accepted the challenge.
Restoration Process
I started with loosen up the parts with WD40 rust remover. The zippo lighter inside case was stuck in the zippo bottom case. It was not only the rust, someone/something ran over it for sure. When loose I separated all the parts and cleaned them all with the methods that I found necessary for this restoration.
I chose to sandblast the metal motive and the lighter case + hand grind the lighter outer case with grit 1500 paper to get rid of the plating and get that beautiful brass visible again. I loaded the sandblaster with glass beads to achieve perfect results when sandblasting on cast iron. I use only 80 psi pressure on my air compressor when sandblasting.
In this video I also describe how to refill fluid correctly on your Zippo lighter and show you where you can spare an extra flint.
16
views
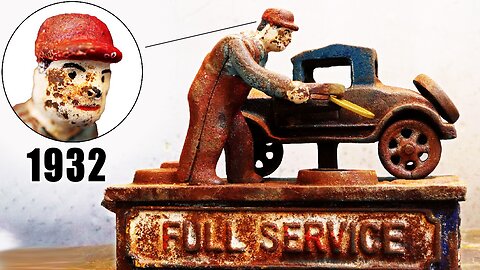
Restoration Of Vintage Mechanical Coin Bank - FULL SERVICE 1932
Restoration Of Vintage Mechanical Coin Bank - FULL SERVICE 1932
Restoration of vintage mechanical coin bank from J E Stevens model Cast Iron Full Service Car from year 1932.
THE RESTORATION PROCESS
I dissembled the coin bank and sandblasted all the big parts. The small parts, such as screws, feathers and minor cast iron details got cleaned up in the mini tumbler. I powder coated all the parts with primer and hand painted all the details two times.
I found some old coins in the coin bank and I soaked them in olive chili oil for 4 days. And they came out super beautiful. The one I liked most was a Swedish 1 schilling from 1835. I will keep this one as my lucky coin in my wallet.
17
views
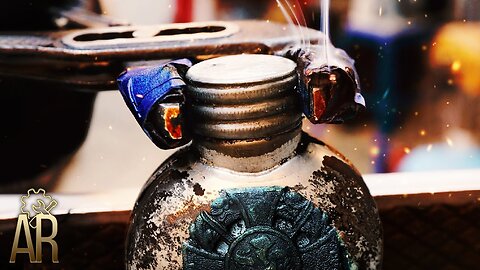
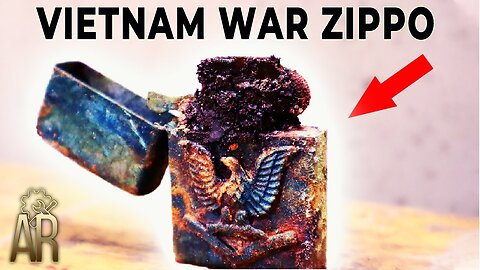
AK 47 Gun Oil Bottle Restoration from the Vietnam War
AK 47 Gun Oil Bottle Restoration from the Vietnam War
Restoration of a AK47 gun oil bottle from the Vietnam War with a Vietnam war gallantry cross medal attached to it. This is a unique repair and includes electroplating/nickel plating, sandblasting and ultrasonic cleaning.
HISTORY
This is an old Vietnamese gun oil bottle used by the army of Vietnam among others. I think that its origin is from the Russian Red Army who also used this kind of bottles. This oil bottle is special because there is a Vietnam war gallantry cross medal attached to it. This medal was given by the former government of South Vietnam (Republic of Vietnam). The medal was awarded to military personnel, civilians, armed forces and organizations in recognition of deeds of velour or heroic conduct while in combat with the enemy in the Vietnam war missions.
HOW DID I GET THIS RESTORATION PROJECT
I got this Vietnamese army gun oil bottle together with a lot of other rare Vietnam war pieces from a fan of my channel who contacted me directly after my popular Vietnam Zippo Lighter restoration.
RESTORATION PROCESS
The metal on the bottle was intact but with a lot of patina. I started this restoration with a drop of WD40 and with a little heat treatment I got the bottle cap off and started cleaning the parts with stone tumbling and sandblasting. After I have cleaned the parts I electroplated the bottle with nickel to make the metal more resistant and shinier. The Vietnam war gallantry cross medal was treated with alcohol, sandblasting polishing and finally I used ultrasonic sound cleaning to make it shine. (the same way that you clean jewelry) I have loaded the sandblaster with virgin white aluminium oxide this time to be gentle with this cool Vietnamese restoration.
60
views
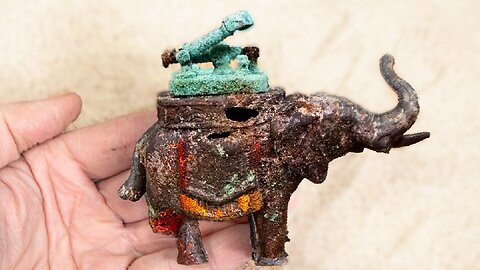
India Elephant Lighter Restoration
India Elephant Lighter Restoration
Restoration of a BROKEN elephant cigarette lighter from India in a very poor condition. I will do my best to rescue this indian beauty and bring this spectacular animal back to its best form.
A subscriber from India sent me this very damaged cigarette lighter from his hometown New Delhi. He was so kind also to send me an elephant statue of Lord Ganesha or Ganesh – a very worshiped Hindu god. Its very fine and will now be a true friend at my new Awesome Playground.
Restoration Process
I started by wondering if I really could restore this lighter. It was old and the elephant part was made of thin pewter with several holes. Anybody who has worked with thin pewter and trying to repair holes in thin pewter knows it is a NIGHTMARE. You need heat to fix it, but too much heat and it will all melt down. I had to repair 2 holes and I also created a new leg and attached it to the elephant.
The lighter part was made of cheap and thin mixed metal it looked like brass but it wasn’t. So yes, it’s not as easy as doing a Zippo lighter restoration. But here we go! AWESOME as I am 😉
I started by separating the lighter part from the elephant part – I did use a bit of heat but easy job. I choose to use baking soda when doing the sandblasting part because I think that regular sand would have gone thru the thin pewter and would have vanished to many details away from the elephant.
After that I did the pewter casting job to repair the holes. I started by filling the elephant with special casting sand and casted the two holes with success. I protected the surrounding area with clay. I also casted a new leg for the Indian beauty. I used a lot of time hammering and grinding to get it right and to get the new leg to fit in on the old animal.
The lighter part was an easy fix. The metal was just so poor that I didn’t separate anything. I just cleaned it as it was in my mini tumbler. I added a new flint stone and a new lighter spring, a new wick and added some new cotton balls. I filled it with Zippo lighter petrol, and I ignited, and it worked very well.
It was a cool restoration video to make and and my first item from India that I have ever restored. Hopefully more to come. ❤
29
views
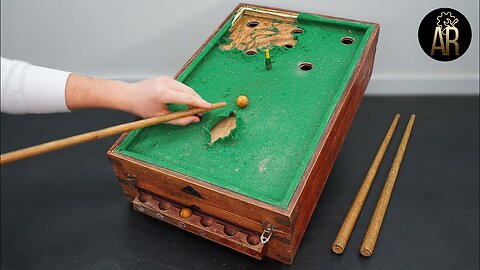
Bar billiards restoration 1933s - Pool table Restore Mercier le Champagne
Bar billiards restoration 1933s - Pool table Restore Mercier le Champagne
Restoring a Vintage 1933s Bar Billiards: Bringing the Old Rusty Beauty Back to Life
Welcome to my YouTube channel, dear viewers! Today, I want to take you on an exciting journey through the restoration of an impressive billiard table from 1933, showcasing all its fascinating details.
This billiard table was a true gem that I discovered on YouTube, albeit in a heavily damaged condition. However, with my craftsmanship and a touch of passion, I managed to breathe new life into this old treasure.
One of the biggest challenges was the playing surface, which was severely warped. But I didn't let that discourage me and decided to completely replace it. You'll be amazed at how it looks in the end!
The cues were also in poor shape, but after thorough sanding and treating them with high-quality oil, they now look brand new. To give them the final touch, I mounted custom-made aluminum end caps on the cues. These end caps were personally crafted by me using a lathe machine, and I'm truly proud of the result.
But that's not all! The metal digits that display the scores were entirely missing. To replace them, I created a mold using a 3D printer. A piece of sheet metal was placed inside the mold, and then I used a hammer to shape the metal. The result? Perfectly formed metal digits that completed the table.
The wooden frame of the billiard table was also heavily worn, but after hours of work, sanding, and staining, it now shines like new. A finish with high-quality oil ensures it will remain in top condition for many years to come.
In this video, I'll guide you through the entire restoration process, step by step, so you can fully appreciate the attention to detail and effort that went into this project. Perhaps this restoration will even inspire you to start your own DIY project!
12
views
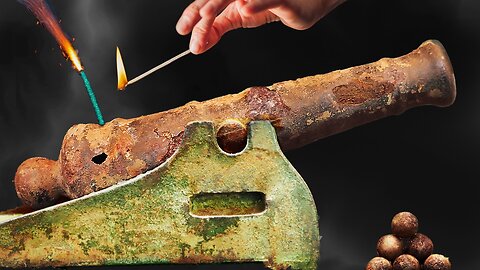
Cannon Restoration + Test firing
Cannon Restoration + Test firing
Restoration of an antique salute cannon from around 1860’s. I will restore this beautiful treasure and repair all the necessary defects and test shoot it with 3 salute cannon shells.
ABOUT THE SALUTE CANNON
This is an antique salute cannon bought at an auction here in Sweden. The cannon is from Hällefors Bruk in Sweden and this cannon is dated to be around the mid 19th century. The cannon is made of cast iron and is in two parts, the cannon stand and the cannon barrel. The two parts weigh around 14 kilos.
Hällefors Bruk was founded in 1652 and is well known all over the world for making solid cannons used for defense and battle. They are also known for making iron pipes, iron stoves, cast iron pans and a lot of other iron stuff.
THE RESTORATION PROCESS
I started by inspecting the salute cannon and directly took it to sandblasting. I sandblasted the cannon barrel and the stand and used regular sandblasting sand as my media with high (6.5 bar) air pressure.
After sandblasting I removed a lot of very fragile metal from the barrel using my new flexible shaft machine. I also removed a lot of excess iron from the casting process to improve the overall look of the cannon.
There were some marks on the cannon barrel that could indicate that the cannon once was deactivated and later activated again. But it was sold to me as a functioning salute cannon.
I did face a little problem with the cannon barrel though. After so many years standing outside in the Swedish harsh weather, the last 20 millimeters of the cannon bore was totally blocked by rust. That means it was unable to fire salute shots in this condition and had to be repaired.
So I drilled all the rust out of the bore with a very long cobalt drill and the supporting tool that I have made for this occasion to support the long drill and to ensure that the bore would be drilled 100% right so it could function correctly again.
There were a few holes in some very thin cast iron at the bottom of the barrel plus the bottom was hollow. So welding it was not an option. I decided to fill the whole bottom of the barrel with tin. And this repair turned out really well. After this I thoroughly cleaned the bore and I soaked the barrel in motor oil for a few days to ensure that there was oil in every little corner of the cannon. I painted the barrel black using heat and linseed oil.
The cannon stand was in really solid cast iron and painted and therefore in OK condition after all these years out in the weather. I did some minor grinding and refreshed the H for Hällefors, which was engraved in the metal a long time ago. After that I powder coated the stand in green army color and painted the bottom black.
I also cleaned the small cannonballs which came with the cannon. NOTE: they are only for decorative purposes since they don’t fit into the cannon bore.
I filled some old fireworks in the cannon and did 3 blank salute shots (all shot were blanks and I was using maximum 8 gram black powder) in a very safe and uninhabited area environment. So do not test this in your garage, please! Even 8 grams of black powder can be very powerful and cause serious injury and fire if used wrong.
42
views
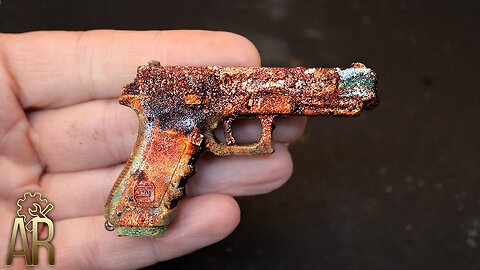
Glock 17 Gun Restoration - MINI Caliber .11
Glock 17 Gun Restoration - MINI Caliber .11
Restoration of Glock 17 mini gun. In this video I will restore and repair a very little gun in caliber .11. I will also try to test shoot it with real ammunition.
About the Glock 17 mini gun
This little handgun was sent to me to restore by a subscriber from this channel. The package was very anonymous, so I do not get much information about its origin and what happened to the Glock.
The restoration process
I started by removing some of the rust so I could get an overview on how to disassemble this little Glock 17 handgun. I disassembled the gun. There were many parts, and this gun restoration was much more complex than I first thought.
The gun slide was stuck, so I had to carefully hammer on it to make it movable. When I removed the magazine there were two non-shootable dummy cartridges inside, cute mini ammunition.
When everything was taken apart, I sandblasted the gun slide and the magazine, and all the other metal parts were cleaned in my mini tumbler. I cleaned the gun frame in hot soap water and gave it some plastic coating.
I reassembled the Mini Glock and used a lot of time to get all the gun parts at the right place. I did a very cool snakeskin laser engraving on the gun slide and engraved the words “MINI GLOCK” on the magazine. I think this restoration video turned out very well. A lot of close-up video roll.
In the end of the restoration video I test shoot the little Glock 17 with 1 shot of caliber 0.11 that a friend’s friend produced special to me - its like fireworks not real ammo.
57
views
SUPER RARE Air Gun Restoration – The Warrior .177
SUPER RARE Air Gun Restoration – The Warrior .177
Rare Air Gun Restoration from 1930’s Accles & Shelvoke Ltd, model The Warrior .177 pistol. I will restore this antique weapon and bring it back to its glory and beyond.
ABOUT THE .177 AIRGUN
I got this beautiful Air pistol “donated to restore” from one of my subscribers in Canada (Thank you Glenn). This is a British made beauty from Accles and Shelvoke Ltd in Birmingham. The model’s name of this weapon is “WARRIOR” and it was produced between 1931 to 1939. So its around 100 years old. PATENT No's. BRIT 351268 USA 538057
ABOUT THE RESTORATION
The Air gun was in a really bad condition – The surface was totally covered in rust, the handle was cracked open and the grip was missing. The trigger was badly fixed in an earlier attempt to fix it and the trigger guard was missing.
I started the restoration process by disassembling the pistol. That was a little bit challenging because of all the rust. I spend quite some time trying to pull out the gun barrel, but I succeeded at last. I sandblasted all the major parts with fine glass breads and with a low air pressure to be as gentle as possible to the gun parts.
I repaired and welded the gun handle with my TIG welder and make it look as good as new. I also created some new gun handles in beautiful Asia walnut wood.
There was a lot of pitting on the metal of the gun, so I improved it by carefully grinding with some 1000 grit sandpaper and after words I polished all the visible metal.
I had to rebuild the gun trigger and create a new trigger guard who should fit naturally into the old gun. I assembled all the parts and did a test shooting in my garage. I was excited about this restoration because I knew it would be challenging.
Please let me know what you think about this restoration project in the comment field. Thank you!
19
views
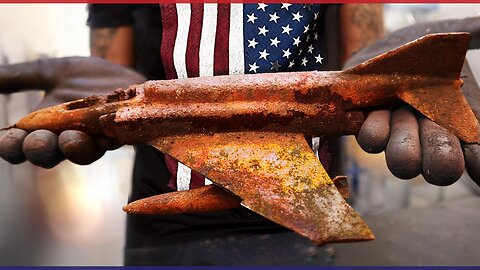
F-4 PHANTOM II Aircraft Restoration - U.S. Airforce Fighter JET
F-4 PHANTOM II Aircraft Restoration - U.S. Airforce Fighter JET
Restoration of McDonnell Douglas F-4 Phantom II – The legendary aircraft used by the US Air Force, the NAVY, and the Marines. See me restore and repair this fighter jet plane back to awesome to celebrate the Air Force's 75th anniversary. Aim high airmen!
ABOUT THE MCDONNELL DOUGLAS F-4J PHANTOM II
This legendary fighter jet plane was produced by McDonnell Douglas and came out in 1958. At that time the F4 Phantom II had a revolutionary design and has been serving the US Air Force, US NAVY, and the US Marines for many years. It could reach a top speed at MACH 2.2 Phantom production ran from 1958 to 1981 with a total of 5,195 aircraft built. The fighter did set 15 world records for its in-flight performance.
The last time the McDonnell Douglas Phantom II was operating was in Operation Desert Storm before the plane was retired in 1996.
The Phantom Fighter jet was gradually replaced by more modern aircraft such as the F-15 Eagle and F-16 Fighting Falcon in the U.S. Air Force, the F-14 Tomcat in the U.S. Navy, and the F/A-18 Hornet in the Navy and Marine Corps.
I got this scaled metal model of the McDonnell Douglas Phantom II from one of my subscribers 2 years ago. I have saved the restoration project to celebrate the U.S. Air Force's 75th anniversary 18. September 2022. So congratulations and Aim high airmen!
ABOUT THE RESTORATION
I started by saving (prying them out) the two little pilots from the cockpit. Then I dismantled the bombs and the exhaust from the Phantom F4. I gave the whole aircraft a very clean sandblasting. I then TIG Welded the broken wing and ground it for many hours to 100% match the other wing. I drilled new holes to mount the bomb using a laser precision tool.
The cockpit canopy was missing so I have been searching for a new cockpit for the McDonnell Douglas F-4 Phantom II for a long time. My only problem was that this plane model was old and rare, so I couldn’t find any spare parts. Finally, I found a nice guy in the USA actually from the US Air Force who has the same Aircraft. He was so kind to make a mold so I could cast my canopy for this restoration project.
I used resin to cast the new canopy. I was a little bit skeptical in the casting process, but the new canopy was amazing and with a few adjustments it fits the Phantom F4 perfectly. BOOM!
There was also a stand along with the aircraft, but the bottom part was missing. So I cast a new one in aluminum and painted it black. To honor the Airmen I had my aluminum blocks engraved with the text Aim High – Fly – Fight – Win which is the official motto of the U.S. Air Force. The stand also turned out well and fit the airplane very nicely.
Finally, I gave the aircraft a good polish. I did not want it to be mirror blank just very bright and clean. I designed a whole package of decals that fit the older versions of the McDonnell Douglas F-4 Phantom II. As a little tribute, I added the U.S. Air Force 75th anniversary logo on the tail.
27
views
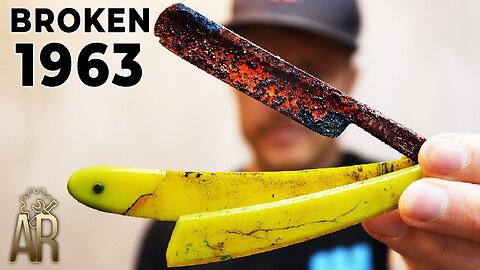
Broken Straight Razor Restoration From 1963
Broken Straight Razor Restoration From 1963
I broke straight razor restoration in 1963. Today I restored a vintage razor from year 1963. The blade and the handle are both broken. But I will fix it and make this jewel beautiful and really sharp again.
This straight razor comes from a friend who owns an antique store here in Europe. He knows that I like these kinds of restorations, so he didn’t hesitate to send it to me.
RESTORATION PROCESS
With this straight razor, it’s straightforward. I de-mounted the handle and removed the rust with 12% vinegar. I started by removing the broken part of the blade thereafter I hand-grinded the blade with grit 1000/1500. After that, I polished the blade with my Dremel 3000. As a compound, I used ultra-cut/ultra-gloss. I did choose to Nickel plate the blade to protect it from rust in the future. For the handle, I used some tough dark wood from Africa. Finally, I sharpened the razor on water stone grit 400/1000/3000/8000 and finished it on a leather strap.
15
views

Restoration of WOODY from Toy Story - CRAZY Zombie edition
Full restoration of Sheriff Woody from Toy Story. I will repair this crazy Zombie edition of the beloved doll from the classic movie Toy Story 2 from the year of 1999.
The restores tool chest that I use in this video
In this video, I use an almost identical copy of the famous restore tool chest used in the original movie Toy Story 2 produced by Pixar animation studios back in 1999. I got this tool chest from another very skilled woodworker and YouTuber named Matthew Moustache. You can see him create the beautiful tool chest here:
• Making Toy Story 2 Cleaner Tool Chest...
The restoration process
I started disassembling the Woody doll by taking off all his clothes. One foot was really burned, so I had to use the heat blower to get off his cowboy boots. I took the Zombie head off and placed it on a looking home build platform which is a reference to one of Sid Phillips's toys from the original Toy Story 2 movie.
I pulled out all the U nails and the metal plate that was melted into Woody's head. I did a short sandblasting and I used baking soda as sandblasting media to avoid destroying the soft plastic on his head. I cleaned all the holes and made some reinforcements with wood and tiny nails, so I could sculpt a new strong, and lasting face with clay. I used air-drying silky doll clay to sculpt and repair Woody's face.
I used a lot of time filling, grinding, and shaping the face. I painted him using my airbrush with many layers of acrylic water-based hobby paint. I mixed a custom skin color that is slightly darker than the original color and I also painted his hair and eyebrows a bit darker than the original Woody. I printed the eye color with my color printer and glued the paper onto his eyes.
Buzz Lightyear made a new cowboy belt buckle for his friend. And this ended up really cool. I washed all his clothes in my mini washing machine and bought some second-hand boots on eBay to replace to old burned ones.
It was a very challenging restoration and a hard job making the face look real again. I was aiming for the face shape and cool expression that Woody has in Toy Story 2 movie. And I think that I succeeded very well with the face repair job.
48
views
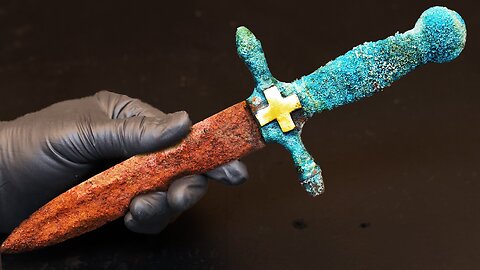
RARE Dagger Restoration - HOLY GRAIL from World War 1
Restoration of A REAL Italian Arditi trench dagger from WW1. For me, it is one of THE HOLY GRAILS. It is VERY uncommon to find a knife from 1915 in such a beautiful condition. See me restore this knife with respect.
ABOUT THE WW1 TRENCH DAGGER
I got this dagger donated by one of my Italian subscribers who has seen some of my other World War restoration videos. He told me that this is a Piemonte National Guard knife from around the mid-1800s that was shortened to be effective in the trenches during the battle of WW1.
So this dagger most likely belonged to an Italian “Arditi” from the Royal Italian Army elite special force of World War I. They were the first modern storm troops and they have been defined as "the most feared corps by opposing armies". Italy fought as allied with Serbia, Russia, France, Britain, and the United States against Germany, Austria, Hungary, Bulgaria, and the Ottoman Empire who together formed the Central Powers. For me, it feels like I’ve been given the holy grail. Thank you so much.
ABOUT THE RESTORATION
I started by removing some of the corrosion from the brass so I could figure out how to disassemble the knife. The knife blade and the handle were in unreal good condition with only minor damage to repair. I started sandblasting the knife blade and MIG welded a reinforcement in the upper side of the blade cause the upper part was in really bad shape.
I also repaired a big crack that went through both sides of the tip of the dagger. I chose TIG welding for this job to have more control because the metal was fragile. I ground the knife blade hardened the metal and made it all look as good as possible, without compromising the original trench build from WW1.
The beautiful old dagger handle got a gentle sandblasting too. There was a big hole in one of the quillons that I chose to fill up with solder. I had to grind with my smallest files to make this look good. That repair came out really nice.
For me, this could easily be one of my best restorations. So epic and so satisfying to get my hand on such a historical and well-conserved relic. I did this repair as lightly as possible without overruling the beautiful old look.
So I’m very pleased with this restoration video and I really hope that you like it too.
99
views
Zippo lighter restoration - Vietnam War repair Long Bin 1967-68
Zippo lighter restoration from the Vietnam War Long Binh post. This time I did a full restoration and repair of a very dirty and rusty Zippo lighter that was sent to me to restore.
I don’t know anything about this lighter because the person who sent it was anonymous, but I assume that part of it is real.
The Zippo lighter outer case seems real enough and was way more damaged and elder-looking than the inner part. There was a very vague Zippo brand name in the bottom lighter case with serial number PAT 2517181 (Maybe the 8 is a 0?)
The inner part of the Zippo was surprisingly shiny, after getting some wd-40 rust remover, considering it should be over 50 years old.
If you know anything about this Zippo, if it’s a fake Vietnam War lighter or the real deal then please leave a comment below. I like to know. Thanks.
The inscription on the lighter was
VIETNAM LONG BINH 67-68
WE HAVE DONE SO MUCH FOR SO LONG WITH SO LITTLE THAT WE NOW CAN DO ANYTHING WITH NOTHING FOREVER
24
views
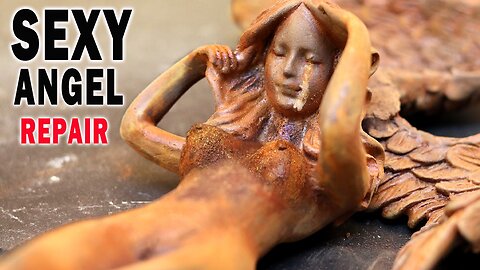
BEAUTIFUL Angel Restoration
ABOUT THE BROKEN ANGEL
I got this rusty broken angel from the local antique store. It’s made of cast Iron and is used as a metal decoration in people's homes or gardens. I think the angels are supposed to be rusty when used as decoration. I got this restoration project for absolutely free because it is hard to repair and weld cast iron and at the same time make it look good. But I am always into a challenge, and I was blown away by this little figure's beauty, so I have to save her. ❤
ABOUT THE RESTORATION
I started by sandblasting the angel’s base and body to weld those two parts together. I did a few tack welds which hold the two pieces very fine together. I prepared it for TIG brazing/welding by grinding a deep groove all around the front/back legs and heating the cast iron to around 175°C/350 °F. I TIG brazed it with aluminum bronze and had 110 amps on my welding machine in DC TIG mode. I used 100% argon as my shield gas. I slowly cooled it to normal temperature by burying the angel in the sand. I ground and removed the excess material and polished the welding.
After that, I used the same procedure when I welded the wings back on the angel’s body. Cast Iron is OK to solder if you know what you are doing. But it is very difficult to make it look good. So I had to grind to make the weldings look natural.
I decided to decorate the angel feathers by giving the wings a layer of smoky white paint with my airbrush. I also added some gold color to the wings. I dry-brushed a lot of details to make the restoration look even more beautiful.
Finally, I did a lot of polishing to make the metalwork look outstanding. I’m very pleased with this restoration video and I hope that you like it too.
78
views