

Ford 4R70W vs C4 Driving Impressions
Ford Fairlane Torino 4R70W AOD First Drive
Episode 553 Autorestomod
We finally get the 4R70W driven 1969 Fairlane out and driving. We like the way the US Shift controller handles the Monster Transmission 4R70W and it the combination of the two is light years ahead of where the car was with driving. We’d like to see a little more gearing, but other than that, we are very pleased with the outcome so far.
Thanks for watching and please encourage others to subscribe.
Jford@autorestomod.com
www.patreon.com/gasolinemedia
Playlist for the whole build: https://youtube.com/playlist?l
ist=PL9zPeh4WymNjO4SnE2ZvsFM92G7k5pSHa
16
views
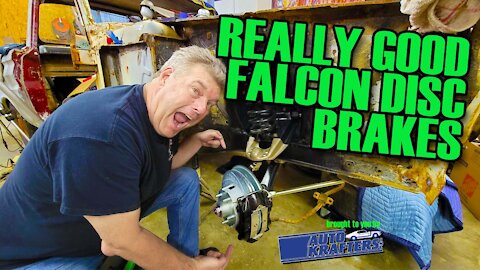
Upgrade Disc Brakes Tips and Tricks
https://youtu.be/FuF1uCoxJz4
Disc Brake Install Tips and Tricks
Stainless Steel Brake-USA is a company that rose from the ashes of SSBC. It was bought by enthusiast to bring back the quality brake systems that had been offered before. Because we have a long standing relationship with folks that are now at SSBC-USA, we thought we’d give them a shot at putting brakes on our 1965 Falcon Ranchero.
We give tips on greasing the bearings. We show how to set the bearings. We detail out how to install the kit for trouble free use.
Hey, thanks for watching! We appreciate every view and each subscription!
Tell folks we need them to subscribe!
jford@autorestomod.com
http://www.patreon.com/gasolinemedia
ssbc-usa.com
Kit we used: A120D for v-8 spindles
Had we stayed I-6 and four lug: A120-4/5
Auto Krafters
Spindle RH Front 1965 Ford Falcon: C5DZ-3105R
https://www.autokrafters.com/p-23339-spindle-rh-front-1965-ford-falcon-comet-ranchero-1965-66-mustang-v8-289-futura-sprint-squire-shelby-gt-c5dz-3105r.aspx
Spindle LH Front 1965 Ford Falcon: C5DZ-3105L
https://www.autokrafters.com/p-23338-spindle-lh-front-1965-ford-falcon-comet-ranchero-65-66-mustang-v8-289-futura-sprint-squire-shelby-gt-350-c5dz-3105l.aspx
43
views
2
comments
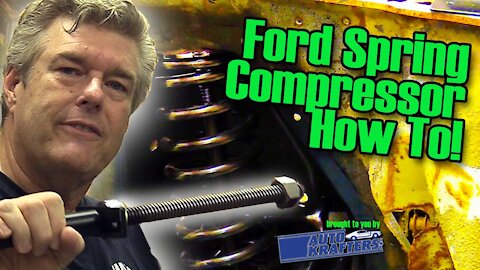
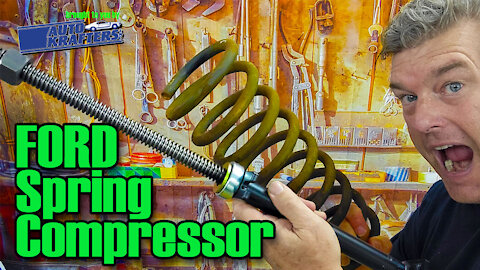
Ford Spring Compressor How To
We wanted to follow up with the Auto Krafters coil spring compressor the next week after were showed you our new favorite tool. Illness had other ideas. So this week we show you the safest coil spring compressor we’ve found to sue on Ford Mustang Cougar Maverick Torino Montego Fairlane Falcon Comet Cyclone. We also show you that sometimes you have to punt and use the other compressor because of suspension woes. Plus we talk about a tool we use to make the job a tic easier when removing Ford coil springs.
Hey, thanks for watching! We appreciate every view and each subscription!
Tell folks we need them to subscribe!
jford@autorestomod.com
http://www.patreon.com/gasolinemedia
https://youtu.be/umLnOLEhwME
https://www.autorestomod.com/diagrams.html
Front Coil Spring Compressor Tool 1960-77 Fords And Mercurys :6080CSC
https://www.autokrafters.com/p-22851-front-coil-spring-compressor-tool-1960-77-fords-and-mercurys-6080csc.aspx?keyword=spring+compressor
37
views
What Shocks are the Best on A Classic Ford
Best Classic Ford Shocks
Episode 128 Manic Mechanic
What Shocks are Best on Classic Ford
Shocks
What do the shocks do? Shocks help keep the tire planted on the road and control the compression and rebound of the springs.
Secret: Your Classic Ford was not designed with gas pressurized shocks in mind. The engineers were designing all the suspension components to use oil shocks...which are largely unavailable now.
Gas shock absorbers
99 percent of what you get
High pressure gas shocks can and often will add spring rate/spring ride height to a suspension. How much is up for debate. I do know that the wagon dropped nearly an inch when we went from the gas to oil shock.
KYB Gas Adjust shocks are arguably one of the most popular low cost options. They are very sporty in ride. $70.00 pair.
Oil shocks (traditional style shock absorber) Roughly 350.00 for a pair of front shocks.
Koni 82-1388SP3
QA1
Viking
Low pressure gas
KYB GR2 $70.00 for a pair
Bilstein $260.00
Ridetech $400.00
Hey, thanks for watching! We appreciate every view and each subscription!
Tell folks we need them to subscribe!
jford@autorestomod.com
http://www.patreon.com/gasolinemedia
www.autokrafters.com
Upper Arm Spring Seats With Roller Bearings: C4DZ-3388RBS
https://www.autokrafters.com/p-24130-upper-arm-spring-seats-with-roller-bearings-1960-70-ford-falcon-1966-70-fairlane-1968-71-torino-1970-77-maverick-1965-73-mustang-pair-c4dz-3388rbs.aspx
124
views
Best Coil Spring Compressor!
Best Coil Spring Compressor For Fords 1960-1977
We review the Auto Krafters Front Coil Spring Compressor Tool for 1960-77 Fords
Parts:
Front Coil Spring Compressor Tool 1960-77 Fords And Mercurys: 6080CSC
https://www.autokrafters.com/p-22851-front-coil-spring-compressor-tool-1960-77-fords-and-mercurys-6080csc.aspx
Hey, thanks for watching! We appreciate every view and each subscription!
Tell folks we need them to subscribe!
jford@autorestomod.com
http://www.patreon.com/gasolinemedia
49
views
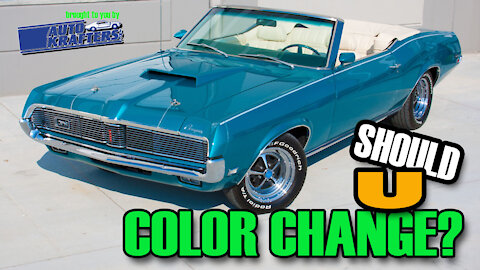
What Color Should I Paint My Car?
Should you Change the color of your classic Ford.
This week we look at whether it is a good idea to change the color of your classic Ford.
Torino, Falcon, Fairlane, Comet, Montego Cyclone, Spoiler.
Thanks for watching and please encourage others to subscribe.
Jford@autorestomod.com
www.patreon.com/gasolinemedia
35
views
1
comment
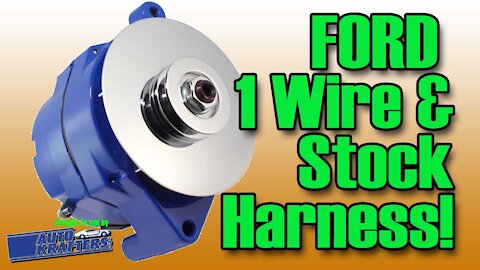
How To 1 Wire Alternator Using Original Ford Wiring
One Wire Conversion on a Stock Ford Wiring Harness
We talk about how to set up a one wire alternator with a stock Ford wiring harness. We discuss putting a 1 wire alt on a Ford generator harness (1960, 1961, 1962, 1963, 1964). We stalk about butting a one wire generator on a Ford Alternator harness. https://www.autokrafters.com/
https://www.rccinnovations.com/index.php?show=menu-volt-all
Tell folks we need them to subscribe!
jford@autorestomod.com
http://www.patreon.com/gasolinemedia
43
views
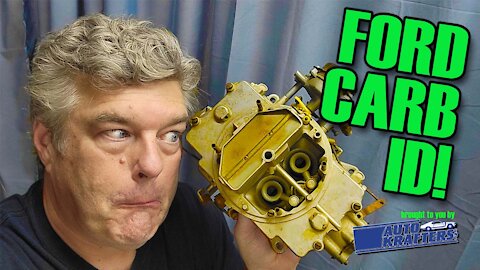
Know Your Ford Carburetor!
Autolite 2100 ID 1960-1974
All information is listed in the description below.
1. What sizes? There were 8 different venture sizes for the 2 barrel 2100.
.98 @190 cfm
1.01 @245 cfm
1.02 @ 240 cfm
1.08 @287 cfm
1.14 @ 300 cfm
1.21 @ 351 cfm
1.23 @ 356 cfm
1.33 @ 424 cfm
Autolite 4100
1.08 @ 480 cfm
1.12 @ 600 cfm
1.19 @ 669 cfm
2. In order to know what size venturi you have look on the drivers side of the float bowl. There will be a set of numbers that corispond to the venturi size we just talked abut. Thus yu can know what the cfm of the carburetor is.
Tech tip: CFM stands for cubic feet per minute and lets you now how muchg air and fuel will pass the veturis when the car is running.
3. The carb tag ia and was the most detailed part of the carburetor info. If it has the carburetor tag it will list the Decade, year, model of car, and group (Carburetors are Group F) the leter after that denotes what the use was, typically it was for manual or automatic. Below that on the tag is the change level then the date year is first, followed by month (There is no I in the date coding system as it could be confussed with a 1 then day.
IF the tag is missing the carburetor info is on the drivers side front foot of the carb. But it will lack the date code.
4. In stock configureation, at 4,000 rpm at 90 percent volmetric efficency, the Autolite 1.14 venturi carburetor will perform very well. But it won’t get the kind of miulage that a 4100 autolite can. Simply put, a 4V carburetor will get better gas mileage if you don’t dploy the secondaries because the primaries are smaller. The chart I am showing is available on our website at the url below.
289-302 go with 1.08 primary. (this in the 4100 is 480 cfm) and will net you better milage.
Our 260 has a 240 primary.
5. The Autolite 4100 has some sticky points.
• No PCV port on the carb. The only port is on the spacer.
• Many aftermarket intakes will not support the 4100 spacer due to the base plate confifureaton.
• Thre manual shift 1.08 carbs are expensive since they are for the HiPo 289 typically.
• The 1.19 venturi is ultra rare and was only used on the 383 “high torque Mercury engine in 1958.
Issues on both the 4100 and 2100
• Jets on both carburetors are usually specific Ford jets but can be obtained from places like Mikes Carburetor. Early carburetors up intol 1966 ish used a jet the same size as Holley.
• Power valves are common to Holley but some caps can interfier with the power valve.
• The throttle shafts can be worn and might exibit issues will weird idle charicteristics.
Carburetor Spacer Kit: C3OZ-9A589C
https://www.autokrafters.com/p-233-carburetor-spacer-kit-1963-65-and-1969-ford-fairlane-1965-69-mustang-1965-68-falcon-1969-montego-others-4bbl-c3oz-9a589c.aspx
https://www.fordification.com/tech/partnumbers_overview.htm
109
views
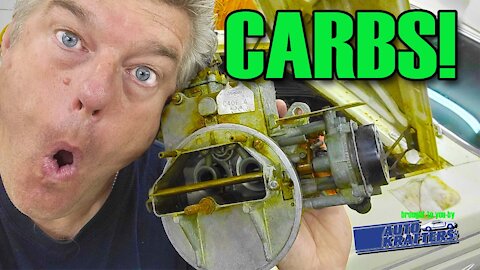
Carburetor Tear Down Tips!
Carburetor Tear down Tips
We invest some time into our Ford Autolite 2100 carburetor
We take apart the carburetor for our 1964 Falcon Futura. We inspect the carb for issues relating to the problem we have with the car stalling and hesitating when driving. We show our methods for inspection. We show how we clean the carburetor. We show how to know what areas of the 2100 Autolite are problematic.
jford@autorestomod.com
http://www.patreon.com/gasolinemedia
66
views
Ignition Switch On The Left?
Ford Ignition Switch on the Left
Ford ignition switch location changed throughout the years.
Episode 121 Manic Mechanic
The Model A had the ignition switch on the right side in the ceter stack of gauges.
https://www.alamomodela.com/restoration-ray-williamson.php
The 1941-48 Ford cars had the ignition switch on the column.
In 1949 Ford move the ignition switch to the dash panel on the passenger side of the steering wheel.
1951 Ford went to a “key turn start” and moved the ignition to the drivers side of the car. Before you had a push button or switch start.
The ignition key stated there until 1964 when it moved back to the right of the column on passenger cars and stated oto the left of the column on the F1-F350 trucks until 1973 and was on the left in the F500 and above until 1981!
So why the move? I don’t know. BUT...
Porsche did the same thing on the post war cars. The answer comes down (at least on Porsches) to this:
According to Wall Street Jorurnal reporter Dan Neil:
Porsche Museum curator (1993 to 2011) and keeper of keys Klaus Bischof explained, its placement had nothing to do with racing. In the early Postwar period, when the company amounted to a mere handful of men hammering and welding in an old sawmill, electrical wire was scarce. Putting the switch on the left “saved a little bit of wire, a little bit of money,” Mr. Bischof said, “and maybe 200 grams.”
So I thought, maybe Ford was being frugal and putting less wire in and moved the ignition switch over by the fuse block which would then be on the left of the wheel by the instrument cluster in 1951. Nope. These Fords didn’t even go near the fuse panel. So...I’m stumped.
What I found on a forum:
Having the ignition switch on the left side of the dash was...at one time, a convenience. After unlocking the left door, the same key could easily be placed in the ignition cylinder.
At one time, there were no left door lock cylinders on passenger cars or trucks. People unlocked the right door, then slide across the seat. Back then, the switch was conveniently located to the right of the column.
1951 was the first year Ford offered a left door lock cylinder on trucks, but only on the 5 Star Deluxe Cabs. All 1953 and later Custom Cabs have it, but it was an option on Standard Cabs thru 1961.
jford@autorestomod.com
http://www.patreon.com/gasolinemedia
71
views
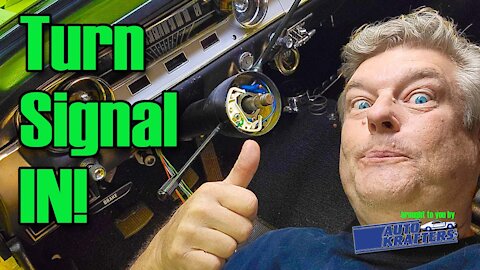
Ford Turn Signal Switch Harness How To
Ford Turn Signal Switch Harness How To
Ford Falcon Galaxie Mustang turn signal harness how to
We finally install the Auto Krafters turn signal wring harness to get our 1964 Falcon up and running as it should be. We show how to remove a falcon steering wheel. We remove the original broken turn signal switch. We install the new turn signal switch from Auto Krafters.
jford@autorestomod.com
http://www.patreon.com/gasolinemedia
www.autokrafters.com
Horn Ring Contact & Brush 1962-64 Galaxie 1960-64 Falcon: C2OZ-13A821A
https://www.autokrafters.com/p-8950-horn-ring-contact-brush-1962-65-ford-fairlane-1962-64-galaxie-1960-64-falcon-64-72-f-100-pickup-more-c2oz-13a821a.aspx
Steering Column Bearing 1960-65 Ford Falcon 1960 Galaxie T Bird 1965-66 Mustang: C3DZ-3517A
https://www.autokrafters.com/p-10266-steering-column-bearing-1960-65-ford-falcon-1960-galaxie-tbird-1965-66-mustang-1963-65-comet-and-others-c3dz-3517a.aspx
Turn Signal Switch 1962-64 Ford Fairlane 1963-64 Falcon: C3OZ-13341B
https://www.autokrafters.com/p-1635-turn-signal-switch-1962-64-ford-fairlane-1963-64-falcon-comet-ranchero-65-mustang-61-64-f-100-f-250-pickup-c3oz-13341b.aspx
182
views
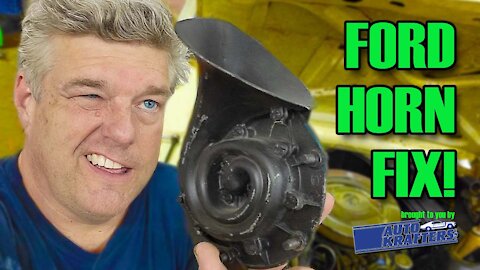
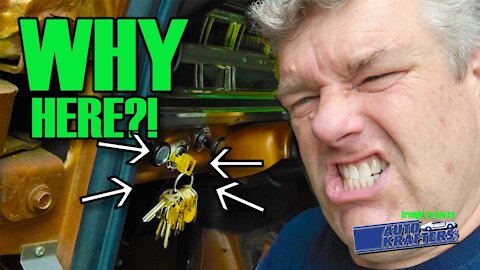
Ford Horn Not Working?
We test our Falcon horn and show you how to make sure that your horn is good from top to bottom. We show how to test a relay. We show how to test the horns. We show how to check for 12 volts to the relay. We show how to test for continuity from the relay to the horn button.
Web site wiring diagram links:
http://averagejoerestoration.com/mustang-resources-and-tech/mustang-wiring-and-vacuum-diagrams/
http://www.wiring-wizard.com/Falcon_Diagrams.htm
jford@autorestomod.com
http://www.patreon.com/gasolinemedia
27
views
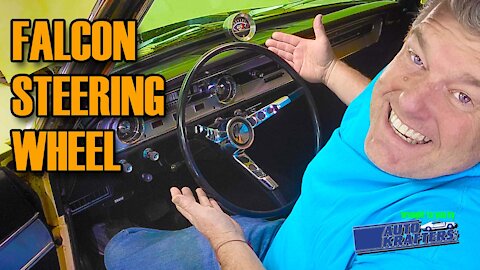
Falcon Steering Wheel
Steering wheel swap
Horn Broke, Watch for Finger.
The “Sports-Type Steering Wheel,” the name used in the 1963 Sales brochure for the the imitation wood grain wheel (that really had more in common with the look of a bowling ball than a block of wood) has been unavailable in the aftermarket for a long time. But we were wondering if you could take a early 1965 Mustang wheel and make a spring esq wheel out of it.
Could you hydro dip it? Yes. Though I would find a place to do that for you rather than attempting it yourself.
You could also use this wheel on a standard Falcon and use the “Ford” logo Mustang horn button rather than the Sprint horn button and change out the Mustang logo for something else.
jford@autorestomod.com
www.patreon.com/gasolinemedia
Parts:
https://www.autokrafters.com/
Steering Wheel 1964 Ford Mustang 16-Inch 3-Spoke Black: C4ZZ-3600-01
https://www.autokrafters.com/p-127-steering-wheel-1964-ford-mustang-16-inch-3-spoke-black-c4zz-3600-01.aspx
Horn Ring 1963-64 Ford Falcon Sprint With Generator: C3DZ-13A805
https://www.autokrafters.com/p-12904-horn-ring-1963-64-ford-falcon-sprint-with-generator-chrome-plated-die-cast-painted-accents-c3dz-13a805.aspx
61
views
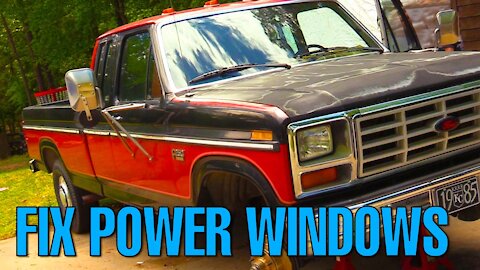
Ford Truck Power Window Motor Replacement
The Window Freezes. The Window won’t go up or down. The window stutters when you roll it up. The Door Glass is not operational. You may need to do a Ford Power window replacement
jford@autorestomod.com
http://www.patreon.com/gasolinemedia
www.npdlink.com
Motor, Power Window: 23395-1
https://www.npdlink.com/product/motor-power-window/104237?backurl=search%2Fproducts%3Fsearch_terms%3D23395-1%252B%26top_parent%3D60000%26year%3D1985&year=1985
Switch Assy, Power Window LH: F-14529-2
https://www.npdlink.com/product/switch-assy-power-window-lh/128732?backurl=search%2Fproducts%3Fsearch_terms%3Dpower%252Bwindow%252Bswitch%26top_parent%3D60000%26year%3D1985&year=1985
25
views
1
comment
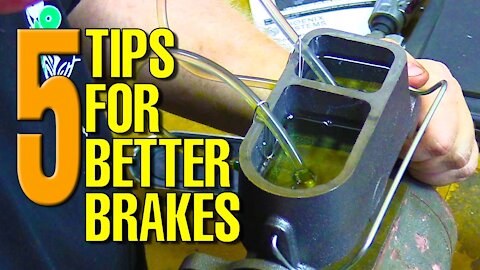
5 Tips For Better Brakes
Brakes Won’t Bleed
Soft Brake Pedal
New Brakes
Old Brakes.
5. Check your hard lines/soft lines/bleed screw. The dirty secret is that if you are using stainless brake lines, you may have to tighten the line up a little tighter than with Nicop or mild steel. The issue being that the flair on the stainless is less malleable than the flair on the other two. Air may be getting in but fluid may not be getting out. Also, old lines are old, and replacements are available, Check for damage to the lines.
4. New/existing parts issues. In the last three master cylinders we have gotten, one of them was not well rebuilt, we had air leaks on the seal and some substance that was not dissipating in the brake fluid. Always bench bleed a master cylinder thoroughly before installing it. Also, on Drum brakes, make sure that the rub pads are in good shape. If they are grooved, you could have problems under braking.
3. Air in the line/Improper bleeding procedure. Start at the back of the vehicle farthest away from the master for the rear system and the farthest from the master fro the front system. Air is the enemy of good braking.
2. wrong parts/mix and match parts. Make sure that all the parts on the car are correct for that car (or are the correct aftermarket parts). This could be an issue of a former power brake car having been converted to a non power system, or a non power car converted to power. Wrong push rod etc.
1. Leaks. Wheel cylinders, calipers, but especially master cylinders and bleeder screws. Cars without power brakes will see a rust trail down the firewall inside the car if the master cylinder seals are going bad. Harder to detect on cars with power brakes. But the fluid is very bad for the rubber diaphragm. And when we bleed the brakes, the bleeder screws if too loose will allow air into the system, or if they are not tight enough will draw air into the system.
BONUS.
Old or low brake fluid. Our truck has to have a leak in the system somewhere on the front. As we have lost fluid.
112
views
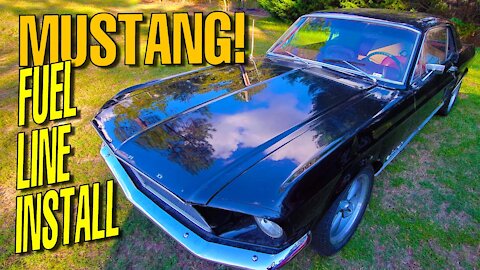
Mustang Fuel Line Tricks and Tips
We install a late 1967 fuel line on an early ‘67 Mustang to improve performance. And to not set the car on fire….
Hey, thanks for watching! We appreciate every view and each subscription!
Tell folks we need them to subscribe!
jford@autorestomod.com
http://www.patreon.com/gasolinemedia
Parts:
Fuel Line, Tank To Pump: 9369-26AS
https://www.npdlink.com/product/fuel-line-tank-to-pump/106962?backurl=search%2Fproducts%3Fsearch_terms%3Dfuel%252Bline%26top_parent%3D200001%26year%3D1968&year=1968
Fuel Pump, Mechanical: 9350-6A
https://www.npdlink.com/product/fuel-pump-mechanical/106916?backurl=search%2Fproducts%3Fsearch_terms%3Dfuel%252Bsender%26top_parent%3D200001%26year%3D1968&year=1968
Sending Unit Assy, Fuel Tank: 9275-1DR
https://www.npdlink.com/product/sending-unit-assy-fuel-tank/214211?backurl=search%2Fproducts%3Fsearch_terms%3Dsending%252Bunit%26top_parent%3D200001%26year%3D1968&year=1968
Fuel Tank: 9002-1B
https://www.npdlink.com/product/fuel-tank/106635?backurl=search%2Fproducts%3Fsearch_terms%3Dfuel%252Btank%26top_parent%3D200001%26year%3D1968&year=1968
60
views
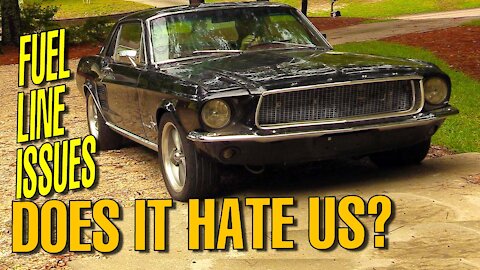
Mustang Fuel Leak Diagnosis
We diagnose the fuel leak on a friends 1967 Mustang hardtop
Fuel leaks lead to bigger problems as we try and find out why our buddies 1967 hardtop Mustang is leaking fuel. What we find is a strange system set up with fuel filters in the wrong place, fuel lines run to places they shouldn't go.
Hey, thanks for watching! We appreciate every view and each subscription!
Tell folks we need them to subscribe!
jford@autorestomod.com
http://www.patreon.com/gasolinemedia
39
views
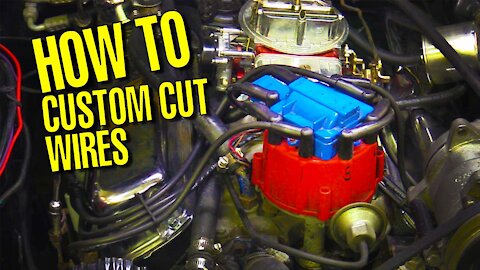
Custom Cut Plug Wire How To
We use OE Style Valve Cover Bolt Kit For 1986-93 5.0L Mustang: M-6582-8AK from National Parts Depot to neaten up the engine bay on our 1967 Mustang hardtop. We also use the Separator Set, Ignition Wire, Black: M-12297-9AK
Thanks for watching and please encourage others to subscribe.
Jford@autorestomod.com
www.patreon.com/gasolinemedia
Parts from National Parts Depot:
Oe Style Valve Cover Bolt Kit For 1986-93 5.0L Mustang: M-6582-8AK
https://www.npdlink.com/product/oe-style-valve-cover-bolt-kit-for-1986-93-50l-mustang/216391?backurl=search%2Fproducts%3Fsearch_terms%3DM-6582-8AK%26top_parent%3D150000%26year%3D
Separator Set, Ignition Wire, Black: M-12297-9AK
https://www.npdlink.com/product/separator-set-ignition-wire-black-incl-2-2/206364?backurl=search%2Fproducts%3Fsearch_terms%3DM-12297-9AK%26top_parent%3D150000%26year%3D
34
views
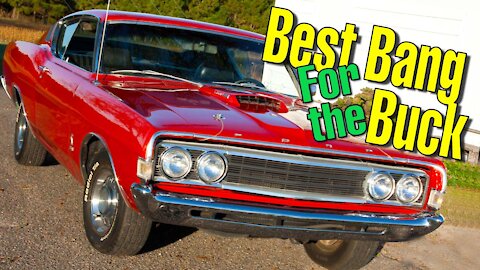
Best Bang for Your Classic Car Buck
1. Wheels and Tires. Easy and (sometimes) Cheap, wheels and tires are a great way to change the look of your classic Muscle Car. Aluminum wheels will reduce unsprung weight and help performance, low profile tires will also help performance.
2. Polyurethane bushings. I only recommend the urethane when talking about aftermarket control arms and sway bars.
3. Crate Engines. Especially when we are talking about “the usual suspects” like the 350 small block Chevy and the Ford 302. I would not trade an LS for an Olds 455.
4. Rear gear ratio. If you are driving the car a lot, you might consider losing the 3.73 or 3.90 in favor of a 3.00. It will help keep the RPMs down when you are going to out of town shows.
5. Patina. Like it or hate it. It ain’t going anywhere and can offer bang for the buck when you have a cool enough classic. We talk about when too much is really too much and what constitutes just right.
Hey, thanks for watching! We appreciate every view and each subscription!
Tell folks we need them to subscribe!
jford@autorestomod.com
50
views
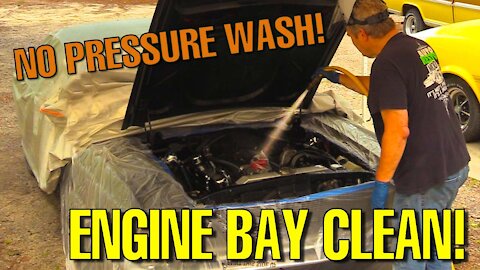
Cleaning Engine Bay Using Super Clean
We start to detail the engine bay of our short term project 1967 Mustang hardtop. The engine bay in our ‘67 Mustang Coupe is not extremely dirty but could definitely use some cleaning in preparation for us making it a better looking place to look at.
We take off the carburetor. We show how to use plastic to keep the rest of the car nice while we are cleaning. We discuss using a pressure washer.
Hey, thanks for watching! We appreciate every view and each subscription!
Tell folks we need them to subscribe!
jford@autorestomod.com
http://www.patreon.com/gasolinemedia
20
views
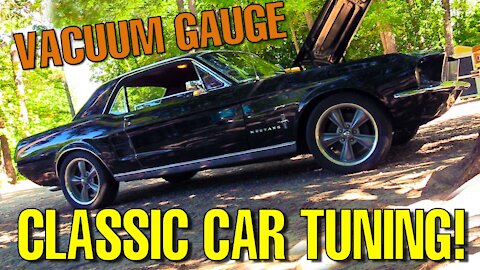
Engine Tuning With Vacuum Gauge
Hey, thanks for watching! We appreciate every view and each subscription!
Tell folks we need them to subscribe!
jford@autorestomod.com
http://www.patreon.com/gasolinemedia
Engine Tuning with Vacuum Gauge
1. Check plugs.
• Old need to be replaced. Fuel fouled can be cleaned and re-gaped.
• Gap on a Electronic ignition (Duraspark, Davis HEI, Pertronix) should be around .35 to .45 (check with your distributor manufacturer). Points type ignition should have the plugs gaped to around .16 (check the service manual for correct gap).
Run engine. Check for your miss. If it is gone you have found your miss.
2. Check float level. Generally examine carburetor. Look for unplugged vacuum ports, things like our accelerator pump where it is not even hooked up.
• Carb basics. Idle screw.
• Idle jets
• accelerator pump
• float setting on Holley
Run engine.
3. Vacuum check with Carb cleaner around carburetor base and intake.
• Older carbs check throttle shafts. You are looking for an increase in vacuum.
4. Timing. This can be tuned with a vacuum gauge or a timing light. This engine is an unknown, and is somewhat cobbled together. So we are going to use a vacuum gauge.
Run engine.
5. Tune carburetor for best performance. Use vacuum gauge to make sure you have the engine running at it’s best.
47
views
1
comment
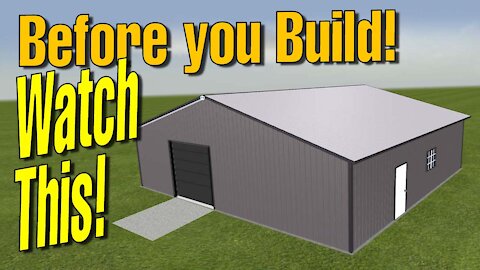
Before You Build A Shop
How To Put Up a Shop (the boring stuff
Episode 526 Autorestomod
Thanks for watching and please encourage others to subscribe.
Jford@autorestomod.com
www.patreon.com/gasolinemedia
Before you do ANYTHING, know your local ordinances for county (if outside the city limits) or city. Find what zone you live in as well. This will help you to narrow down the rules that you will have to live by.
You might get lucky and have a web site available for your area like Q Public that shows the zoning and lot lines to help you establish yourself. Link for our q public county map below. We are in an RC zoning district, the most restrictive zoning in Aiken County. We chose this area because fiber optic was a reality, not a “some day soon”.
A) Find out how long permitting takes. In our area a permit typically takes 7 to 10 days. Areas with several metric tons of bureaucracy it will take longer—certain areas of So Cal are over a year for permits.
B) Make sure there are no new rules on the horizon. Our zoning rules changed just after we got approval for the building. Had we been four days later with our permit we would have had to either get a variance (read more wait time) or reduce our structure size.
C) Understand the rules. Some areas require that you have them out at each stage of construction; from lot clearing to concrete to final building.
D) Know the rules. We have a friend who’s new business construction is in the city of Aiken. The city forced them to add a retention pond to the front of their business property—even though there was a retention pond on the property already. She fought and won to have the new pond filled in.
E) The friendly (but squeaky) wheel get the grease. Our permitting went on for four weeks. Vacations and people out sick kept pushing us back. I was always courteous when going by to check on things. If they told me give it another week, I did. Dad always told people who wanted him to go faster with his work: If you don’t like this speed you really won’t like the other. Making them hate you won’t get your permit done faster.
What should you put up?
That is a personal and availability issue. Around here, the least expensive pole barn was January. The next lest was November or December. Our research showed that a pole barn was, at the time, more expensive than a metal building. That has since flattened out.
THE BUILDING
Which is better, metal or pole?
Yes.
Metal goes up quicker on concrete. Our construction time will be two days. That does not count insulation.
• Most all metal buildings can be insulated the smaller buildings like ours will have less than wonderful insulation. I plan to insulate with R13 in the walls and R13 on the roof.
Any time you put up a metal building or pole barn, you will have more ambient noise from the metal. We had been told that spray insulation will reduce noise from rain and such...it does not. The quietest building we have had was with a shingle roof.
Stay even. When you are building, construction “likes” even numbers. SO if your square footage calculations sa you can max out at 37 feet, go 36, your waste pile will thank you.
Big box on the wall (electrical). What ever you think you will need...add more. We are putting up a 30 space box. And we discussed with our electrican what we’d be running. Welders, compressors and tools.
Both can be a pain to insulate and drywall depending on construction type.
Tip on pole barns to make insulation/drywall easier: get the Girts horizontal between the truss supports. It will be more expensive, but make drywall easier to do.
On the metal building side, our building has the walls with what appears to be an odd stud center. This will cause us to have to do some creative framing for the insulation and walls. We are also not going to float our drywall so that we can easily make changes to the electrical or what ever.
279
views

We Get the 55 to FIRE
We Start our Friends 1955 Chevrolet and get FIRE!
We are the ‘55 Bel Air that has been sitting for years and get a ball of flame.
BUT, at least it started.
Hey, thanks for watching! We appreciate every view and each subscription!
Tell folks we need them to subscribe!
jford@autorestomod.com
http://www.patreon.com/gasolinemedia
23
views
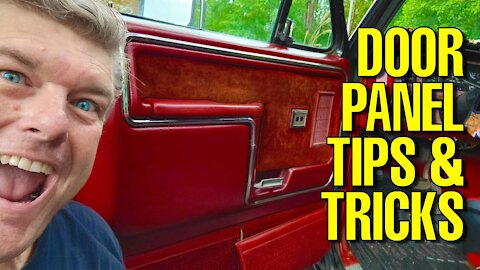
Door Panel Tips and Tricks
F150 F250 F350 Door Panel Tips And Tricks
We Review the Dashtop Door Panel, Replacement Style for the F150, F250, F350 Ford Truck. We show how to remove the door panel. We show how to safely remove the original trim. You will also see how to set up a new door panel for original trim.
jford@autorestomod.com
http://www.patreon.com/gasolinemedia
www.npdlink.com
Door Panel, Replacement Style: F-DPR-80E-C
https://www.npdlink.com/product/door-panel-replacement-style/137301?backurl=search%2Fproducts%3Fsearch_terms%3DF-DPR-80E-C%26top_parent%3D60000%26year%3D1982&year=1982
Switch Assy, Power Window LH: F-14529-2
https://www.npdlink.com/product/switch-assy-power-window-lh/128732?backurl=search%2Fproducts%3Fsearch_terms%3DSwitch%252BAssy%25252C%252BPower%252BWindow%26top_parent%3D60000%26year%3D1982&year=1982
Switch Assy, Power Window, RH: F-14529-1
https://www.npdlink.com/product/switch-assy-power-window-rh/128724?backurl=search%2Fproducts%3Fsearch_terms%3DSwitch%252BAssy%25252C%252BPower%252BWindow%26top_parent%3D60000%26year%3D1982&year=1982
Housing, Power Lock Switch, LH: F-14528-3A
https://www.npdlink.com/product/housing-power-lock-switch-lh/185174?backurl=search%2Fproducts%3Fsearch_terms%3DHousing%25252C%252BPower%252BLock%252BSwitch%25252C%252BRH%26top_parent%3D60000%26year%3D1982&year=1982
Housing, Power Lock Switch, RH: F-14528-2A
https://www.npdlink.com/product/housing-power-lock-switch-rh/185173?backurl=search%2Fproducts%3Fsearch_terms%3DHousing%25252C%252BPower%252BLock%252BSwitch%25252C%252BRH%26top_parent%3D60000%26year%3D1982&year=1982
Switch Assy, Power Lock: F-14529-3
https://www.npdlink.com/product/switch-assy-power-lock/128733?backurl=search%2Fproducts%3Fsearch_terms%3DF-14529-3%26top_parent%3D60000%26year%3D1982&year=1982
Pads, Arm Rest: F-24140-4C
The C in the part number denotes Napa Red
https://www.npdlink.com/product/pads-arm-rest-replace-your-cracked-or-bruised/131940?backurl=search%2Fproducts%3Fsearch_terms%3Darm%252Brest%26top_parent%3D60000%26year%3D1982&year=1982
Switch Assy, Power Window LH: F-14529-2
https://www.npdlink.com/product/switch-assy-power-window-lh/128732?backurl=search%2Fproducts%3Fsearch_terms%3Dpower%252Bwindow%252Bswitch%26top_parent%3D60000%26year%3D1985&year=1985
15
views

5 Reasons To Go To A Car Show
1. It will Energize you on your project. Seeing other cars finshed can inspire you to get moving on your car if you are stalled.
2. It is a great way to meet people that can possibly help you with things you are needing done. Or with parts that you are having a hard time finding.
3. If you are trying to get your car finished, a car show deadline will make you have a goal for completion.
4. Get custom business cards made so you can keep in touch with the other participants that you meet.
5.Finally it probably one of the coolest communities you can get involved with, especially on the local level. Many of the cars that attend are drivers and the owners are often willing to help in many ways more than just information.
Hey, thanks for watching! We appreciate every view and each subscription!
Tell folks we need them to subscribe!
jford@autorestomod.com
http://www.patreon.com/gasolinemedia
5
views