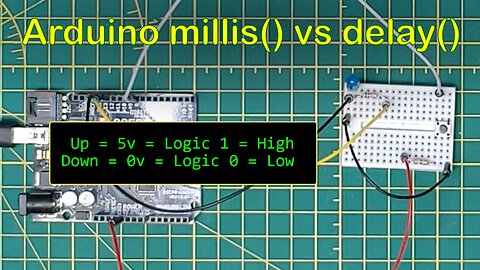
millis() vs delay() in Arduino
In this one, we explore 2 different ways of inserting a delay in your loops. One gives you the ability to jump out of the delay if needed. millis() vs delay() in this trek into DIY tech.
1
view

PLC Based Touch Tester
This is another one from the archives. This is a device I put together circa 2014 for testing touch screens. You can see how technology improves as time goes on.
00:08 Introduction
01:13 PLC Comparison - Old And New
04:12 Touch Tester Application
06:59 Solenoid Actuated Finger
09:56 Conclusion
Support Bent Sprocket:
Patreon - https://www.patreon.com/bentsprocket
Website - http://bentsprockettech.com/
Online Store - https://www.tindie.com/stores/bentsprockettech/
1
view

How I Record Youtube Videos - Techniques and Equipment
This trek into DIY tech we take a look at the techniques and equipment I use to record these videos for you.
00:05 Introduction
01:14 What You Look Like From My Angle
01:31 Spoiler Alert
02:54 Why Did I Start The Channel
07:32 Handheld With Motion Shot Style Origins
08:25 We Are Telling A Story
11:18 The Equipment
Links:
Studio Binder - https://www.youtube.com/@UCUFoQUaVRt3MVFxqwPUMLCQ
Support Bent Sprocket:
Patreon - https://www.patreon.com/bentsprocket
Website - http://bentsprockettech.com/
Online Store - https://bentsprockettech.com/online-store/
#cameraequipment #camerasetup #vlogging #youtubechannel #technique #howtoyoutube #howtoyoutubechannel
2
views

Edison And Ford Winter Estates FIeld Trip
I am sharing our trip to the Edison and Ford Winter Estates here in Florida. The museum portion is puposely short as I believe that there was no way to capture what was there on camera and the only real way to experience that part of it is in person.
Visit Edison and Ford Winter Estates:
https://www.edisonfordwinterestates.org/
00:05 Intro
02:44 The Beginning Of The Trail
03:02 Time Stopped By A Cloud
07:21 Edison Pier
07:42 Lily Pond
08:42 Family Of Ducks
09:54 The Coconut Grove
11:46 Off The Path And Into Some Bamboo
13:24 Edison's Study
14:27 Caretaker's Yard
18:38 Behind Edison's Study
20:54 Library Of Main House
21:35 Edison Bedroom
22:31 Edison Family Den
22:55 Edison Family Living Room
23:30 Across The Covered Walkway
24:24 Original Wicker FUrniture?
25:05 Sitting Room
25:59 Dining Room
26:35 The Kitchen
28:42 Path By The Water
29:50 The Brown Wooly Fig
30:32 Bench At The Water's Edge
32:21 Ford Home
33:28 Car Exhibit
35:16 Ford House
35:26 Kitchen And Butler's Pantry
35:47 Maid's Bedroom
36:02 Secretary's Bedroom
37:16 Living Room
37:44 The Guest ROom
38:57 Dining Room
39:48 Living Room From The Other Side
40:18 Time For Snacks
40:59 The Big Little Store
42:22 Heading Back To The Museum
42:46 In THe Museum
45:48 To The Lab
48:17 Cafe At The Exit
48:39 Coclusion
Support Bent Sprocket:
Patreon - https://www.patreon.com/bentsprocket
Website - http://bentsprockettech.com/
Online Store - https://bentsprockettech.com/online-store/
5
views
DIY Paint Pan - Recycled Juice Jug Hack
A paint pan with a brush holder and an easy way to pour unused paint back into the can.
2
views
Tammy The Cat Helping With Maintenance On The House - Sort Of
because there are not enough cat videos on the interwebs.....
2
views

Eating Breakfast Helps You Design Better Drones
This may not be the actual solution I go with, but it will help me get some measurements for the CAD and 3D print solution.
4
views
1
comment

ZD550 DIY Quadcopter Frame Assembly
This trek into DIY tech has us assembling the ZD550 quadcopter frame. This will be an ongoing project that will feature remote ID, as well as camera gimbal installation among others.
Rumor on the net is that the boom hinges are very hard to assemble because of the lack of documentation. I tried to use the video from the provided link associated to the Amazon listing I bought it from. It was pretty bad. If you've purchased this frame, hopefully this video helps. There are timestamps bellow so you can go right to the part you need to see.
Timestamps:
00:05 Inroduction
02:18 Unboxing
05:19 Size Comparison With One Of My Designs
06:03 Starting The ZD550 Assembly
08:56 Boom Hinges
19:41 Motor Mounts
22:59 Boom Assembly
23:49 Landing Gear Assembly
26:35 Putting It All Together
28:20 Using Threadlocker
31:21 Boom Hinge Lock Test
32:01 Battery Rack
36:02 Screwing The Top On
37:46 Conclusion
Support Bent Sprocket:
Patreon - https://www.patreon.com/bentsprocket
Website - http://bentsprockettech.com/
Tindie - tindie.com/stores/bentsprockettech/
7
views

On The Beach Just Before The Storm- Hurricane Idalia 2023
Just enough water is being pushed up on the beach that it created a mini beach set a bit back from the shoreline.
8
views

Bluetooth Tank Switched To Runcam 3s
This trek into DIY tech we switch out the GoPro 3 for a RunCam 3s. Come with me and see why I did it and how successful it was.
Timestamps:
00:05 Intro
01:07 Coffee First!
01:36 CAD Design
04:12 Slicing The CAD Design
04:56 3D Printing The Parts
05:29 Assembling The Parts
06:24 Field Testing
06:39 Split Screen Control Setup
08:50 Success?
08:55 Future Upgrades
09:47 Conclusion
Related Videos:
Bluetooth Controlled Zumo Tank - https://youtu.be/4tqyF7zYb0Q
Resource Page On Website:
https://bentsprockettech.com/diy_projects/bluetooth-zumo-tank/
Support Bent Sprocket:
Patreon - https://www.patreon.com/bentsprocket
Website - http://bentsprockettech.com/
Tindie - https://www.tindie.com/stores/bentsprockettech/
2
views

Plugged A Hole In My Tin Roof With Flex Seal?!
Video of me applying it: https://youtu.be/zoj4hsXA--k?t=1186 After a month and a week baking in the Florida sun, the patch is still good. We'll keep the experiment going and see how long it lasts.
3
views

Super Cheap LED Worklight Review
I was looking for a good interim solution for lighting in our new storage and came accross this little gem. At under $2 USD you can't beat it. Very nice size and form factor. Plus it's insanely easy to place and use.
https://www.harborfreight.com/144-lumen-ultra-bright-portable-led-worklightflashlight-63878.html
Support Bent Sprocket:
Patreon - https://www.patreon.com/bentsprocket
Website - http://bentsprockettech.com/

Pixy Cam Overview - No Manual
On this trek into DIY tech, we're going to look at a Pixy Cam. I recently started doing research into different machine vision systems for work and it brought back memories of this little camera. This is not in the same league as the ones I'll be using at work, but nice to explore from a hobby standpoint.
I haven't messed around with one of these in a few years, so it should be interesting.
Support Bent Sprocket:
Patreon - https://www.patreon.com/bentsprocket
Website - http://bentsprockettech.com/
1
view


DIY SUP Board Rack for Soft Top Jeep
This trek into DIY tech sees us going outside and braving the impending inclement weather to put a SUP board rack on the boss' soft top Jeep. Yeah I know, it's a mouthful. Sorry, but that's how it went down. LOL This was a long one, but well worth it to see that smile on her face.
00:05 - Intro
01:06 - Materials
03:47 - Disclaimer
05:32 - Measuring the Boards
06:22 - Cutting the Boards
06:54 - Installing the Stops
08:36 - Laying It All Out
09:40 - Gluing and Screwing
11:32 - First Test Fit
12:21 - Adding a Cross Brace
15:19 - Beveling the Rails
16:57 - Adding D Rings
18:44 - Prepping For Paint
21:59 - Time For Some Paint
26:56 - Adjusting the Jeep-side D Rings
27:28 - Watch Your Fingers!
29:08 - Installing the Jeep-side D Rings
31:35 - All Done?
31:47 - Trying It On the Jeep
34:20 - Happy Birthday!
35:26 - Conclusion
Support Bent Sprocket:
Patreon - https://www.patreon.com/bentsprocket
Website - http://bentsprockettech.com/
2
views

Channel Update 2023-05
This is an exciting time. I am finally able to start the build on the the new shed workshop for the work I'm doing at my day job with the added benefit that there will be some floor space left over for the projects we will be exploring on the channel this year. Stick with us as we expand and take deeper treks into DIY tech!
3
views


Channel Intro
If you're looking for a different way to be exposed to STEM and making, you've come to the right place. We'll take a few treks into DIY tech and see if we can't learn a little something on the way. If nothing else, maybe you get a smile out of it. As always, I appreciate the time you spend with me. See you in the next video!

Channel Update 2023-04
We got approved for the project loan! We'll be documenting construction as we go so you can join us on the trek. Let me know in the comments if there is a particular thing you would like me to focus on as we go. With this will come an opportunity to build bigger and better projects for you.
Also, check here from time to time as I will have more activity there for you as we grow. https://www.youtube.com/@bentsprockettech/community
Support Bent Sprocket:
Website - http://bentsprockettech.com/
Patreon - https://www.patreon.com/bentsprocket
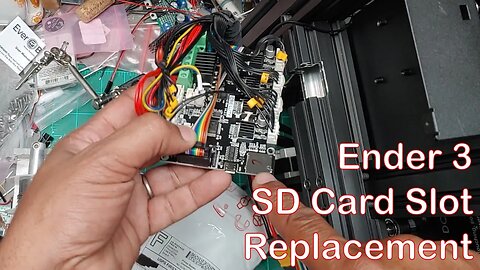
Ender 3 SD Card Slot Replacement
This trek into DIY Tech is an SD card slot replacement on a CReality Ender 3 3D printer. These card slots get a lot of use, especially if you create the STL files on a PC and then transfer them using your micro SD card. The video is longer than it needs to be, but I felt there was additional info worth covering.
Timestamps:
00:06 Intro
00:53 The Problem With The SD Card Slot
02:42 How I Use Two Printers
04:05 Change Of Plans
05:54 The Raw SD Card Slots
06:31 What Tools Do You Need
10:29 Off The Track (Diversify Your Skills)
14:08 Removing The Old Part
18:21 Cleaning And Prepping The PCB
20:50 Installing The New Part
25:12 Inspecting Our Work
29:38 But Does It Work?
32:01 Conclusion
Parts:
SD Card Slot - https://www.ebay.com/itm/195176024584
Tools Used:
Microscope - https://www.adafruit.com/product/636
Helping Hands - https://www.adafruit.com/product/291
FLux Pen - https://www.adafruit.com/product/3468
Solder Wick - https://www.adafruit.com/product/149
Solder - https://www.adafruit.com/product/1886
Soldering Iron - https://www.amazon.com/Weller-Digital-Soldering-Station-WLC100/dp/B000AS28UC/ref=asc_df_B000AS28UC/?tag=hyprod-20&linkCode=df0&hvadid=198103947043&hvpos=&hvnetw=g&hvrand=16626052286725773507&hvpone=&hvptwo=&hvqmt=&hvdev=c&hvdvcmdl=&hvlocint=&hvlocphy=9012320&hvtargid=pla-448477212877&psc=1
Magnifier Light - ZW5jcnlwdGVkUXVhbGlmaWVyPUEyWEcyT0JRSEZLVlY4JmVuY3J5cHRlZElkPUEwMzUxOTc5NlkzOE5MT1ZJOTZVJmVuY3J5cHRlZEFkSWQ9QTA1NzcwMTRGODFTQzVONlYxMjAmd2lkZ2V0TmFtZT1zcF9hdGYmYWN0aW9uPWNsaWNrUmVkaXJlY3QmZG9Ob3RMb2dDbGljaz10cnVl
Support Bent Sprocket:
Patreon - https://www.patreon.com/bentsprocket
Website - http://bentsprockettech.com/
15
views

Channel Update 2023-03
I've accepted a very exciting new position. We'll be pushing the boundaries of technology so you know I'm over the moon about it. The organization I will be working for is all about growing the community so they are supportive of my efforts to keep the channel going. Once everything settles down I'll be working to get the videos back on schedule.
Also, check here from time to time as I will have more activity there for you as we grow. https://www.youtube.com/@bentsprockettech/community
Support Bent Sprocket:
Website - http://bentsprockettech.com/
Patreon - https://www.patreon.com/bentsprocket
1
view
Quadruped Robot Stands Up
The Battery Pack Quadruped is standing! This is the pirst test of the servos. Programming video is coming soon. Stay tuned!
1
view

Droid 22 Overview and Story
Before we begin design and construction of Droid 23, let us take a trek into the construction and history behind Droid 22. Droid 22 was constructed as the mascot for Makerspace Forsyth. He continues service as a reference for future generations of droids.
Timestamps:
00:09 Intro
01:20 Pulling Droid 22 Out Of Storage
02:33 A Look At The Outside Of Droid 22
04:48 Upcycled Arms
05:45 Waldo Chair Design Sketches
07:27 Let's Look At Droid 22's Insides
18:09 Rolling Base Test
19:12 The Original System Design Sketches!
23:26 Droid 22 (Historical Slideshow)
24:16 Conclusion
24:53 For My Dad (Remembering One Of His Favorite Hobbies)
Pa, thank you for teaching me so much. I will make sure none of it goes to waste.
Support Bent Sprocket:
Patreon - https://www.patreon.com/bentsprocket
Website - http://bentsprockettech.com/
1
view

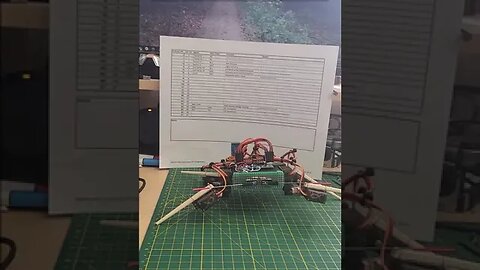
Battery Pack Quadruped Robot - Part 1
In this trek into DIY tech we start building that quadruped robot from the Project Planning Sheet example. If you haven't checked that video out, look below for the link to it as well as the link to download the project planning sheet from the website.
Timestamps:
00:05 Intro
01:12 Laying Out Some Components
02:42 Converting A Block Diagram To A Schematic
07:10 Using VHB To Secure The PCBs
07:39 Point to Point Wiring Begins
13:50 Power On Test
14:00 Making The FOrward Sensor PCB
20:16 Giving It Some Legs
28:02 Paperclip and Screw Terminal Trick
31:31 Making Bamboo Shins
34:04 Routing The Servo Wires
34:12 Adding Sensor Antenae
36:03 and We're Done!
37:16 Conclusion
Adafruit 16 channel servo driver - https://www.adafruit.com/product/815
Adafruit 4 x AA battery pack - https://www.adafruit.com/product/830
Metal Gear servo 9g - https://www.amazon.com/MG90S-Servo-Motor-Helicopter-Arduino/dp/B01JY3H4MA/ref=sr_1_5?crid=2637Q035L6XZB&keywords=metal%2Bgear%2B9g%2Bservo&qid=1675127804&sprefix=metal%2Bgear%2B9g%2Bservo%2Caps%2C635&sr=8-5&th=1
Project Planning Sheet - https://bentsprockettech.com/wp-content/uploads/2022/12/Project-Planning-Sheet.pdf
Project Planning Sheet video - https://youtu.be/55YiwqUBH4k
Support Bent Sprocket:
Patreon - https://www.patreon.com/bentsprocket
Website - http://bentsprockettech.com/
12
views