Toughest Brake Job Ever On My 99 Olds Aurora
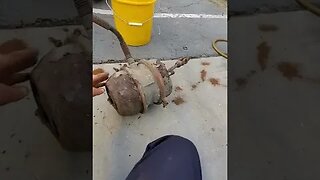
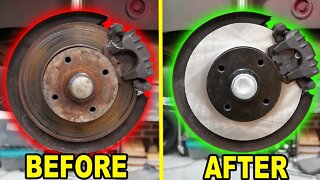
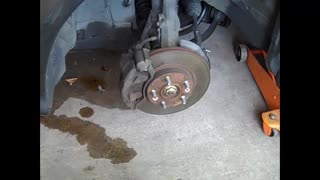
The rear brakes on my 99 Oldsmobile Aurora were very bad so I finally took a day to replace them. The rotors were warped from driving down a steep mountain on a hot summer day so they wore the brake pads badly.
I had the parts in the trunk of the car for a while now but I dreaded doing the job. I cannot see paying a mechanic to do a job that normally takes an hour so I decided to do it myself on this unusually warm December day.
I figured it would take two hours at the most if I ran into problems but I had to get it done.
The rear drivers side went relatively well. I say relatively because I had no idea how these brakes went together. I have worked on many, many antique and classic vehicles in the years but never one like this.
I had researched online first to see how these brakes work so I had an idea. But real life things always look a bit different than on a photo on the internet.
I am lucky that all the parts had been coated with anti seize compound in the past so the bolts came off easily.
The problem is when I got to the point where I had to compress the brake cylinder. This type of brake cylinder must be screwed back in rather than compressed like all the other ones I ever worked on.
I did not have the special too for the job so I used a screwdriver and hammer. It did the job but it sure took a long time. It was late in the afternoon by the time I finally had one side of the vehicle finished.
On the second part of the video, coming soon, I will show more details of the brakes and what is going on here.
Thanks for watching. Please Subscribe & follow my daily videos.
Troy
http://www.thedoityourselfworld.com
http://www.theoffgridproject.com
Note: Copying this video, in part or in full, is a violation of copyright unless the user has express permission from the owner. Violation of this copyright will be pursued to the fullest extent of the law.
-
 18:07
18:07
Autorestomod and Manic Mechanic
2 years ago $0.02 earned5 Tips For Better Brakes
118 -
 22:02
22:02
CrazedPerformanceRepair
4 years agoMost detailed Brake Job Pontiac G6
5 -
 16:00
16:00
Learn How To Fix Everything You Own
7 months agoHow To Quickly And Easily Change Your Front Brake Pads And Rotors On A 2012-2018 Ford Focus.
10 -
 1:33
1:33
aalex3
5 months agoTop 5 FACTS about YOUR Car's Brakes
35 -
 40:32
40:32
gofasthavefun.ca
1 year agoBest Brake Job Replacement Tips (Simple & Thorough) | AnthonyJ350
25 -
 0:59
0:59
Trucking & Fixing With Ryan
2 years agoThe Worst DOT Ready Brake Chamber I Have Ever Seen #short #shorts #youtube
3 -
 20:54
20:54
Humble Mechanic
1 year ago $0.04 earnedHow to Change Front and Rear Brake Pads, Rotors and Brake Fluid
9894 -
 11:13
11:13
RodsShop Automotive How To Tutorials
3 years ago $0.01 earnedHow to Replace Front Brake Pads and Rotors on a 2004 Mazda 6
52 -
 4:44
4:44
Garage Boys
5 years agoHow To Replace Brake Pads On Acura TSX
2 -
 4:57
4:57
Nefarious Racing
1 year agoHow to Properly Bed In New Car Brake Pads & Rotors
89